Red Analyze Tool – High Detail Quick
Red Analyze High Detail Quick basically completes the same task as Red Analyze Focused Supervised but there are some differences in how it completes a task. This means that Red Analyze High Detail Quick also concentrates on teaching the network what defects look like as in Red Analyze Focused Supervised.
Red Analyze High Detail Quick vs Red Analyze Focused Supervised
Red Analyze High Detail Quick mode uses an architecture which is different from that of Focused mode. Due to its architectural difference, it doesn't have Sampling Parameters in Tool Parameters pane as it samples from the entire view. Because of this, Red Analyze High Detail Quick normally can bring more accurate or detailed results in pixel levels than Red Analyze Focused Supervised, given the default settings of the tool parameters.
Another important difference between them is Red Analyze High Detail Quick requires only a handful of tool parameters compared to Red Analyze Focused Supervised. It only requires a small number of Training and Processing parameters but it still produces great accuracy. Thanks to its unique training architecture, this will reduce the efforts of manual parameter tuning.
The way you label images and create a neural network model in Red Analyze High Detail Quick is basically the same as Focused mode. As well as Red Analyze Focused Supervised, only the binary classes (Good/Bad) are supported in Red Analyze High Detail Quick. It means that multiple classes of defects are not supported.
When you label an image as Good in Red Analyze High Detail Quick (in other words, an image that does not contain any defect regions), the tool will also use that image for training once it is added to the training set. In particular, the tool will attempt to train the network so that images labeled Good do not generate any defect responses. Adding labeled, defect-free Good images to your Training Image Set can help you validate the performance of the tool in classifying good and bad images.
Red Analyze High Detail Quick vs Red Analyze High Detail
Red Analyze High Detail Quick has some differences from Red Analyze High Detail. As it is a speed-optimized version of Red Analyze High Detail and thus bears a bit reduced defect detection accuracy, normally it can be trained much faster than Red Analyze High Detail with a little decrease in the accuracy.
Red Analyze High Detail Quick doesn't use the Validation Set for training and so it does not offer the validation loss nor support Loss Inspector, which makes it much quicker in training. But because of its unique, advanced training architecture, its accuracy holds within subduable ranges in many cases.
Also, Red Analyze High Detail Quick only supports a few basic parameters when compared to Red Analyze High Detail. It only requires a small number of Training and Processing parameters but it still produces great accuracy. Thanks to its unique training architecture, this will reduce the efforts of manual parameter tuning.
Away from these, Red Analyze High Detail Quick is no different from Red Analyze High Detail including how to train & process, and the interpretation and the utilization of the results. Note that if the tool parameters are properly tuned, the accuracy of High Detail modes are higher than that of High Detail Quick modes on average.
|
Features |
Red Analyze Focused Supervised | Red Analyze High Detail | Red Analyze High Detail Quick |
| Loss Inspector | Not supported | Supported | Not supported |
| Validation Set | Not used in training | Used in training | Not used in training |
| VisionPro Deep Learning Tool Parameters | Less parameters |
More parameters for control*, |
Almost no parameters |
* More training and perturbation parameters for detailed training control and granular adjustment
Training Process
The process for training Red Analyze High Detail Quick mode is:
-
Collect images that represent the full range of defects that you expect to encounter.
-
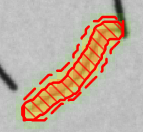
Go through each image in your training image set and carefully label the defects. Drawing the region is important to make a better model.
Defect Label 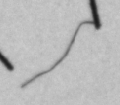
-
Add a few good images and label them as Good.
-
Edit tool parameters.
-
Train the tool and check the result.
-
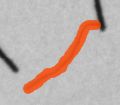
Validate the tool by presenting images that were not used during training, which contain defects as well as good images that do not contain defects.
Defect Marking