DataMan SDK Development
You can use DMCC as an application programming interface for integrating a reader into a larger automation system.
You can also use the DataMan SDK (hereafter referred to as SDK). The following sections give detailed information about installing the SDK, its contents, building the SDK sample application, and about the utility source codes provided with the SDK.
DataMan SDK Contents
The DataMan SDK comprises the SDK binary files and their documentation, along with code sources of some helper utilities and a sample application.
The binary files are available for two platforms: one for Microsoft .Net (PC) and one for Microsoft .Net Compact Framework (CF). The name of each file corresponds to the platform it belongs to (PC/CF). There are two components for each platform, one is the DataMan SDK core itself (Cognex.DataMan.SDK), the other is for discovering available devices to be used with the SDK (Cognex.DataMan.Discovery).
The source codes are provided in the form of complete Microsoft Visual Studio projects. In order to build the SDK sample application, open the sample code’s solution in Microsoft Visual Studio and choose Build solution.
Using the SDK
Usual steps in a typical DataMan SDK application
- Discover the device (may be omitted if the device address is known in advance).
- Subscribe to the events you are interested in (e.g. result string arrived event).
- Connect to the device.
- Send DMCC commands to the device (e.g. trigger).
- Process the incoming result data (e.g. show result string).
Accessing the DataMan SDK library
To use the SDK for your own purposes, perform the following steps:
- In Microsoft Visual Studio, click Create Solution/Project.
- Under Project, right-click References and choose Add Reference…
- In the pop-up window, click the Browse tab and look for the Cognex.DataMan.SDK.*.dll file (where * refers to the platform you are working on, either PC or CF) in the directory where you installed or copied the binary files.
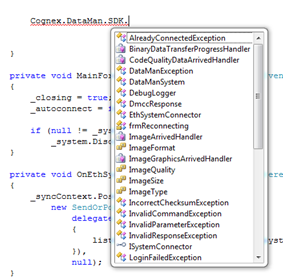
- You can add the following line to the beginning of your code:
| using Cognex.DataMan.SDK; |
to find the different elements belonging to the SDK in this namespace. They will appear in the intellisense as seen in the following image:
Enumerating DataMan Devices
In your project, which already uses the SDK, you’ll need the following additional steps:
- Under Project, right-click References and choose Add Reference…
- In the pop-up window, click the Browse tab and look for the Cognex.DataMan.Discovery.*.dll file (where * refers to the platform you are working on, either PC or CF) in the directory where you installed or copied the binary files.
- Add the following line to the beginning of your code:
| using Cognex.DataMan.Discovery; |
to find the different elements belonging to the SDK in these namespaces. They will appear in the intellisense.
From this point on, you can choose to discover devices either via Ethernet or via serial communication (RS232/USB), or you can choose to do both.
- Discovering devices via Ethernet:
- Create a new EthSystemDiscoverer.
|
EthSystemDiscoverer ethSystemDiscoverer = new EthSystemDiscoverer(); |
- Subscribe to its SystemDiscovered event.
|
ethSystemDiscoverer.SystemDiscovered += new EthSystemDiscoverer.SystemDiscoveredHandler(OnEthSystemDiscovered); |
- Create event handler of type EthSystemDiscoverer.SystemDiscoveredHandler.
- The event handler argument is an EthSystemDiscoverer.SystemInfo. These SystemInfo objects contain information required for connecting to a reader. You can store these SystemInfo objects in your own collection.
- To start device discovery, call the ethSystemDiscoverer.Discover() method.
- Discovering devices via serial communication (RS232/USB):
- Create a new SerSystemDiscoverer.
|
SerSystemDiscoverer serSystemDiscoverer = new SerSystemDiscoverer(); |
- Subscribe to its SystemDiscovered event.
|
serSystemDiscoverer.SystemDiscovered += new SerSystemDiscoverer.SystemDiscoveredHandler(OnSerSystemDiscovered); |
- Create event handler of type SerSystemDiscoverer.SystemDiscoveredHandler.
- The event handler argument is a SerSystemDiscoverer.SystemInfo. These SystemInfo objects contain information required for connecting to a reader. You can store these SystemInfo objects in your own collection.
- To start device discovery, call the serSystemDiscoverer.Discover() method.
Subscribing to Events
If you want to react to result-like events in your application, you have to subscribe to the related events. There are also some events related to connection state changes.
Here is an example where you subscribe for the events of read string and image arrival:
| mySystem.XmlResultArrived += new XmlResultArrivedHandler(OnXmlResultArrived); mySystem.ImageArrived += new ImageArrivedHandler(OnImageArrived); |
Connecting to a DataMan Device
Your Ethernet device
Connect to your Ethernet device by performing the following steps:
- Create a connector to your device:
| EthSystemConnector myConn = new EthSystemConnector(deviceIP); |
where deviceIp is either a known IP address or one that was discovered by an EthSystemDiscoverer.
- Specify user name and password:
|
myConn.UserName = "admin"; myConn.Password = "password or empty string"; |
- Create a new DataManSystem instance with the created connector:
| DataManSystem mySystem = new DataManSystem(myConn); |
- Call the Connect() method of your DataManSystem instance:
| mySystem.Connect(); |
- (Optional) Verify if you are connected:
| if (mySystem.IsConnected) |
- To disconnect, call
| mySystem.Disconnect(); |
Your Serial device
Connect to your serial device by performing the following steps:
- Create a connector to your device:
| SerSystemConnector myConn = new SerSystemConnector(PortName, Baudrate); |
where PortName and Baudrate are either known serial connection parameters or come from a SerSystemDiscoverer.
- Create a new DataManSystem instance with the created connector:
| DataManSystem mySystem = new DataManSystem(myConn); |
- Call the Connect() method of your DataManSystem instance:
| mySystem.Connect(); |
- (Optional) Verify if you are connected:
| if (mySystem.IsConnected) |
- To disconnect, call
| mySystem.Disconnect(); |
Sending DMCC Commands to DataMan Devices
Use SendCommand () for sending different commands to the reader. For information about available commands, refer to the DMCC Command Reference.
There is one mandatory parameter for SendCommand () which is the command string itself. There are also two optional parameters: one for overriding the default timeout for the command and another for passing additional bytes with the command.
The following is an example for sending a DMCC command.
| DmccResponse response = mySystem.SendCommand("GET DEVICE.TYPE"); |
Some functions like SendCommand() or GetLiveImage() also have asynchronous implementations. If you wish to use these, look for the desired function name with Begin/End prefix. These functions go in pairs; the function with the Begin prefix returns an IAsyncResult which can be used by the one with the End prefix.
Displaying Static and Live Images from a DataMan Device
To have static images displayed, use DataManSystem.GetLastReadImage () or subscribe for the event ImageArrived to get images.
To have live images displayed, perform the following steps:
- Set the reader to live display mode:
| mySystem.SendCommand("SET LIVEIMG.MODE 2"); |
- Periodically poll the device for images by using
| mySystem.GetLiveImage(ImageFormat, ImageSize, ImageQuality); |
See an example implementation in the source of the Sample application. In the example, a new polling thread is created to avoid locking the GUI.
To turn off live display mode, use
| mySystem.SendCommand("SET LIVEIMG.MODE 0") |
Helper Utilities
Some helper functions are provided as source codes with the SDK in the project called DataManUtils. Some of the main features are described below.
Gui
Provides functions for image manipulation like fitting a result image into a specified control, converting bitmap data to/from a byte array, and so on.
Additional classes provide SVG helpers for image parsing and SVG rendering. SVG formatted result component is used by the reader to mark the area of the image where the code was detected.
ResultCollector
The order of result components may not always be the same. For example sometimes the XML result arrives first, sometimes the image. This issue can be overcome by using the ResultCollector.
The user needs to specify what makes a result complete (e.g. it consists of an image, an SVG graphic and an xml read result) and subscribe to ResultCollector’s ComplexResultArrived event.
The ResultCollector waits for the result components. If a result is complete, a ComplexResultArrived event is fired. If a result is not complete but it times out (time out value can be set via the ResultTimeOut property) or the ResultCollector’s buffer is full (buffer length can be set via the ResultCacheLength property), then a PartialResultDropped event is fired. Both events provide the available result components in their event argument, which can be used to process the complex result (e.g. maintain result history, show the image, graphic and result string, and so on.)
DmccEscaper
Can be used to escape or un-escape a DMCC command string.
FileLogger
Simple logger class can be used during development. This, like all other utilities provided here, works both on PC and CF platforms.
Using the Helper Utilities
The helper utilities are contained in two projects. Both projects refer to the same source codes, but one is created for Microsoft .Net Compact Framework (DataManUtilsCF) and the other of for the PC’s Microsoft .Net Framework (DataManUtilsPC). To use the features provided in these utilities, include the proper DataManUtils project in your solution and reference it in the project in which you wish to use it.