Filmstrip Image Viewer Setup
The Filmstrip Image Viewer control element shows the 2D images that have been recorded by the Filmstrip. The following example procedure shows how to set up a Filmstrip Image Viewer element on your WebPage, along with some additional web page User Inputs to efficiently use the viewer on the web page while the job is Online.
-
Create a WebPage in the Web Pages Browser by right-clicking on the Web Pages node and selecting the New Web Page option in the context menu. Alternatively, open an existing web page by double-clicking it, or right-clicking it and selecting the Edit option.

-
Bring the Toolbox to the front, if needed, with the View > Toolbox menu, and look for the FilmstripImageViewer entry in the Vision Controls and Displays node.

- Drag and drop the FilmstripImageViewer element to the WebPage.
-
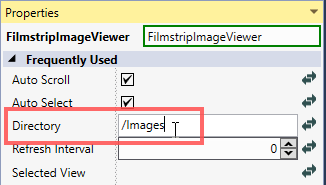
Click the FilmstripImageViewer element on the web page to bring forward its Properties window. Check the value of its Directory property to make sure that it corresponds to the recording directory set for the Filmstrip.
- Drag and drop the following User Inputs to the Web Page as well:
A Display element. This viewer will be used to show the image selected on the Filmstrip Image Viewer.

- Two CheckBoxes, configured as described below:
A CheckBox named CheckBox_AutoScroll, its Label property set to Auto-scroll. This CheckBox will be used to to enable or disable auto-scrolling in the Filmstrip Image Viewer while the job is Online.

A CheckBox named CheckBox_AutoSelect, its Label property set to Auto-select. This CheckBox will be used to to enable or disable auto-selecting the latest image added to the Filmstrip Image Viewer while the job is Online.

- A Numeric Entry and a Label, configured as follows:
- Name the Numeric Entry NumericEntry_RefreshInterval. This user input will be used to change the refresh interval of the Filmstrip while the job is Online.
- Name the Label Label_NumericEntry, and change the value of its Text property to Refresh Interval (sec). This Label will indicate what the Numeric Entry element does on the web page.
Position the Label_NumericEntry and NumericEntry_RefreshInterval elements next to each other as shown in the following image:

- The following three Buttons:
A button named Button_RunTask, its Label property set to Run Task. This button will be used to execute Filmstrip recording when clicked.

A button named Button_Clear, its Label property set to Clear. This button will be used to clear the contents of the Filmstrip Image Viewer when clicked.

A button named Button_Refresh, its Label property set to Refresh. This button will be used to refresh the contents of the Filmstrip Image Viewer when clicked.

-
Position the Web Page Control Elements listed in the previous step as shown below.

-
Left-click the Display element, then click the
 (Bind) button of its Source property in the Properties window, as shown in the following image, to open the Expression Builder.
Then, bind the Display element to the Filmstrip Image Viewer with the Expression Builder by selecting the $WebPages.WebPage.FilmstripImageViewer.SelectedView tag through the Tag Selector (or typing it in the textbox), as shown in the following image. Click OK to apply the change.

With the binding completed, the Display element will show the image selected on the Filmstrip Image Viewer.
-
Bind the two CheckBoxes to their corresponding Filmstrip Image Viewer properties as follows:
-
Left-click the CheckBox_AutoScroll CheckBox, then click the
(Bind) button of its Checked property in the Properties window, as shown in the next image, to open the Expression Builder.
Then, bind the CheckBox to the Auto Scroll property of the Filmstrip Image Viewer with the Expression Builder by selecting the $WebPages.WebPage.FilmstripImageViewer.AutoScroll tag through the Tag Selector (or typing it in the textbox), as shown in the following image. Click OK to apply the change.

With the binding completed, you will be able to enable or disable auto-scrolling in the Filmstrip Image Viewer during Run Mode with this CheckBox.
-
Left-click the CheckBox_AutoSelect CheckBox, then click the
(Bind) button of its Checked property in the Properties window, as shown in the next image, to open the Expression Builder.
Then, bind the CheckBox to the Auto Select property of the Filmstrip Image Viewer with the Expression Builder by selecting the $WebPages.WebPage.FilmstripImageViewer.AutoSelect tag through the Tag Selector (or typing it in the textbox), as shown in the below image. Click OK to apply the change.

With this binding completed, you will be able to enable or disable auto-selection of the latest image in the Filmstrip Image Viewer during Run Mode with this CheckBox.
-
-
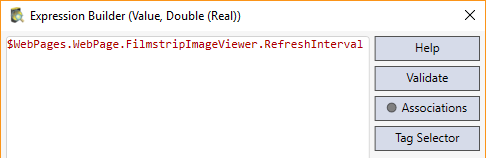
Bind the NumericEntry_RefreshInterval Numeric Entry to the Refresh Interval property of the Filmstrip Image Viewer. Left-click the Numeric Entry control element on the web page, then click the
(Bind) button of the Value property in the Properties window to open the Expression Builder, as shown in the next image.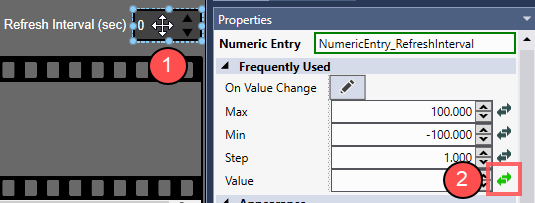
Then, bind the CheckBox to the Auto Scroll property of the Filmstrip Image Viewer by selecting the $WebPages.WebPage.FilmstripImageViewer.RefreshInterval tag through the Tag Selector (or typing it in the textbox). Click OK to apply the change.
With this binding completed, you will be able to increase or decrease the interval of automatically refreshing the contents of the Filmstrip Image Viewer with this control element during Run Mode.
-
Bind the three Buttons to their corresponding Filmstrip Image Viewer actions as follows:
-
Left-click the Button_RunTask Button on the web page, then open its Click Command property drop-down menu in the Properties window. Select the Tasks.InspectionTask.Run command.

-
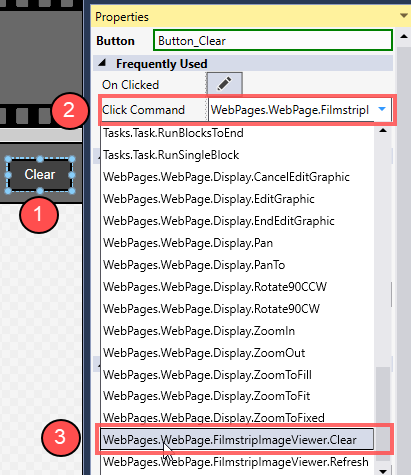
Left-click the Button_Clear Button on the web page, then open its Click Command property drop-down menu in the Properties window, as shown in the next image. Select the WebPages.<WebPage>.FilmstripImageViewer.Clear command. <WebPage> corresponds to the name of the web page that is currently configured.
-
Left-click the Button_Refresh Button on the web page, then open its Click Command property drop-down menu in the Properties window. Select the WebPages.<WebPage>.FilmstripImageViewer.Refresh command. <WebPage> corresponds to the name of the web page that is currently configured.

-
- Save the changes you made on the web page, then click the
 button, or press F5 to set the job Online.
If every web page element has been configured correctly, all of them should be fully functional, as shown below.
