Delete Cells Dialog
The Delete Cells dialog is used to remove a cell, a range of cells, a row or column of the spreadsheet.
Note: If your spreadsheet was created in EasyBuilder View, you will not be able to use the Delete Cells dialog. To use Delete, first go to the File menu and click Unprotect Job.
-
Click a cell or a range of cells in which you would like to remove a cell, a range of cells, a row or column.
-
On the Edit menu, click Delete.
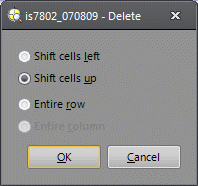
- Select the appropriate delete action:
- Shift cells left: Removes the selected cell(s) and shifts the remaining cells to the left. Select the same number of cells as you want to remove.
- Shift cells up: Removes the selected cell(s) and shifts the remaining cells up. Select the same number of cells as you want to remove.
- Entire row: Removes an entire row of cells; click a cell in the row that you want removed. For example, to delete row 5, click a cell in row 5.
- Entire column: Removes an entire column of cells; click a cell in the column that you want to remove. For example, to delete column B, click a cell in column B.
- Click OK to delete the cell(s), row or column.