Send Data To an In-Sight Vision System- In-Sight 4.x.x Firmware
In order to send data from the ControlLogix PLC to the In-Sight Explorer spreadsheet, the data must be pulled from the EtherNet/IP stack by using the ReadEIPBuffer function. For more information, see ReadEIPBuffer.
This function takes the data format created within the FormatInputBuffer function and reads the data from the data area of the EtherNet/IP Output Assembly (output from the network), and formats this data into the In-Sight Explorer spreadsheet. This data is received from the PLC every RPI cycle; the corresponding spreadsheet data is updated only when the spreadsheet executes. For more information, see FormatInputBuffer.
EXAMPLE: Sending 32 Bit Integer Data to an In-Sight Vision System
For this example, create a new job within In-Sight Explorer, then perform the following steps to configure the data that will be received by the ControlLogix PLC.
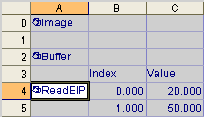
- Open the AcquireImage cell (A0) and set the Trigger parameter to Continuous.
- Right-click an empty cell and select Insert Function. From the left-side of the screen, expand the Input/Output category and double-click on the FormatInputBuffer function to insert it into the spreadsheet.
-
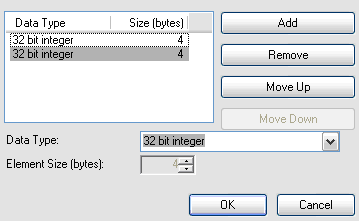
From the FormatInputBuffer dialog, click on the Add button and add two 32-bit integers to the list.
- Close the FormatInputBuffer by clicking the OK button.
- Right-click an empty cell and select Insert Function. From the left-side of the screen, expand the Input/Output category, click on the Network subcategory and double-click on the ReadEIPBuffer function to insert it into the spreadsheet.
- Set the ReadEIPBuffer function's Buffer parameter as a cell reference to the just created FormatOutputBuffer Buffer data structure.
- The Data Access functions will automatically be added to the spreadsheet based on the fields added to the FormatOutputBuffer function.
- Place the In-Sight vision system in Online mode.
-
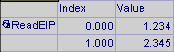
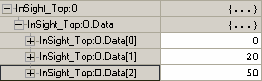
Within RSLogix 5000, open the Controller Tags dialog and change the value of the InSight_Top:O.Data[1] and InSight_Top:O.Data[2] tags. The values in the In-Sight Explorer spreadsheet should change, as well:
EXAMPLE: Sending Floating Point Value Data to an In-Sight Vision System
If another data type, for instance a type other than the 32-bit integers type, or a mix of data types needs to be sent, the simplest method to accomplish this is to create a User Defined Type in ControlLogix, and then to copy that data from the In-Sight vision system's output tag to the newly created User Defined Type. The steps below illustrate how to copy to two cells as floating point values:
- In RSLogix, go into Offline mode.
-
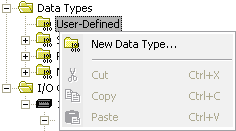
Within RSLogix, right-click on the User-Defined > Data Types folder and select New Data Type... from the menu.
-
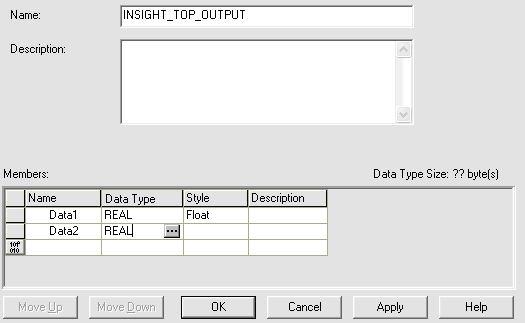
Give the new data type a descriptive name and add two floating point values to the Members: list.
-
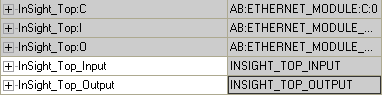
Next, add a new tag to the project's Controller Tags, using the user defined data type, as shown in the example below.
-
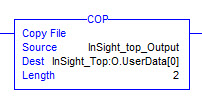
Finally, add a COP instruction to the MainRoutine ladder logic program, which will copy the data from the InSight_Top_Output tag to the InSight_Top:O.Data[1] tag.
- Place the In-Sight vision system Offline.
- Open the previously created FormatInputBuffer function, and change the Data Type values of both to 32 bit floating point.
- Place the In-Sight vision system back Online.
-
After this program has been downloaded to the ControlLogix PLC, the data in the InSight_Top_Output tag will now appear in the floating point format: