Explorer Remote Subnet List
Configures remote subnet settings to add and manage subnets in the In-Sight Network pane. When no remote subnetwork are configured, vision systems which are not in the same subnetwork as your PC will be ignored during automatic discovery. Configuring a remote subnet allows vision systems from that subnetwork to appear in the In-Sight network list automatically when your PC receives discovery message from them, even if they are not in the same subnetwork as your PC.
Explorer Remote Subnet List Dialog Controls
To display the Explorer Remote Subnet List dialog, click Remote Subnets from the System menu.
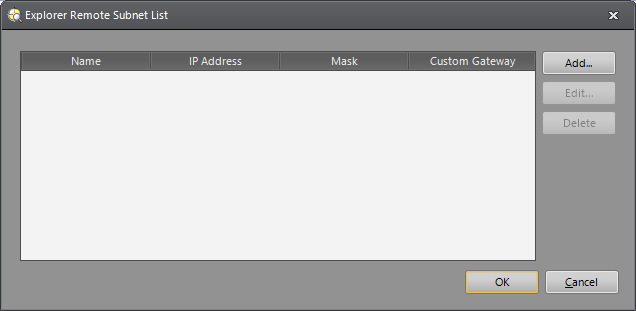
- Name: Displays the name for the subnet, as it appears in the In-Sight Network pane.
- IP Address: Displays the network IP address of the remote subnet.
- Mask: Displays the subnet mask of the remote subnet.
- Custom Gateway: Displays the gateway IP address, if necessary.
- Add: Launches the Add Subnet dialog, where subnet information is added.
- Edit: Launches the Edit Subnet dialog, where a previously created subnet may be modified.
- Delete: Removes the selected subnet from the list.
Add/Edit Subnet Dialog Controls
The Add Subnet dialog is launched by pressing the Add button in the Explorer Remote Subnet List. The Edit Subnet dialog is launched by selecting an existing subnet in the Explorer Remote Subnet List and pressing the Edit button, or by double-clicking the selected subnet in the list.
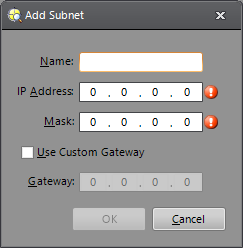
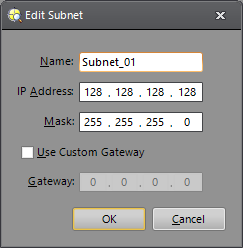
- Name: Specifies a descriptive name for the subnet, as it appears in the In-Sight Network pane.
- IP Address: Specifies the network IP address of the remote subnet.
- Mask: Specifies the subnet mask of the remote subnet.
- Use Custom Gateway: Specifies whether or not a custom gateway is required to access the subnet, if the network infrastructure is incapable of routing to the network.
- Gateway: Specifies the gateway IP address to be used to access the remote subnet.