Perform Authorization
For certain manufacturing environments, it is common to have an authorization process before a batch changeover can be completed and production is allowed to resume. During the authorization process, a quality or production supervisor is often required to verify that an operator has entered the correct batch information (Authorize-Only) or enter the identical batch information previously entered by an operator (Double-Blind).
The Authorize function can be used to perform these authorization processes. When Authorize-Only is performed, an operator (User 1) makes changes and a supervisor (User 2) verifies the changes. When Double-Blind is performed, User 1 makes changes and User 2 is required to re-enter the changes made by User 1. The authorization results are often tracked by Audit Messages.
This topic covers how to configure a spreadsheet containing the Authorize function, how to perform the authorization process, and what kind of audit messages are generated when the authorization is tracked by Audit Messages.
Configure a Spreadsheet
-
The spreadsheet is configured as follows:
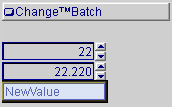
A2 = Authorize("Change Batch",1,1,A4,A6)
A4 = EditInt(0,255)
A5 = EditFloat(0,100)
A6 = EditString(8)
-
If using VisionView® application to perform authorization, add the sample job to a Custom View. Select the area that contains the Authorize function cell (A2) and the referenced cells (A4, A5 and A6) for the Cell Range in the Custom View Settings dialog.
Note: If adding the sample job to an EasyView, insert Symbolic Tag for the Authorize function cell (A2) and the referenced cells (A4, A5 and A6), and check the In EasyView checkbox for each Symbolic Tag in the Symbolic Tag Editor dialog. - If the authorization results are tracked by Audit Messages, insert a Symbolic Tag for the Authorize function cell (A2) and check the Audit Message checkbox for the Symbolic Tag in the Symbolic Tag Editor dialog. Then, check the Enable the Audit Messages checkbox and the Changes to Tagged Cells checkbox in the Audit Message Settings dialog, and configure the other settings in the dialog as needed.
-
The referenced cells (A4, A5 and A6) show the values last entered by an operator, whether the values are authorized or not. Optionally, the GetAuthorizedValue function can be used to show the last authorized values in the spreadsheet. For example, to show the last authorized values for the referenced cells (A4, A5 and A6), the spreadsheet can be configured as follows:
C4 = GetAuthorizedValue(A4)
C5 = GetAuthorizedValue(A5)
C6 = GetAuthorizedValue(A6)
Note:-
The GetAuthorizedValue function always returns a string type value. To use a numeric output of this function as an input to another function, use the Value function to convert it into a numeric value.
- In addition to the authorized values, the name of the approver (User 2) and the data/time for the last successful authorization can also be displayed in the spreadsheet using the GetAuthorizeApprover and GetAuthorizeDateTime functions.
-
Authorization Process
-
User 1 presses an edit control and manually enters a new value.
Note:- If User 1 has a Locked Access level, User 1 is not allowed to make any changes in edit controls.
- User 2 must be different than User 1, and have sufficient privileges to log on (the minimum Access level is defined by the Level parameter). When None is the selected Level, the same user is allowed to log on to authorize the new values.
-
After entering all new values, User 1 presses the Change Batch button. The Authorization Logon dialog appears.
Note: The name of the button is configured by the Label parameter.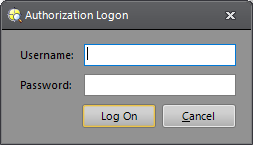
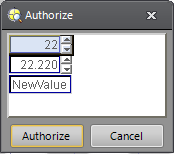
- User 2 logs on to In-Sight Explorer by entering the correct User Name and Password in the Username and Password fields. Once User 2 successfully logs on, the Authorize dialog appears. The Authorize dialog varies based on the Authorization type (Authorize-Only or Double-Blind).
When performing Authorize-Only, the new values entered by User 1 are displayed in the Authorize dialog, and User 2 is not allowed to change any value in the dialog (all edit controls are disabled). If User 2 determines the new values are correct and clicks the Authorize button, the change is authorized. If User 2 determines the new values are incorrect and clicks Cancel, the changes are not authorized.

When performing Double-Blind, the new values entered by User 1 are hidden in the Authorize dialog (the last authorized values are displayed), and any edit controls that are not supported by the Authorize function are disabled. User 2 presses the edit control and manually re-enters the new value. After entering all new values, User 2 clicks the Authorize button and the change is authorized. If User 2 clicks Cancel, the changes are not authorized.
 Note: If User 2 enters one or more incorrect value and authorization fails, the Authorize dialog appears again. In this case, the values entered by User 2 are displayed in the dialog. If User 2 attempts the Double-Blind authorization again, User 2 must re-enter User 1’s values to have a successful authorization.
- When the Authorize button is clicked, Audit Messages are generated if authorization results are tracked by Audit Messages (optional).
- When the authorization is successful, the values returned by the GetAuthorizedValue function are updated to show the latest authorized values (optional).
Audit Messages
The type of Audit Message varies depending on the Authorization Type and the result of the authorization (success or failure). When Cancel is pressed, an Audit Message are not generated.
Authorize-Only
Once the Authorize button in the Authorize dialog is pressed by User 2, an Audit Message is generated for each of the following:
-
Changes made by User 1. The Audit Message contains the name of User 1, the symbolic tag of the edit control, the old value of the control and the new value of the control.
-
A success status and the name of User 2.
Note: When Authorize-Only is selected and User 2 presses the Authorize button, the authorization is always a success.
Double-Blind
Once the Authorize button in the Authorize dialog is pressed by User 2, an Audit Messages is generated for each of the following:
If authorization is a success:
- Changes made by User 1. The Audit Message contains the name of User 1, the symbolic tag of the edit control, the old value of the control and the new value of the control.
- A success status and the name of User 2.
If authorization is a failure:
- A failure status and the name of Use 2.
None
If None is the selected Authorize Type, no authorization will occur. However, if the user presses the labeled pushed button (the Change Batch button in the sample job), an Audit Message is generated for each of the following:
-
Changes made by the user. The Audit Message contains the name of the user, the symbolic tag of the edit control, the old value of the control and the new value of the control.
-
A success status and the name of the user.
Note: When None is selected and the labeled button is pressed, a success status is always generated.