Adding a New Sensor to the Configuration
Background Information
The Available Sensors pane automatically populates its tree with the following:
- Sensors and emulators that are detected on your local network subnet
- Sensors that you have manually configured for use with the In-Sight OPC Classic Server
A sensor may not automatically appear in the tree for the following reasons:
- The sensor supports OPC and is configured properly for your network, but it is not on your local subnet. In this case, you can go ahead and manually add the sensor to the OPC configuration using the steps to follow.
- The sensor supports OPC but is not configured properly for your network. In this case, launch In-Sight Explorer and run the In-Sight Connection Manager to configure the sensor for your network. If you configure the sensor to be on your local subnet, then it will appear in the Available Sensors pane after refreshing the tree. If you configure the sensor to be on a different subnet, you will need to follow the steps outlined below to manually add the sensor to your configuration.
- The sensor does not support OPC. If the sensor is a 3400 or 5000-series device, you may need to update the firmware to the latest version using In-Sight Explorer before it will function properly with the OPC Classic Server. Refer to the In-Sight Explorer help file for instructions on how to update the firmware on a sensor. Older In-Sight sensor models such as 1000- and 4000-series sensors do not support OPC and will not show up in the network tree.
- Your tree is only showing Configured Sensors. In the Configuration Editor, toggle the Sensors > Show Only Configured menu option to allow all available sensors to appear.
Add a New Sensor to the Configuration
-
In the Configuration Editor, click Sensors > Add...
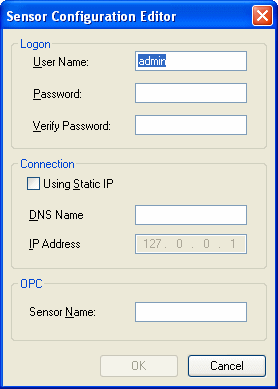
- Type in valid User Name and Password credentials to access the sensor.
- If you would like to use the DNS name of the sensor when accessing it, enter the DNS Name. Otherwise, a static IP may be specified by selecting the Using Static IP check box and typing in the IP Address of the sensor.
- Type in an OPC Name for the sensor. This name, along with the DNS Name (if specified), will identify the sensor in the Available Sensors pane and the Server pane.
- Click OK.
- At this point, you may now proceed to add tags to your configuration.