 Reviewing the Results Table
The Results Table in the settings pane displays a profile of each tool in the job. To sort the table by a column, click on the column title; to reverse the sort order, click on the column title again. To restore the default sorting, click on the column title a third time. Tools can be re-ordered within the table by dragging and dropping them into their desired location within the table, as well.
The Results Table displays the following default columns (from left to right):
- Pass/Fail Indicator: Uses a green circle
 and a red rectangle
  to represent success and failure, respectively. Pass/fail criteria are specified in the Locate Part and Inspect Part steps.
-
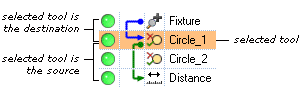
Tool Order and Dependency Graphics : Displays the tool order and the dependencies between the selected tool (highlighted in orange) and other tools. Select this column to sort the tools by the order they were added to the job. Setting the sort to this column also enables you to drag and drop the tools into your own desired order. Tools in a Group Math & Logic Tool can be added or removed from the group by expanding the tool and dragging the desired tool in or out of the group.
Note: Group Tools cannot be dropped under other Group Tools, and tools which would cause a circular reference cannot be added to a Group Tool.A dependency exists when a tool references another tool. There are two parts to each dependency: a precedent and a dependent, which are connected by a line. The precedent refers to the source of the data (that is, the tool providing the input) and is represented by a circle; the dependent is the destination of the data (that is, the tool receiving the output) and is represented by an arrow. Blue dependency graphics indicate that the selected tool is the destination; green indicates that the selected tool is the source.
- Tool Icon: Visually indicates the type of tool used (for example, Presence/Absence Edge, Identification Read Text, Counting Blobs).
- Name: Lists the tool’s name, which can be changed from its default name in the Locate Part or Inspect Part step.
-
Result: Lists the results for the tool, which are also displayed either in the Settings or Range Limits tab in the Locate Part or Inspect Part settings pane.
In-Sight Models Results In-Sight 2000-110 and 2000-120/120C Vision Sensors
Pass/Fail status only In-Sight 2000-130/130C Vision Sensors Measurement and Counting Inspection tools: Standard Results (Numeric Data)
Presence/Absence Pattern tool: Pass/Fail status and Pattern Score
Other tools: Pass/Fail status only
In-Sight Vision Systems (All Models) and In-Sight 2000 Series 23X Vision Sensors (23M, 230) Standard Results (No Limitations) - Pass: Displays the pass rate for the tool either as the number of pass results/total results (default) or as a percentage.
- Fail: Displays the fail rate for the tool either as the number of fail results/total results (default) or as a percentage.
- Time(ms): Lists the amount of time, in milliseconds, needed to run the tool.
-
Type: Displays the type of tool. For example, "PatMax RedLine™ Patterns (1-10)" is displayed for the PatMax RedLine™ Patterns (1-10) Location Tool, and "PatMax® Patterns (1-10)" is displayed for the PatMax® Patterns (1-10) Location Tool.
Note: To hide the Type column, right-click and select Show Type Column.
The Job Status group box, to the left of the Results Table, displays the overall pass rate (Rate) for all images viewed since the pass/fail count was last cleared and the job time (Time) for the current image.