Spreadsheet View
The main component of In-Sight Explorer's graphical user interface (GUI) is a spreadsheet, an adjustable, semi-transparent overlay that is superimposed onto a video image acquired from an In-Sight vision system.
Note: Right-clicking within the spreadsheet displays a shortcut menu
that allows various spreadsheet operations to be performed. For more information, see Right-Click Menu.
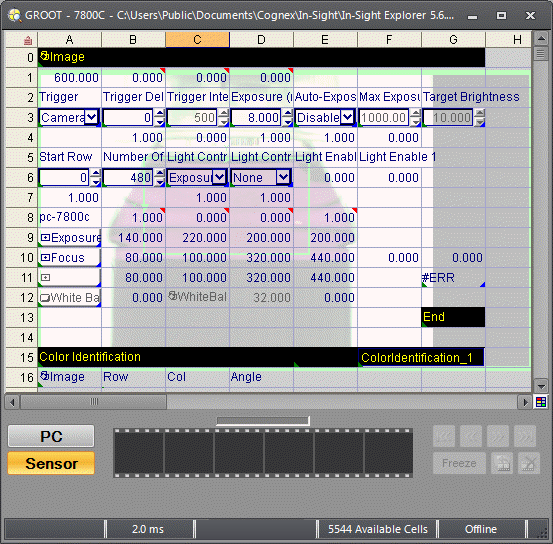
In addition to the semi-transparent spreadsheet overlay containing the active job, the Spreadsheet View consists of:
- The active image from the In-Sight sensor.
- The status bar, which indicates the current available job size, as the number of available, allocated cells (use the Job Size Limit dialog to modify the value), the Flintstones status and job execution time of the active In-Sight sensor.
- The title bar indicating the sensor name and file name of the active job.
Note:
- If you drag and drop or load the job from your PC, the title bar displays "Spreadsheet View" until the job is saved to the sensor. Once the job is saved, the file name is displayed.
- Shortcuts to images cannot be dragged to Spreadsheet Views or the In-Sight Files pane. Drag the original source image, rather than the shortcut, to the desired location.
- The number of Spreadsheet Views you can simultaneously display depends on your PC's hardware (CPU speed and memory, primarily). Opening more than 10 windows might exceed memory resources and cause unexpected behavior if the jobs are particularly complex.
- Not all In-Sight sensors can access the Spreadsheet View.
To display the Spreadsheet View of an In-Sight vision system or emulator, do one of the following:
- Double-click on the desired vision system/emulator in the In-Sight Network pane; if necessary, click Show Spreadsheet View on the Window menu.
- Right-click on the sensor/emulator in the In-Sight Network pane and click Show Spreadsheet View from the drop-down menu that appears.
Note: If another user is already
logged onto the desired In-Sight sensor/emulator, a warning message will appear.
Click Yes to disconnect the other
user from the destination system and continue with the logon process.
Click No to cancel the logon attempt
and return to In-Sight Explorer.