Format String Dialog
EasyBuilder View
The FormatString dialog is used to select and format Location and Inspection Tool data to generate an Output String that can be sent to a remote device, such as a robot controller. When configuring a string for a robot (in the Communication group-box of the Communication Application Step, the Device is set to Robot, or the Protocol is set to Serial Kuka or Serial Motoman), the FormatString dialog will automatically select the fixture output generated in the job.
Within the FormatString dialog, each referenced tool result is listed as an individual item. Each item can be formatted by assigning a Label, Data Type, number of Decimal Places, Fixed Width and Pad. In order to format an item, it must first be highlighted in the list. The entire Output String can be formatted by adding Leading Text, Trailing Text, Terminators and Delimiters.
- To format multiple, non-consecutive items, hold down the CTRL key and highlight the items.
- To format multiple, consecutive items, hold down the SHIFT key and highlight the first item, and then the last item, in the list.
Format String Dialog Controls
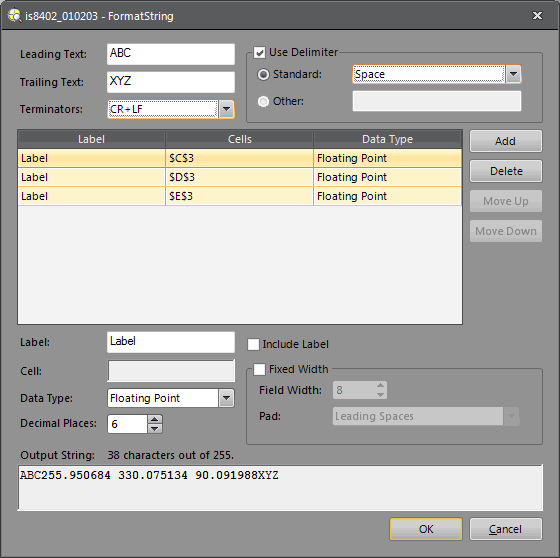
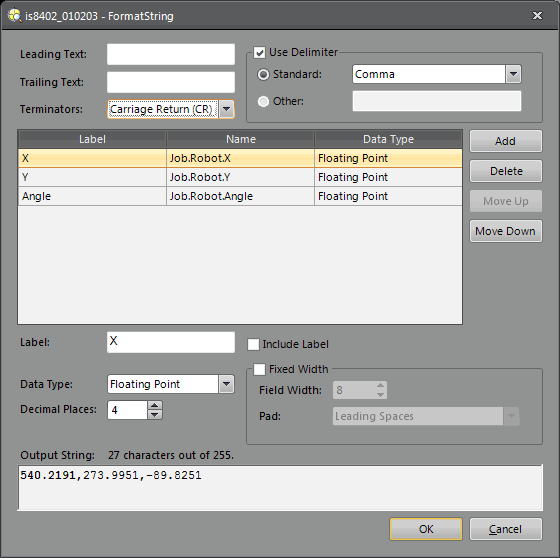
- Leading Text: The Output String prefix. The maximum string length is 30 characters.
- Trailing Text: The Output String suffix. The maximum string length is 30 characters.
-
Terminators: Appends the selected terminator character(s) to the Output String.
- None: No terminator is appended to the Output String.
- Line Feed (LF): Appends a line feed to the Output String.
- Carriage Return (CR): Appends a carriage return to the Output String.
- Carriage Return and Line Feed (CR+LF): Appends a carriage return and a line feed to the Output String.
- Use
Delimiter: Enabled by default; the items are delimited. The maximum string
length is 1 character.
- Standard: Allows you to select a standard delimiter: Comma, Space, Tab, Semicolon or Underscore.
- Other: Allows you to enter a custom, single-character delimiter.
- Add: Launches the Select Output Data dialog, which contains data from any Location or Inspection Tools that were added to the job. After selecting the desired results, the FormatString dialog returns and creates one item for each selected result.
- Delete: Removes the highlighted item from the item list. If no items are highlighted, the Delete button is disabled.
- Move Up: Moves the highlighted item up in the item list. If the item is first in the list, the button is disabled.
- Move Down: Moves the highlighted item down in the item list. If the item is last in the list, the button is disabled.
- Label: Each item may be assigned a label to help identify it. The maximum string length is 12 characters.
- Include Label: When enabled, the item's Label is included in the Output String, preceding the item's string.
- Data Type:
The FormatString dialog automatically determines the Data Type for each
item, based on the contents of the referenced result.
- Integer: Returns a string containing an integer value.
- Unsigned Integer: Returns a string containing an unsigned integer value.
- Integer (hex): Returns a lower-case string containing the hexadecimal value for an integer value, or the first character in an alphanumeric string.
- Integer (HEX): Returns an upper-case string containing the hexadecimal value for an integer value, or the first character in an alphanumeric string.
- Integer (Octal): Returns a string containing the octal value for an integer, or the first character in an alphanumeric string.
- Floating Point: Returns a string containing a floating point value.
- Scientific Notation: Returns a string containing a Scientific Notation value.
- Character: Returns the ASCII character corresponding to an integer value. When supplied with an alphanumeric text string, returns the first character.
- String: Returns a string containing an integer value.
- Decimal Places: Selects the number of decimal places for Floating Point or Scientific Notation Data Types. (0 to 6; default = 6)
- Fixed Width: Each item's string may
be configured to be a fixed width.
- Field Width: Specifies the minimum number of characters contained in each item's string. (1 to 30; default = 8)
- Pad:
If the item's string has fewer characters than the specified Field Width,
it is padded in one of the following ways:
- Leading Spaces: Right justified with leading spaces.
- Trailing Spaces: Left justified with trailing spaces.
- Leading Zeros: Right justified with leading zeros.
-
Output String: Displays the Output String. The characters that correspond to the currently highlighted item are bolded. The total character count is displayed. Syntax: <Leading Text (optional)><Label (optional)><Item0><Delimiter (optional)><Item1><Delimiter (optional)>...<Terminator>
Spreadsheet View
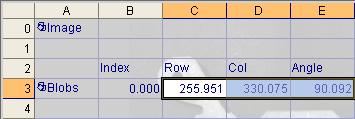
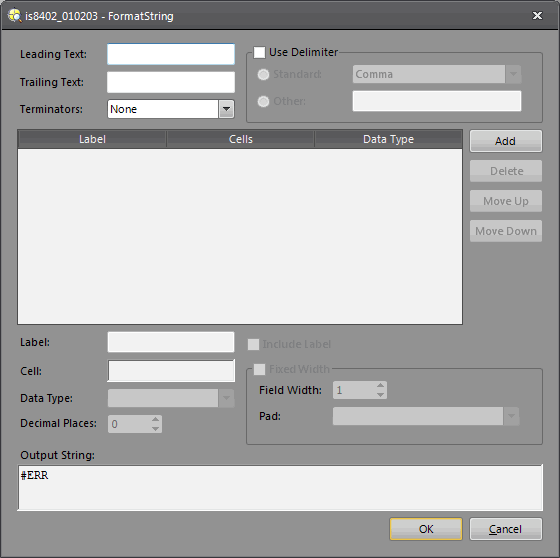
The FormatString dialog is used to easily format referenced cell data and generate an Output String that can be sent to a remote device. Within the FormatString dialog, each referenced cell is listed as an individual item. Each item can be formatted by assigning a Label, Data Type, number of Decimal Places, Fixed Width and Pad. In order to format an item, it must first be highlighted in the list. The entire Output String can be formatted by adding Leading Text, Trailing Text, Terminators and Delimiters.
- To format multiple, non-consecutive items, hold down the CTRL key and highlight the items.
- To format multiple, consecutive items, hold down the SHIFT key and highlight the first item, and then the last item, in the list.
Display the Format String Dialog
-
Select an empty spreadsheet cell.
-
On the Insert menu, click Function.
-
From the Insert Function dialog, expand the Text category.
-
From the right-hand pane, double-click FormatString. For more information, see FormatString(Format-string, [Text or Value, ...]).
Format String Dialog Controls
-
Leading Text: The Output String prefix. The maximum string length is 30 characters.
-
Trailing Text: The Output String suffix. The maximum string length is 30 characters.
-
Terminators: Appends the selected terminator character(s) to the Output String.
- None: No terminator is appended to the Output String.
- Line Feed (LF): Appends a line feed to the Output String.
- Carriage Return (CR): Appends a carriage return to the Output String.
- Carriage Return and Line Feed (CR+LF): Appends a carriage return and a line feed to the Output String.
- Use
Delimiter: When enabled, the items are delimited. The maximum string
length is 1 character.
- Standard: Allows you to select a standard delimiter: Comma, Space, Tab, Semicolon or Underscore.
- Other: Allows you to enter a custom, single-character delimiter.
-
Add: Invokes cell selection mode to reference one or more cells. After selecting the cells, the dialog returns and creates one item for each selected cell.
-
Delete: Removes the highlighted item from the item list. If no items are highlighted, the Delete button is disabled.
-
Move Up: Moves the highlighted item up in the item list. If the item is first in the list, the button is disabled.
-
Move Down: Moves the highlighted item down in the item list. If the item is last in the list, the button is disabled.
-
Label: Each item may be assigned a label to help identify it. The maximum string length is 12 characters.
-
Include Label: When enabled, the item's Label is included in the Output String, preceding the item's string.
-
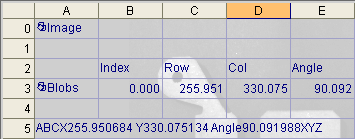
Cell: Each item has an expression. Most of the expressions are cell references. The cells references in the expression are color-coded to match the graphics in the spreadsheet.
Tip: Placing the cursor in the Cell text box and pressing F4 cycles through the four cell reference types. - Data Type:
The FormatString dialog automatically determines the Data Type for each
item, based on the contents of the referenced cell.
- Integer: Returns a string containing an integer value.
- Unsigned Integer: Returns a string containing an unsigned integer value.
- Integer (hex): Returns a lower-case string containing the hexadecimal value for an integer value, or the first character in an alphanumeric string.
- Integer (HEX): Returns an upper-case string containing the hexadecimal value for an integer value, or the first character in an alphanumeric string.
- Integer (Octal): Returns a string containing the octal value for an integer, or the first character in an alphanumeric string.
- Floating Point: Returns a string containing a floating point value.
- Scientific Notation: Returns a string containing a Scientific Notation value.
- Character: Returns the ASCII character corresponding to an integer value. When supplied with an alphanumeric text string, returns the first character.
- String: Returns a string containing an integer value.
- Decimal Places: Selects the number of decimal places for Floating Point or Scientific Notation Data Types. (0 to 6; default = 6)
- Fixed Width: Each item's string may
be configured to be a fixed width.
- Field Width: Specifies the minimum number of characters contained in each item's string. (1 to 30; default = 8)
- Pad:
If the item's string has fewer characters than the specified Field Width,
it is padded in one of the following ways:
- Leading Spaces: Right justified with leading spaces.
- Trailing Spaces: Left justified with trailing spaces.
- Leading Zeros: Right justified with leading zeros.
- Output String: Displays the Output String. The characters that correspond to the currently highlighted item are bolded. The total character count is displayed. Syntax: <Leading Text (optional)><Label (optional)><Item0><Delimiter (optional)><Item1><Delimiter (optional)>...<Terminator>