Auto-Tune
The Auto-Tune dialog is used in conjunction with the OCRMax function to configure the Segmentation parameters of the OCRMax function and train a font database, through the construction of Auto-Tune Records to create an Auto-Tune Model. An Auto-Tune Record consists of an image, the training string and the user-verified location of the characters within the image. The Auto-Tune Model consists of one or more Auto-Tune Records, plus the settings that best segments all of the images within the Auto-Tune Records.
- The Auto-Tune dialog is unavailable when the In-Sight vision system is Online.
- The Auto-Tune dialog will be unavailable if this parameter is set as a reference to an OCRMaxSettings or GetInternalSettings function (this parameter must be set to 0 to enable the Auto-Tune dialog). For more information about enabling the Auto-Tune dialog in conjunction with a GetInternalSettings function, see GetInternalSettings(OCRMax)
- Cognex recommends that when using the Auto-Tune dialog, the segmentation tuning be performed on an In-Sight Emulator instead of an In-Sight vision system. The OCRMax function's Auto-Tune algorithm requires a large amount of computational resources, and performance will be better on the Emulator versus a vision system.
- When training a font database and using the Auto-Tune dialog to segment the characters, Cognex recommends beginning the process with images that best represent how the characters should look (i.e., use your best images first), working from best to worst. Also include images that represent all of the variations that will be expected to be encountered during run-time. This will allow the OCRMax function's Auto-Tune algorithm to tune more successfully.
- The Auto-Tune algorithm will not work on text that exhibits an angle larger than +/- 5 degrees within the ROI. In this scenario, either ensure that the ROI is fixtured so that it is aligned with the text within the angle range, or set the Angle Range parameter to a value greater than 5, at which point the Auto-Tune algorithm will utilize the value in its calculations. For more information, see Region and Angle Range.
- The Auto-Tune algorithm will not work when characters are overlapped. Perform manual segmentation to segment and classify overlapped characters.
- The OCRMaxAutoTune function provides external access to the Auto-Tune dialog, for use with external devices, such as the VisionView Operator Interface Panel.
Overview
With the Auto-Tune dialog running, each image is examined to verify that the characters are being correctly segmented and classified. If the characters are not being correctly segmented, the OCRMax function's Auto-Tune algorithm will calculate the optimal Segmentation parameter settings that segment the current image (the Auto-Tune Record), as well as the previously trained images (the Auto-Tune Model). As more images are trained, the OCRMax function's Auto-Tune algorithm will become more reliable and accurate. Once satisfactory results are achieved, the Auto-Tune dialog is closed, the new Segmentation parameters are applied and the font database is updated with the newly trained characters.
The Auto-Tune dialog provides two primary advantages over manually tuning the Segmentation parameters:
- Images only need to be cycled through once, instead of twice (once to tune the Segmentation parameters, and the second to train).
- Read accuracy should improve because the characters are trained automatically with the Segmentation parameters obtained during the tuning process.
Auto-Tune Dialog Tabs and Controls
To display the Auto-Tune Dialog, press the Auto-Tune button from the OCRMax property sheet.
The Auto-Tune dialog is composed of four different tabs: Auto-Tune, Settings, Records and Font.
In addition to the tabs, the Auto-Tune dialog contains a toolbar with the following controls:
- Reset: Specifies that the Segmentation tab parameters will be reset to their default settings, clear font information and remove any Auto-Tune record (.rec) files associated with the function.
- Open: Launches the Open dialog, which is used to navigate to a previously saved Auto-Tune Model (as a .REC file). By default, the Auto-Tune dialog will automatically load the last saved Auto-Tune Model.
- Save As: Launches the Save As dialog, which is used to navigate to a directory in which to save and store an Auto-Tune Model (as a .REC file). By default, the Auto-Tune Model is saved to memory on the connected In-Sight device (either Emulator or In-Sight vision system, depending upon which is connected and being used to develop the job).
-
Edit Region: Launches interactive graphics mode, where the ROI of the OCRMax function may be modified.
Note: If the referenced OCRMax function's Region parameter is defined by a cell reference or a formula, the Edit Region control will be disabled. - Play First: Go to the first image stored in the Playback Folder (configured using the Record/Playback Options Dialog).
- Play Previous: Go to the previous image stored in the Playback Folder.
- Play Next: Go to the next image stored in the Playback Folder.
- Play Last: Go to the last image stored in the Playback Folder.
- Open Image: Launches the Open Image dialog, which is used to navigate to an image directory.
- Live Video: Enter Live Video mode, where images are continuously acquired from an In-Sight vision system and displayed in the display area. This option is only available when connected to a vision system.
Auto-Tune
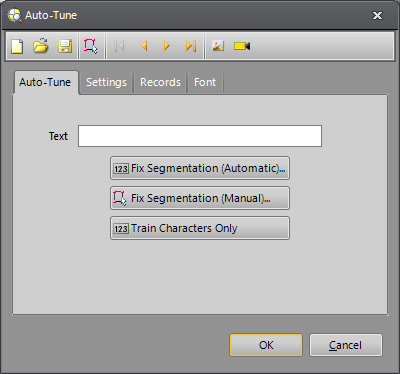
The Auto-Tune tab is used to enter the text string to be trained, activating automatic or manual character segmentation, and adding characters to the font database.
- Text field: Specifies the text string to be trained. If there are spaces in the string, enter them using the keyboard Space bar.
- Fix Segmentation (Automatic): Specifies that the OCRMax function will attempt to automatically segment the characters by creating character regions and using different combinations of Segmentation parameters, until the correct number of characters are found.
- Fix Segmentation (Manual): Specifies that the character regions will be manually adjusted, while in interactive graphics mode, by editing the size and position of the individual character regions. The OCRMax function will then calculate the optimal Segmentation parameters based on the shape and position of the character regions.
- Train Characters Only: Specifies that the text specified in the Text field will be trained and added to the font; no adjustments to the Segmentation parameters will be made.
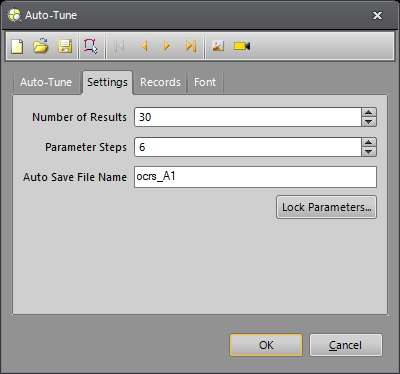
Settings
The Settings tab is used to configure the OCRMax function's auto-tuning algorithm.
-
Number of Results: Specifies the maximum number (1 to 9,999,999; default = 30) of candidate results to generate.
Note: When connected to an In-Sight vision system, a maximum of 15 results may be generated for the Auto-Tune Model. -
Parameter Steps: Specifies the maximum number of iterations (1 to 100; default = 5) to attempt for each Segmentation parameter.
Note: The higher the number of iterations, the longer the Auto-Tune process will take to complete. -
Auto Save File Name: Specifies the name of the .REC file; the default name is "ocrs_{cell}.rec" (when specifying the name, do not add a file path or an extension). The maximum length of the file name is 255 characters, and may only contain alpha-numeric characters and the underscore character. When closing the Auto-Tune dialog via the OK button, the .REC file will automatically be exported to the In-Sight vision system's memory. Afterwards, the .REC file will be automatically imported when the Auto-Tune dialog is re-opened.
Note: To load and/or save a .REC file to a specific location, use the Open and Save As options in the Auto-Tune dialog toolbar controls. -
Lock Parameters: Launches the Lock Parameters dialog, which is used to specify which OCRMax parameters the Auto-Tune dialog should not modify when calculating the optimal Segmentation parameters (which are configured prior to launching the Auto-Tune process).
Note: A parameter will automatically be locked and disabled if that parameter has been created as a cell reference in the Spreadsheet.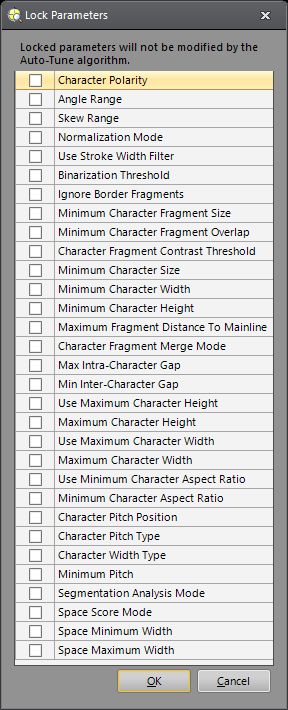
Records
The Records tab displays a list of the Auto-Tune Records. An Auto-Tune Record consists of an image, the trained text string and the user-verified location of the characters in the image.
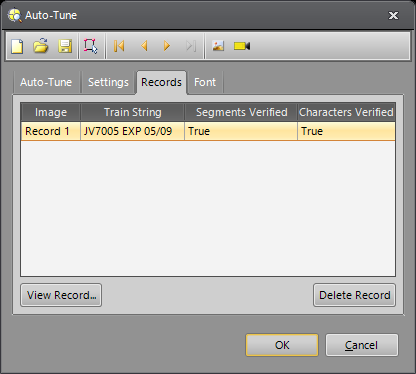
- Table: Displays the name of the image used to train, the text string trained, and whether or not segments and characters were verified.
-
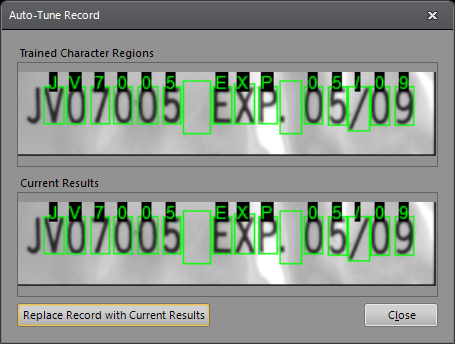
View Record: Select a record to enable, and press to launch the Auto-Tune Record dialog, which displays the previously trained character regions above the current Auto-Tune results. If the current results segment the characters better than the trained results, press the Replace Record with Current Results button to overwrite the previously trained character regions with the current Auto-Tune results.
-
Delete Record: Select a record, and then press this button to remove the record from the list.
Note: Deleting a record may take a few moments to complete.
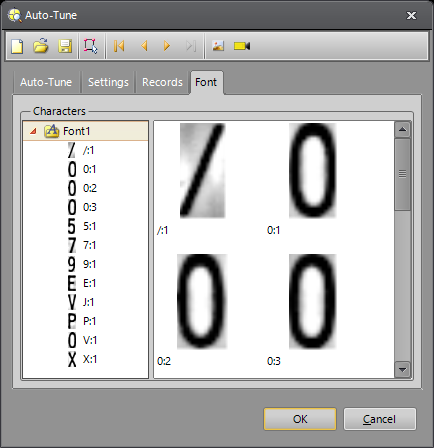
Font
The Font tab displays a read-only view of the trained characters and their instances.
Use the Auto-Tune Dialog
All of the steps below assume that a database of sample images that contain the characters to be trained has been created and placed in a directory. Also, the steps assume that an OCRMax function has been inserted into the Spreadsheet. The process of training and segmenting characters for OCR applications using the Auto-Tune dialog consists of the following: loading training images, training images with automatic character segmentation, training images with manual character segmentation, and finally, correcting character identifications.
Load Training Images
- Load the images; select Record/Playback Options from the Image Menu.
- The Record/Playback Options dialog should automatically open with the Playback tab presented; if not, click on the Playback tab.
- From the Playback Folder section, press the Browse button to launch the Browse for Folder dialog. Navigate to the directory containing the training images and press the OK button to continue.
- The Playback Folder should now display the directory specified, and the Image Count indicates the number of images in the directory. Press the OK button in the Record/Playback Options dialog to continue.
- Once the Playback Folder directory has been specified, the Play First, Play Previous, Play Next, and Play Last buttons in the Auto-Tune dialog toolbar may be used to navigate the images.
Train Images Using Automatic Character Segmentation
- In the Auto-Tune dialog, by default, the Auto-Tune tab will be displayed. In the Text field, enter the text string to be trained.
- From the Auto-Tune dialog's toolbar, press the Edit Region button to enter interactive graphics mode and position the OCRMax function’s ROI over the line of text to be read. When configuring the ROI, ensure that it accounts for any angular rotation and/or skew.
- The function will automatically create character regions around the text that the function determines to be characters, based on the default settings in the Segmentation tab.
- Press the Fix Segmentation (Automatic) button to allow the OCRMax function to automatically adjust the Segmentation parameters.
-
After the OCRMax function has segmented the characters, the Auto-Segment Results dialog will be displayed, with a list of results.
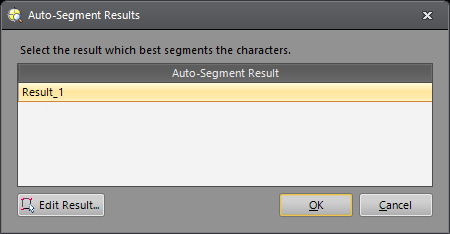
- Examine the result(s) to determine which result provides the best segmentation of characters. Selecting a result in the list will update the character regions in the image. If necessary, press the Edit Result button to enter interactive graphics mode and manually adjust the character regions around the character(s).
- Once the best result has been determined, select the result from the list and press the OK button to close the Auto-Segment Results dialog.
- A new Auto-Tune Record will be created, and the image will be updated with the new character regions. The Font will also be updated with the newly trained characters.
- Load the next image, and repeat steps 1 through 8.
- Once all of the training images have been used, press the OK button to close the Auto-Tune dialog.
Train Images Using Manual Character Segmentation
- In the Auto-Tune dialog, by default, the Auto-Tune tab will be displayed. In the Text field, enter the text string to be trained.
- From the Auto-Tune dialog's toolbar, press the Edit Region button to enter interactive graphics mode and position the OCRMax function’s ROI over the line of text to be read. When configuring the ROI, ensure that it accounts for any angular rotation and/or skew.
- The function will automatically create character regions around the text that the function determines to be characters, based on the default settings in the Segmentation tab.
- Press the Fix Segmentation (Manual) button to enter interactive graphics mode.
- Manually edit the position and size of the character regions, as needed.
- Once all of the character regions have been resized and re-positioned as needed, press the OK button on the Job Edit toolbar to exit interactive graphics mode.
- The Auto-Tune dialog will once again be displayed, and a new Auto-Tune Record will be created, and the image will be updated with the new character regions. The Font will also be updated with the newly trained characters.
- Load the next image, and repeat steps 1 through 8.
- Once all of the training images have been used, press the OK button to close the Auto-Tune dialog.
Correct Character Identifications
This option is used when the image has been segmented correctly, however the characters were misidentified.
- In the Auto-Tune dialog, by default, the Auto-Tune tab will be displayed. In the Text field, enter the text string to be trained.
- Press the Train Characters Only button.
-
The Font will be updated with the newly trained characters, and a new Auto-Tune Record will be created.
Note: If the error message "Incorrect Auto-Tune Record text string in the Auto-Tune Model" is encountered, this error indicates that an Auto-Tune Record has been added that is identical to another Auto-Tune Record, except the classification between the two is different. For example, if the first Auto-Tune Record has a zero classified as the letter "O" in the first, but in the second it is correctly classified as "0," this error will occur. In this error condition, go to the Records tab and verify the text strings specified for the Auto-Tune Record are correct.