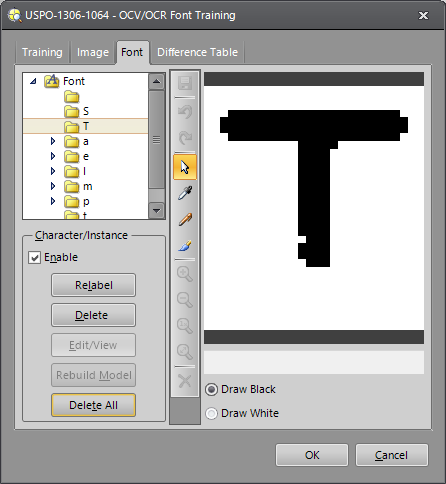
Image Editor
The Image Editor allows users to edit individual instances of a font character. The currently selected Instance of a character Model is displayed in the Image Editor. The following buttons allow single-click access to common tasks.
|
|
Saves the character instance into the active Font. If a character has been edited without being saved, you will be prompted to save (or discard) the changes when you change the selected character or exit the dialog. |
|
|
Undo the last action. |
|
|
Redo the last action. |
|
|
When the Normal (Pointer) icon is selected, as the mouse is scrolled over the image, the greyscale value is returned for each pixel. Zoom-to-Region:
Create a dotted rectangle around an image region and zoom in; the user-defined
rectangle zooms to fill the entire image area. When creating the rectangle,
the initial location of the cursor will be the center of the rectangle.
Once the maximum zoom is reached, Zoom-to-Region is disabled. CTRL+Left-click
the mouse and drag the Pan the zoomed
image: SHIFT+CTRL+Left-click the mouse and drag the |
|
|
Click on a pixel to select the color (black or white) for subsequent drawing operations. Once a value is selected, the mode automatically changes to the previous drawing selection (thin or thick). The color selected will be indicated by the radio button selected (either Draw Black or Draw White). Note: Selecting outside of the image area is ignored.
|
|
|
Draws a one-pixel thick line, using the color selected by the Eyedropper . |
|
|
Draws a three-pixel thick line, using the color selected by the Eyedropper or by selecting Draw Black or Draw White. |
|
|
Increase the level of magnification. |
|
|
Decrease the level of magnification. |
|
|
Set the zoom ratio to 1:1. The image will represent a 1:1 pixel mapping between the image and your display resolution. |
|
|
Fit the image to the display. The image will automatically scale to be maximally displayed behind the spreadsheet, with the entire image visible. The image's original aspect ratio is maintained; some empty (grey) space may exist around the image. |
|
|
Cancels the action. |