Red Analyze Tool – Supervised Mode
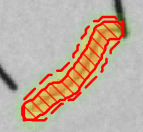
When the Red Analyze tool is in Supervised Mode, the focus is on teaching the network what defects look like. During training, only images that are labeled will be considered during training. Images which contain labeled defect regions are trained to learn the defects. In addition, the tool also learns the parts of the labeled images which do not include defect regions. In general, when you are training a Red Analyze tool in Supervised mode, you are training the tool to detect and respond to defects. Therefore, the most import guideline for labeling images is that if an image is labeled as containing a defect, each and every defect in the image must be labeled.
When you label an image as Good in Supervised mode (i.e. an image that does not contain any defect regions), the tool will also use that image for training. In particular, the tool will attempt to train the network so that images labeled Good do not generate any defect responses. Adding labeled, defect-free Good images to your Training Set can help you validate the performance of the tool in classifying good and bad images.
When selecting images, you will want to ensure that you have a training image set that includes all of the defects you expect to encounter during runtime, as well as defect-free images. If you did not teach the tool what a particular defect looks like, the tool will not find those defects. For example, if you only teach the tool what stains look like, the tool will not find scratches.
In Supervised mode, the process for training the tool is:
- Collect images that represent the full range of defects that you expect to encounter.
-
Go through each image in your training image set and carefully label the defects.
Defect Label 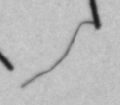
- Add a few good images and label them as Good.
- Train the tool.
-
Validate the tool by presenting images that were not used during training, which contain defects as well as good images that do not contain defects.
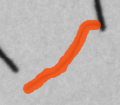
Defect Marking