Optimize Speed
The topics in this section present useful tips and tricks to decrease processing time of your VisionPro Deep Learning application.
Tool and Stream Processing Time
Individual tool processing time is displayed in the Database Overview, as shown below:
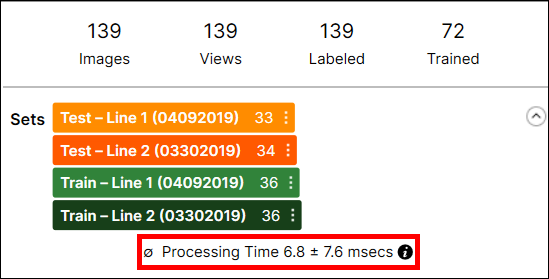
Processing Time is the average processing time per image in the last processing task, and it is the sum of the processing time and the post-processing time.
The processing time for a stream containing multiple tools is not available through the VisionPro Deep Learning GUI, and you cannot estimate it by summing the tool execution time of the tools in the stream because the processing time includes the time required to prepare and transmit view information between tools.
When considering stream processing, remember that the processing of tools in a stream is always serialized when you call Stream.Process(). Only one tool is ever processed at a time unless you explicitly process tools individually using Tool.Process().
Throughput
Within VisionPro Deep Learning, throughput refers to the total number of images that can be processed per unit of time. If your application can process multiple streams concurrently using different threads, it may be possible to improve system throughput, although individual tool processing will be slower.
Software Side: Parameter Optimization
The topics in this section describe how to best optimize the parameters of the various VisionPro Deep Learning tools to help maximize performance.
| Parameters | Feature Size | Sampling Density | Color Channels | Precision | Iteration |
|---|---|---|---|---|---|
| Tools | Locate, Analyze, Classify | Locate, Analyze, Classify | Locate, Analyze, Classify | Blue | Red |
| Processing Time |
|
|
|
|
|


Tool parameter choices directly effect tool execution speed, but there is typically a tradeoff between tool speed and accuracy or robustness.
| Tool Parameters | How it affects speed | Best value option | Watch out for... |
|---|---|---|---|
| Architecture | The processing time of High Detail modes is usually longer than that of Focused modes (and SuaKIT Segmentation/Classification) because of the difference in both post and pre-processing logic. | ||
|
Feature Size (Focused mode) |
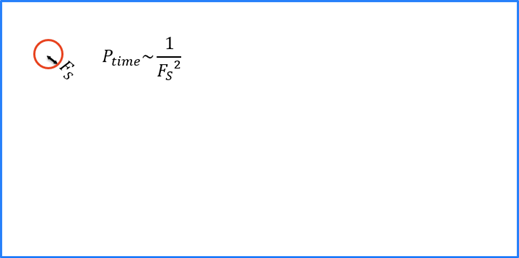
At runtime, Deep Learning tools need to sample the entire input image. The feature size determines the number of samples required for a given image size. The larger the feature size, the fewer the samples. |
O(n2) increase in speed with larger feature size. |
Larger feature sizes may cause the tool to miss features or defects. Use the Parameter Search parameter optimization utility to find an optimal feature size. |
|
Sampling Density (Focused mode) |
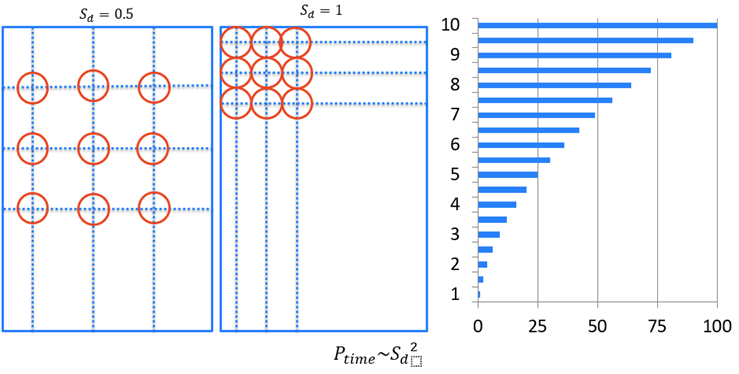
Similarly to feature size, the sampling density determines the number of samples required for a given image size. |
O(n2) increase in speed with lower sampling density. |
Risk of missing features or defects. |
|
Refinement parameters |
The Blue Locate and Red Analyze tools include the following processing-time parameters that provide more accurate results at the cost of increasing execution time:
|
Increasing the iteration value increases processing time linearly. |
|
|
Low Precision (Focused mode) |
If your system meets certain specific requirements (CUDA Compute Capability 6.1 or greater), you can enable the Low Precision processing mode for Red Analyze and Green Classify tools. Enabling Low Precision mode converts any existing trained tool to use a low-precision computation mode during processing, and it generates low-precision tools for all future training operations until it is disabled. Note: Once a tool has been converted to use the Low Precision mode, it must be retrained to disable Low Precision mode.
Low precision tools can execute from 25% to as much as 50% faster than normal-precision tools.
|
Additional run-time speed improvements for low precision tools are seen on systems with Turing Tensor cores. | Changing a tool to use Low Precision mode may change the results the tool produces to a small degree. Generally high-level feature identification, defect classification, and general classification will be unchanged, but specific feature and defect regions and scores may change slightly. |
Feature Size Optimization
Feature size strongly influences processing time (n2 ), in other words,, a feature size of 100 is 100 times faster than a size of 10, while a feature size less than 15 usually doesn’t yield good results.
For both training and runtime, each Deep Learning tool will collect image samples that completely cover the extent of the image.
The feature size is directly related to the time required to run, and to a lesser extent, train the tool. A larger feature size is much quicker to process, but larger feature sizes will not be able to "see" or "respond to" small features.
During training, the tool will sample the entire extent of the input image, and it will oversample regions that it determines contain more information.
Sampling Density Optimization
The Sampling Density parameter determines how densely the image is sampled. The smaller the number, the fewer samples will be taken of the image.
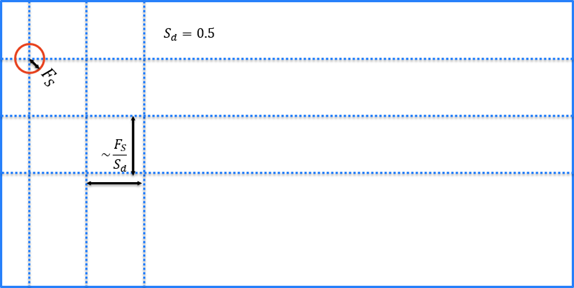
A Sampling Density setting of 0.5 is four times faster than a setting of 1 [0(n2)].
Color Channels Optimization
If your application relies on color images, only use the minimal number of required color channels possible, and only send images that already have the correct number of channels to avoid conversion. This is because:

Precision Optimization
The Blue Locate Tool includes a unique parameter, Precision, which is used to indicate when the tool stops looking for features after it has reached the desired positional precision. This is set as a percentage of the feature size being searched for:
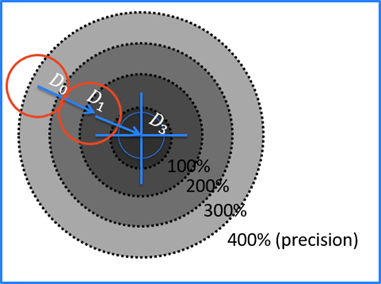
If precision is equal to 400 % the Locate tool will stop at D0
200 %: D1
100 %: Matches with precision
Stop criteria: 

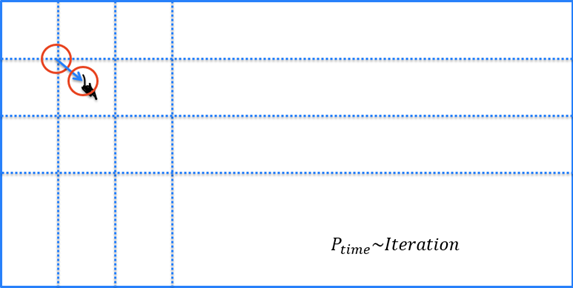
Iteration Optimization
The Red Analyze Tool – Unsupervised Mode has an additional parameter, Iterations, when the tool is in Expert Mode. This parameter specifies the number of additional iterations in interesting areas the tool will perform to locally improve the results of the analysis.
Software Side: Region of Interest (ROI) Optimization
When configuring your Region of Interest (ROI), attempt to always create a ROI that is as small as possible. And, when using the Red Analyze Tool, mask everything in the image that is not relevant to the application.
Hardware Side: GPU Optimization
The following are considerations for selecting GPU drivers mode on Windows:
Tesla Compute Cluster (TCC)
- Only for NVIDIA RTX / Quadro®, Tesla® and GeForce® GTX TITAN (though not officially communicated by NVIDIA).
- The GPU cannot be used for display.
- For NVIDIA RTX / Quadro®, the default mode is WDDM.
Windows Display Driver Model (WDDM)
- For the NVIDIA GeForce® or NVIDIA RTX / Quadro®.
- GPU shared for display and computation.
Memory allocation time
- WDDM >> TCC
Multi-GPU configuration improvement
- WDDM << TCC
Solutions:
- Only use NVIDIA professional or GeForce® GTX TITAN cards with TCC.
- Use the VisionPro Deep LearningGPU Memory Optimization feature.
GPU Memory Optimization

VisionPro Deep Learning Memory Usage:
- Display: memory to store images prior to computation
- VisionPro Deep Learning Reserved: memory reserved for computation
- Free: memory left free, because the amount of memory used is not known
An example for training:
- Reserved memory at 2.0GB (the minimal value for training)
- Free memory at about 1GB
- Which results in a graphics card with at least 3.5GB of memory
An example for runtime:
- Reserved memory at 512MB
- Free memory at about 256MB
- Which results in a graphics card with no minimal memory required
The GPU Memory Optimization feature (which is activated by default, using the default value of 2GB) provides significant speed improvement with Windows Display Driver Model (WDDM) drivers, as well as with the Tesla Compute Cluster (TCC) drivers. However, the reserved memory must be carefully selected, depending on the application. The highest gain in performance is for applications that process small images.
| Pros | Cons |
|---|---|
|
Reserves memory on the graphics card |
Difficult to estimate the correct amount of memory to reserve |
|
No more time lost for memory allocation |
-
If you turn on this option, the system pre-allocates GPU memory for tool optimization. It is recommended to turn on this option when using Focused mode tools (Red Analyze Focused - Supervised/Unsupervised, Blue Locate, Blue Read, Green Classify Focused) to speed up training and processing.
-
If you turn off this option, the system stops to pre-allocate GPU memory. It is recommended to turn off this option in training High Detail modes and High Detail Quick modes (Green Classify High Detail, Red Analyze High Detail, Green Classify High Detail Quick) that it slows down their training speed.
You can deactivate the feature or change the allocation settings via the API or through command line arguments.
For example, in the .NET API, you would set control.OptimizedGPUMemory(2.5*1024*1024*1024ul);; in the C API, you would set vidi_optimized_gpu_memory(2.5*1024*1024*1024);
Estimate Runtime Performance
The following numbers are an approximate guide to the potential runtime performance increment for different card families (baseline = non-TensorCore, standard mode):
| Deep Learning operating mode |
No Tensor Cores (example GTX) |
Volta Tensor Cores (example V100) |
Turing Tensor Cores (example T4) |
|---|---|---|---|
|
Standard |
100% |
150% |
150% |
|
Low Precision |
125% |
125% |
175% |