Create Feature Label (Feature Labeling)
Labels are the user-generated input data that establish the ground truth for the tool. Ground truth refers to the undisputed facts about the images in your application, in other words, what you, as the human determine to be the key information within the image (feature, character, defect, class). Labels establish the ground truth, which is used for both training and performance analysis. So it is imperative that you label accurately.
What is Labeling
Since the Deep Learning software is based on learning, what the network is taught about the images is vitally important. Within the Deep Learning parlance, this process is termed “labeling.” Labeling is the process of a user identifying features or defects, and graphically illustrating them on the image. The label represents the ground truth for the tools and is used to train the tools and validate their performance.
The label is the ground truth for the tool, in other words, you are telling the tool, "this is what it should learn." The most important part of programming the tools is ensuring that the images that are being used for training are completely and accurately labeled. Without knowing the ground truth data for the images, you cannot tell whether the tool is working properly or not. Also, without accurate labeling, the tool's training will not work as well.
When you are evaluating the performance of your tools and application, performance is always measured against the labeling that you provide. If your labeling does not reflect the actual ground truth for your images, then accurate and repeatable tool performance will not mean anything. When you train the Deep Learning tools, the goal for training – the cost function – is attempting to train the tool to produce a response that precisely matches the labeling that you provide.
For each of the tools, labeling is a manual operation (see below for the specifics of how labeling is performed for each tool). The most important characteristic of good labeling is that it is consistent, both between images and between observers and people performing the labeling. If you provide an image set to multiple people to label, and their labels do not agree, then the tool will likely not work well.
For each tool, there is a slightly different process, but the principle is the same. Once Labeling is completed, you will be ready to train the tool, and examine the Markings that the tool provides. You can toggle the display of labels and markings by either using the Alt + Left arrow and Alt + Right arrow keys, or from the right-click menu in the image.
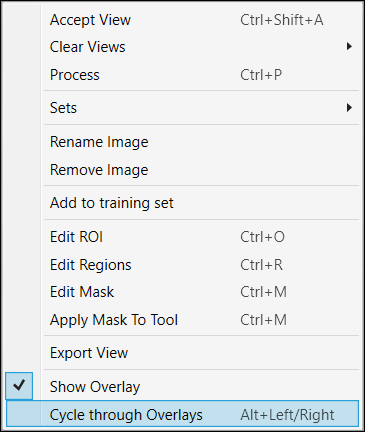
You can also show overlay with enabling the "Label" at the Overlay Checkbox.

Labeling in Blue Read
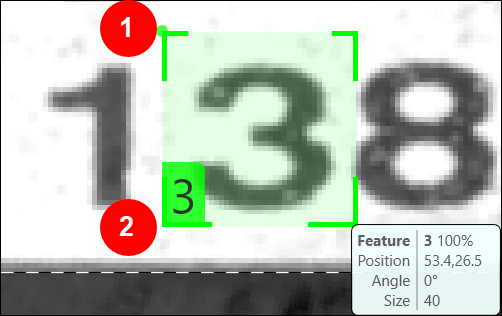
The Blue Read tool is a pre-trained tool to automatically recognize characters and strings, so labeling is not required to use the tool in most cases. However, labeling is recommended for application validation and incremental training. Since the Blue Read tool does not return detailed information about character positions, it does not require precise positional labeling. Instead, the labeling is simply the approximate size of the character, and its identity. Supported characters can be any single UTF-8 character.
|
|
|
|
1 |
Feature Size |
|
2 |
Feature Identity |
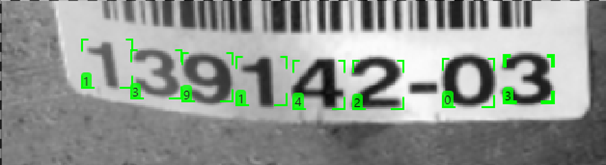
The images in your image set are either labeled or unlabeled. Labeled images are indicated by the presence of green graphics, either features or strings, on the display. In order to determine the performance of the Blue Read tool on your images, you need to be able to compare the characters identified by the tool with the actual character values in the image. The process of Labeling allows you to specify the positions and values of the characters in your images. Once your image set is partially or completely labeled, you can do two important things:
- You can compute statistical measures of the performance of the tool on your images, including Recall, Confusion, Precision and F-Score.
- You can perform incremental training of your tool. (You can improve your tool’s performance by giving it examples of how specific characters appear in your images.)
An extremely important consideration when labeling images is that if an image is labeled, all of the characters in the image should be labeled. If only some characters are labeled, this will invalidate the statistical measurements (since the tool will be finding “spurious” or “unexpected” characters), and it will also cause any incremental training to reduce, rather than improve, the accuracy of the tool (because any characters in an image that are unlabeled are assumed by the tool to not be characters).
Convert Features to Labels
The simplest method for labeling an image is to start with the features in the image that the tool has found. To convert all of the found features in an image into labels, simply right-click on the image and select Accept View. All of the yellow found features are replaced with green labels:

Green labels are similar to yellow features in several ways:
- You can click on them to select them.
- You can create a model from them (select one or more, then right-click on the image and select Create Model).
But green labels have some important differences from features:
- You can move them. If a found feature’s location is incorrect, you can reposition it as part of labeling.
- You can change the feature’s value. If a found yellow feature has the wrong character value (a ‘B’ for an ‘8’, for example), you can convert the feature to a label, select it, and simply type the correct value. Once the label has been corrected, the difference between the feature that the tool found and the label that you have created will be reflected in the tool’s performance statistics. In addition, when you incrementally train the tool, the correct value will be incorporated in the trained tool.
Direct Labeling
In addition to converting features to labels, you can also create labels by simply clicking on the image and typing the label value. If you click on the image and create a feature, but you do not specify the character value, the tool considers that an “Empty Feature” and will not allow you to train.
If you click on an unlabeled image that contains found features, the tool asks you what it should do with the found features in the image:

If you click Yes, the yellow found features are converted into green labels, and you can adjust their positions and change their character values as needed. If you click No, the found features are not converted. The found features are now shown in orange – this indicates that they should probably be converted to features.
Feature Label Graphics
This is how the tool indicates labeled characters that have not been matched with any model. Labeled characters are displayed in the color green.
Feature Parameters for Blue Read
The two Features parameters, Oriented and Scaled, are only available for the Blue Locate Tool and the Blue Read Tool. For the Blue Read tool, they are enabled by default, and cannot be disabled. In addition the Blue Read tool is set to use the Non-uniform option for the Scaled parameter.
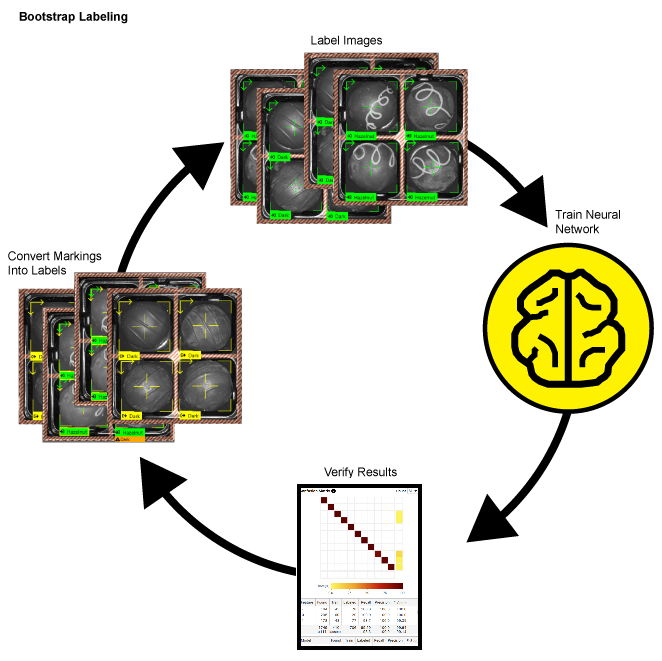
How to Label Fast: Bootstrap Labeling
You can consider using the bootstrap method of labeling your images to speed up the labeling process for each tool. "Bootstrap" labeling refers to the process of beginning your labeling process by just labeling a small sample size of your images, then training the tool, and reviewing the results by accepting views with correct markings to convert them into labels, and removing incorrect markings and replacing them with correct labels. You can speed up this process further by dividing images into multiple views and only labeling a single view. In addition, you can also temporarily reduce the Epoch Count in Training parameters, which will make the training time shorter.
- Label a few images in your Training Set.
- Train the tool.
- Review the images and results.
- Accept the views where the tool's markings are accurate (right-click and select Accept View, or Ctrl + Shift + A). This will change the marking into a label. For the Red Analyze tool in Supervised mode, you may have to edit the defect region. For markings that are inaccurate, clear the markings from the image (right-click and select Clear Marking, or Ctrl + C), and then add the correct label.