Get Data from an In-Sight Vision System - In-Sight 4.x.x Firmware
To get data from the In-Sight Explorer spreadsheet to a ControlLogix PLC, the data must be pushed into the EtherNet/IP stack by using the WriteEIPBuffer function. For more information, see WriteEIPBuffer.
This function takes a buffer of data created by the FormatOutputBuffer function and writes it to the data area in the In-Sight vision system's EtherNet/IP Input Assembly (input to the network). This data is then transferred to the PLC during the next RPI cycle. For more information, see FormatOutputBuffer.
The EIP buffer writes to this data area are queued, meaning that they do not happen during spreadsheet execution, but as a separate event slightly after the execution of the spreadsheet. This means that there is a small window of time during which an inspection will be complete, but a new buffer write will not have resolved.
It is important to use the ResultsValid bit to decide when to read data to prevent subtle intermittent timing issues in your PLC logic that can arise from this setup, as ResultsValid will only become high when data are ready to read, and not before.
EXAMPLE: Getting 32 Bit Integer Data from an In-Sight Vision System
The following steps explain how to format the data that will be sent from an In-Sight vision system to a ControlLogix PLC.
- To begin, using In-Sight Explorer, create a new job.
- From the Palette's Snippets tab, add these two Snippets to the spreadsheet: Acquisition > AcqCounter and Math & Logic > Random.
- Open the AcquireImage (A0) cell and set the Trigger parameter to Continuous.
- Right-click an empty cell and select Insert Function. From the left-side of the screen, expand the Input/Output category and double-click the FormatOutputBuffer function to insert it into the spreadsheet.
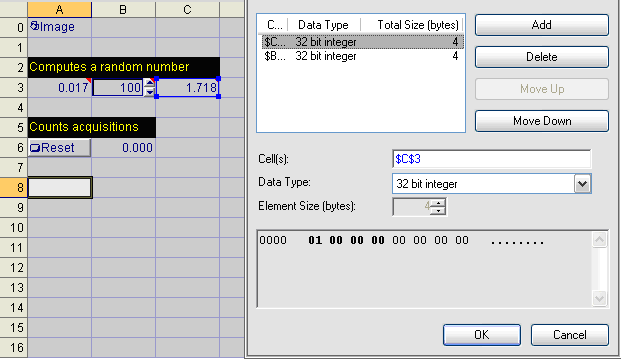
- From the FormatOutputBuffer dialog, click on the Add button. This will initiate the cell selection mode; select the "Scaled random number" cell of the Random snippet.
- From the FormatOutputBuffer dialog, use the Data Type pull-down menu to change the Data Type to 32 bit integer.
-
From the FormatOutputBuffer dialog, click on the Add button again. This will initiate cell selection mode; select the count cell of the AcqCounter snippet. For more information, see Cell Selection Mode.
- Close the FormatOutputBuffer by clicking the OK button.
- Right-click an empty cell and select Insert Function. From the left-side of the screen, expand the Input/Output category, click on the Network subcategory and double-click on the WriteEIPBuffer function to insert it into the spreadsheet.
- Set the WriteEIPBuffer function's Buffer parameter as a cell reference to the just created FormatOutputBuffer Buffer data structure.
- Place the In-Sight vision system Online.
-
The data should now be displayed in the Controller > Controller Tags node of RSLogix 5000.
 Note: The RSLogix Monitor Tags tab must be selected in order to display the data values.
EXAMPLE: Getting Floating Point Value Data from an In-Sight Vision System
If a floating point or a mix of equally sized data types needs to be sent, in ControlLogix create a User Defined Type. Copy the floating point data into the newly created User Defined Type from the In-Sight vision system's input tag.
The steps below illustrate how to copy two cells as floating point values:
- Place the In-Sight vision system Offline.
- Open the previously created FormatOutputBuffer function.
-
From the FormatOutputBuffer dialog, use the Data Type pull-down menu to change the Data Type from 32 bit integer to 32 bit floating point.
Note: Matching the Data Type being used by the vision system is not necessarily required. The bits are copied verbatim from the vision system's output buffers in the order that they appear in FormatOutputBuffer or the Format Outputs tab, regardless of the data type used to receive the buffer in the PLC. - Place the In-Sight vision system back Online.
- In RSLogix, go into Offline mode.
-
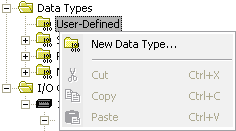
Within RSLogix, right-click on the Data Types > User-Defined folder and select New Data Type from the menu.
-
Give the new data type a descriptive name and add two floating point values to the Members: list.
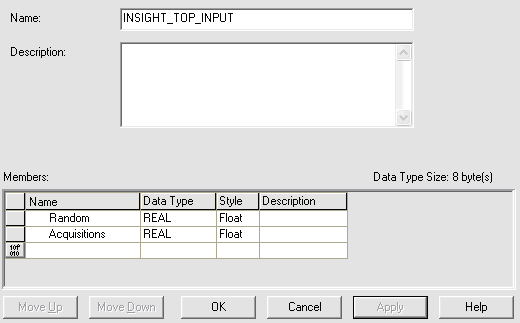
-
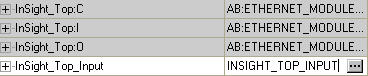
Next, add a new tag to the project's Controller Tags, using the user defined data type.
-
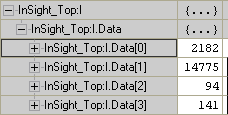
Finally, add a COP instruction to the MainRoutine ladder logic program, which will copy the data from the InSight_Top:I.InspectionResults[0] tag to the InSight_Top_Input tag.
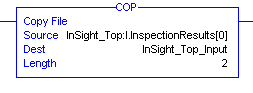 Note: The Length field is the number of the input structures that should be copied to the output. In this case, the input structures are 32-bit floating point values, so the COP command copies 64 bits from the vision system's output buffer into the user-defined type in the PLC. If we were using 16-bit integer types (INT)in the PLC's receiving buffers, then we would have used a length of 4 to get the same 64 bits, and if we were using 8-bit integer types (SINT), then we would have used a length of 8 to copy all 64 bits.
 -
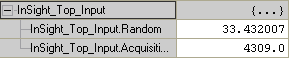
After this program has been downloaded to the ControlLogix PLC, the data from the Random and Acquisition Counter In-Sight Explorer spreadsheet cells will now appear in the InSight_Top_Input tag in the floating point format: