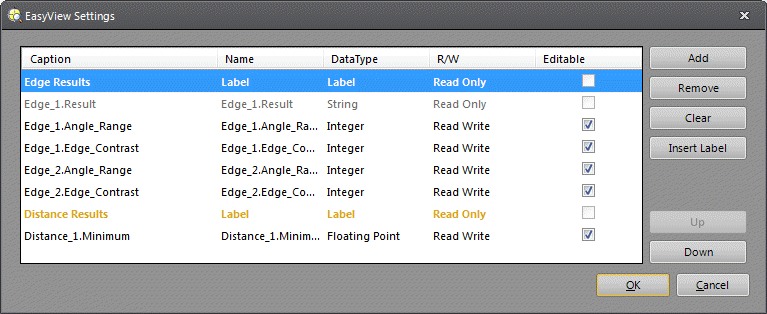
EasyView Settings Dialog
If using an HMI application, you can create an EasyView to customize how data is displayed and to determine if the data is editable by the operator. First, create the EasyView within In-Sight Explorer and save it with the job. Then, preview the EasyView using the VisionView PC Demo application on your PC, or the Web HMI to ensure it is configured correctly.
- The VisionView PC Demo has an automatic timeout of forty-five minutes. To purchase a licensed version that provides complete functionality and does not timeout, install the VisionView PC Software, which is available for download on the VisionView support site.
- The look-and-feel of the VisionView PC Demo will be slightly different than that of the VisionView Operator Interface Panel or VisionView VGA.
Configure an EasyView
- Select a cell in the spreadsheet that contains data you want to include in the EasyView.
- Create a symbolic tag for the cell. For more information on symbolic tags, see Symbolic Tag Editor.
- From the Symbolic Tag Editor, enable the In EasyView checkbox.
-
From the Edit menu, click EasyView Settings to open the EasyView Settings dialog. The item is automatically displayed in the EasyView Settings dialog.
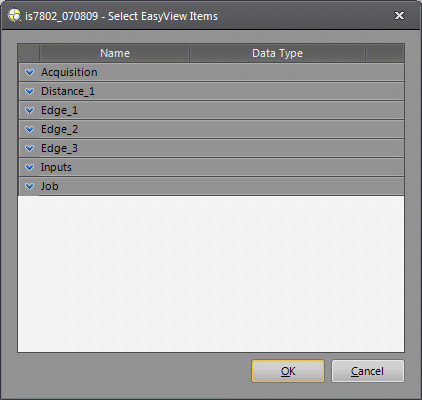
Note:- If the job contains symbolic tags that were previously defined, press the Add button to launch the Select EasyView Items dialog and manually add the items to the EasyView Settings dialog.
- If the job was originally created in EasyBuilder, the Select EasyView Items dialog automatically contains the data from any Location or Inspection Tools that were added to your job.
-
Optionally, enable the Editable checkbox to allow the operator to modify the item from VisionView.
Note: The item must have read-write permissions to be editable from VisionView. - Optionally, press the Insert Label button to create a header label. Labels are a useful way to group items.
- The Caption is the name that is displayed from the HMI application. You can modify the default Caption by clicking within the Caption field of the item or label, and entering a descriptive name. Hit the ENTER key or click outside of the Caption field to commit the change; press the ESCAPE key to cancel the change.
- Rearrange the way the items and/or labels are displayed by selecting them from the list and clicking either the Up or Down buttons to set the desired order.
- Save the job file.
-
To preview how the EasyView will be displayed, launch the VisionView PC Demo or the Web HMI.
Note: If the VisionView PC Demo is installed to your PC, the default installation directory is: C:/Program Files/Cognex/VisionView/PC Demo x.x.x. If the VisionView PC Demo is not installed to your PC, you can download the application from the VisionView support site. - Once the VisionView PC Demo or the Web HMI is launched, log off of the sensor.
-
If you use the Web HMI, you can preview the EasyView in the EasyView pane.
If you use the VisionView PC Demo, add your sensor to the Selected Sensors list, enter Run Mode and click the Switch View button to preview the EasyView.
Note:- To preview an EasyView, you must enable the EasyView options in the HMI View Selection dialog first.
- To preview an EasyView while logged onto an emulator, you must first add the emulator to the Selected Sensors list in the VisionView application.
EasyView Settings Dialog Controls
-
Add: Launches the Select EasyView Items dialog, to manually add items to the EasyView Settings dialog.
- Remove: Removes the highlighted item from the EasyView Settings dialog.
- Clear: Clears all items from the EasyView Settings dialog.
- Insert Label: Creates a header label to group items.
- Up: Moves the highlighted item up in the list.
- Down: Moves the highlighted item down in the list.