Format Cells Dialog
The Format Cells dialog is used to adjust the format of a single cell or a range of cells in the spreadsheet. Six tabs make up the Format Cells dialog: Number Tab, Picture Tab, Font Tab, Alignment Tab, Protection Tab, and Graphics Tab.
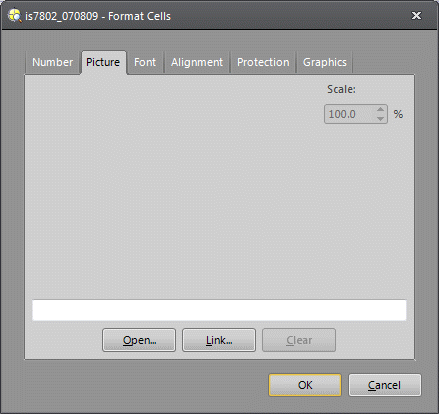
Format Cells Dialog Controls
To display the Format Cells dialog:
-
Highlight the cell or range of cells that you want to format.
-
On the Format menu, click Cells.

Number Tab
Click the Number tab to set the decimal place values of the numeric values in cells from 0 to 6 places. The default setting is 3.
Picture Tab
Click the Picture tab to insert a graphic into a cell to show icons, or other graphics, within the spreadsheet. The picture's file can either be saved with the job, using the Open button, or linked, using the Link button. The following file extensions are supported:
-
BMP
-
GIF*
-
ICO*
-
JPG, JPEG
-
WMF*, EMF*
-
TIF*, TIFF*
-
PNG*
-
EXIF
* Those marked with an asterisk support transparent regions; all others are fully opaque.
When a picture is inserted using the Open button, the size of the job file will increase by approximately the size of the picture file, since it is copied byte-for-byte into the job.

If the picture file size exceeds 20,000 bytes, the following warning message is displayed:

When a picture is inserted using the Link button, instead of stored with the job, the picture can be linked either from a local PC or from a shared network.

Once a picture has been linked, the file path is listed in the text box; this path is editable. This is useful to fix a link that cannot be found, such as when loading a job that was created on another computer.

If a file cannot be located, a red X will be displayed in the spreadsheet and the dialog.

If the path is edited, it must lead to a valid picture file or an error message is displayed. If this occurs, the path will revert to its previous value and the dialog will remain open.

The Scale number box allows the user to enter a scale factor from 1 to 1,000,000,000 percent. Underneath the number box, the effective size of the picture, based on the selected scale, is displayed.
To remove a picture from a cell, use the Clear button.
- If the picture does not fit in the cell, it will be cropped. To view the entire picture, adjust the Row Height and Column Width to enlarge the cell.
- Linking to a dynamically-changing picture file is not supported; if a file is modified outside of In-Sight Explorer, the original picture is still retained.
- When a picture is opened, the Scale is automatically set to a value that will make the picture fill 90% of the current cell's height or width, whichever is more constraining.
Font Tab
Click the Font tab to select the font, the font style (Regular, Italic, Bold or Bold Italic), the font size (8 to 72 point), the color of the text (Foreground color) and the color of the cell (Background color).
By checking the Default font checkbox, you will set your changes as the default settings for all of the cells in the spreadsheet.
- The list of available fonts depends upon the fonts loaded on the host PC. If a job is loaded onto a PC that does not have that font, the default font of that PC will be used instead.
- Changes to foreground and background colors are ignored for any cell containing the ColorLabel function.
- In some cases, the background color may be one grid line off, especially when there is a empty cell between two cells containing text. If this occurs, create a blank string (a cell containing only an apostrophe) in the empty cell to correct the background color formatting.
- If a cell containing a PlotString function is highlighted, the Font, Font Style and Font Size formatting is applied to the PlotString cell and the plotted text string.

Alignment Tab
Click the Alignment tab to align data in the cell(s) to the Left, Center or Right, horizontally or to the Top, Center or Bottom, vertically. To restore the default alignment, click General.

Protection Tab
Click the Protection tab to set cell protection.
Click the Locked checkbox to lock a single cell or a range of cells. Protecting a cell or a range of cells prevents the expression inside the cell(s) from being modified. Therefore you can still change the formatting of the cell(s). For the lock to take effect, the job must be protected. You can protect the job by clicking on the File menu and selecting Protect Job.
Enter a password in the Password field and again in the Verify Password field to hide the cell formulas.
- When a cell is locked, but the job is not protected, a yellow lock symbol
 will appear in the upper-left corner of the spreadsheet.
When a cell is locked and the job is protected, a red lock symbol
will appear in the upper-left corner of the spreadsheet.
When a cell is locked and the job is protected, a red lock symbol  will appear in the same location.
 - Entering a licensing password hides the cells formulas and prevents cell execution unless a license is added to the vision system using the Licensing dialog.
- Once a license is added, the cells execute and the results are displayed. Editing access to the cells is gained by entering the password in the Licensing dialog.
- Access is revoked when you either re-enter the password in the Protection tab or disconnect from the vision system.
- Licenses are generated using the In-Sight License Generator.
- The licensing procedure is explained in detail in Licensing.

Graphics Tab
Click the Graphics tab to format the line width of cell graphics and the scale of graphic overlay text. The formatting only applies to cell(s) containing a function that has an associated interactive graphic or result graphic.
- Line Width: Formats the line width (measured in pixels) for cell graphics. All graphics associated with the formatted cell(s) have the same line width. (1 - 5; default = 1)
- Text Scale Mode: Formats the scale for graphic overlay text. All text associated with the formatted cell(s) have the same scale. (default = General)
- General: The scale setting defined in the Job Display toolbar is used for the formatted cell(s).
- Scale with Image: As the image is zoomed in or out, the graphic overlay text is scaled proportionally with the image.
- Shrink Only: As the image is zoomed out, the scale of the graphic overlay text is decreased. As the image is zoomed in, if the graphic overlay text is smaller than the default font size (9 point), the scale of the graphic overlay text is increased until it reaches the default font size.
- Fixed: The graphic overlay text is a fixed size, regardless of the image zoom level.
Note:If General is the selected Text Scale Mode, the scale setting is not saved to the job file.
If Scale with Image, Shrink Only or Fixed is the selected Text Scale Mode, the setting takes precedence over the scale setting defined in the Job Display toolbar and is saved to the job file.
