How to Train a Font for the ReadText and VerifyText Functions
The OCV/OCR Font Training dialog allows you to add, modify or delete character models to create a user-trained font, which will be stored in the TrainFont function. This font is then used when reading or verifying text, using the ReadText and VerifyText functions, respectively.
- The TrainFont, ReadText and VerifyText functions are only available on In-Sight vision systems using In-Sight firmware 4.x.x, and are not available on In-Sight vision systems running In-Sight firmware 5.1.0 and later. For a complete list of models and supported firmware versions, see Firmware Versions.
- Cognex recommends that the OCRMax function be used instead of the ReadText, TrainFont and VerifyText functions, which are legacy functions. The OCRMax function has enhanced performance capabilities.
- A maximum of eight instances of each character may be extracted to train each character model in the font. By adding more character instances, you increase the variation tolerance of the corresponding character model in the font.
- A font may contain up to 255 character models, as well as 8 instances of a particular character; each model is assigned a single-character label. When either of these limits is surpassed, the In-Sight sensor will ignore any additional character models and they will not be added.
- An OCV/OCR application with little variation in character attributes from one image to the next may require only one instance of each character to be extracted. The number of character instances needed increases as greater tolerance to variations in character attributes is required.
- When the user interface Language is set to a value other than Chinese or Korean, OCV/OCR operations (including Delete and Relabel) will not function on character instances if the label contains Chinese or Korean characters. Set the user interface to the correct language for the characters contained in the label and retry the operation or use English characters in the labels.
- Multiple-byte character model names (e.g. Kanji) are not supported. Multiple-byte characters can be trained, but the character model name given to the character model must be a single byte name.
Open the Font Training Dialog
-
Right-click an empty cell and select Insert Function to open the Insert Function dialog.
-
In the left side of the Insert Function dialog, expand the Vision Tools list of tool categories.
-
Select the OCV/OCR tool category.
-
Select the TrainFont function from the function list and press the OK button or double-click the function name.
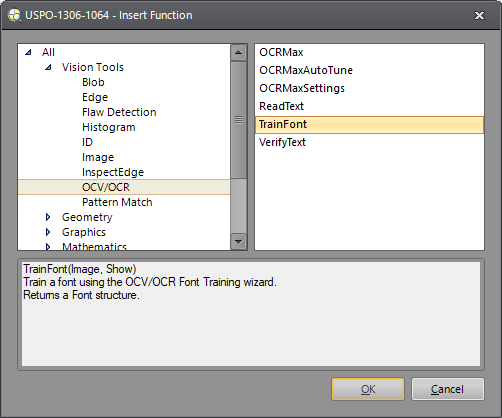
The Font Training dialog appears.
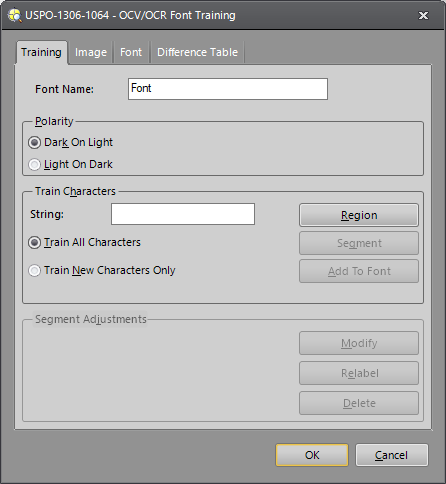
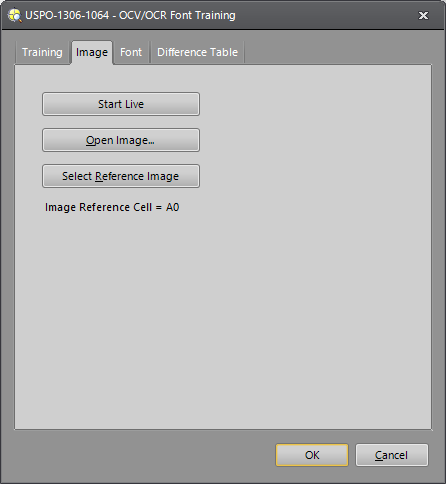
Image Tab
The Image tab allows you to obtain images that you will use to train the font. If the desired image is already loaded as the active image, proceed to the next section. Otherwise, you can obtain a valid image using any of the following methods:
-
Start Live: Places the sensor into Live Acquisition Mode to display a real-time image. Click Stop Live once the desired image has been acquired.
-
Open Image: Displays the Open dialog, which allows you to load an image from an In-Sight sensor, your local PC or a networked PC.
-
Select Reference Image: Enters Cell Selection Mode to reference an Image structure in the active job. (Spreadsheet View only)
-
Image Reference: Defines which image the tool will utilize to perform its inspection.
Training Tab
The Training tab allows characters to be extracted from an image to create models of each character.
- If an image filter is used while training the font, the same filter should be used when reading or verifying the font. Failure to do so will result in poor read/verify accuracy.
- If the font is embossed, better performance may be achieved by applying an Erode or Dilate filter (depending on if the font is black or white) to fill in the embossed center of the character strokes.
-
Choose a meaningful name for the font. Naming a font is useful when a job includes more than one Font data structure in the spreadsheet.
Note: The name of the font can be returned in the spreadsheet, using the GetFontName function.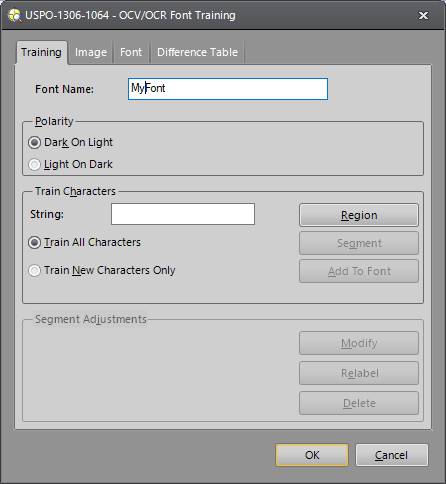
-
If the characters you wish to train are lighter than their surrounding background, you should choose Light on Dark for the Polarity. Otherwise, choose Dark on Light.
Note: Ensure that you set the correct Polarity for your characters before clicking the Add To Font button; Polarity cannot be changed once character models have been added to the font. -
By default, all characters will be added to the font, even if an instance of one or more of the characters already exists in the font. Click Train New Characters Only if you want to add only new characters to the font.
-
Enter the String that matches the first line of text containing the characters you wish to train.

-
Click the Region button.
-
Position and size the interactive graphic so that it encloses the characters to be trained.

-
Double-click within the region to accept the modifications.
-
Click the Segment button. The characters in the Region will be separated into individual character instances, based on the specified String.
-
If any of the characters have not been segmented correctly, click the Modify button to fine-tune the interactive graphic region for individual character instances. To adjust an incorrect segment, click on the segment Region and adjust the position and size to surround the correct character. Repeat this step until all segments are correctly positioned around the characters.
-
If any of the characters have not been labeled correctly, first verify that the specified String matches the characters in the image. If the String is correct, click the Relabel button. Double-click the mislabeled character to open the Relabel dialog. Enter the correct label and click OK.
-
If needed, click the Delete button to removes individual segments.
-
Once all characters have been segmented and labeled correctly, click the Add to Font button. An instance of each character in the selected line of text is added to the current font. Repeat these steps for each additional line of text containing characters to be trained.
Note:- Once characters have been added to the font, segments cannot be modified, relabeled or deleted.
- When possible,
do not add a single character to a trained font. Doing so eliminates spacing
information, which is important when reading the character in a string.
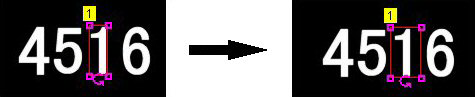
If you do need to train a single character use the following steps.
- After segmenting the character press the "Modify" button.
- Adjust the width of the character box to include space on each side of the character. The sides of the character box should be half way between the trained character and the character next to it, as shown.
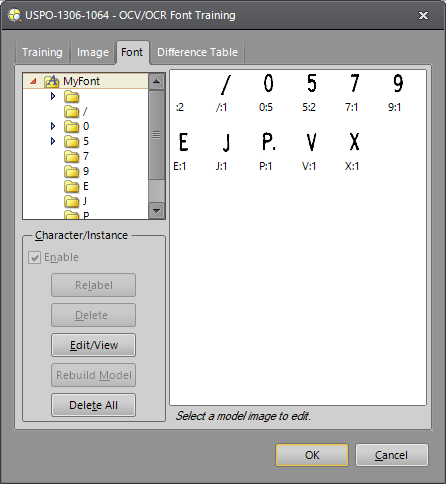
Font Tab
The Font tab is used to view and edit character models in a trained font. A character model is a composite character of a font, formed by taking into account all trained instances of that character.
Your font now contains several character models. Some of the models (such as "C" and "o") consist of multiple character instances. A character instance is a greyscale pattern used as an input to create an OCV/OCR model. All characters, including spaces and punctuation, are segmented and given character models.
At this point, you can browse through character models and delete, edit, rename or enable/disable any particular character model or character instance. For more information, see Image Editor.
When the root
level ![]() of the font tree is chosen, a model for each character
is displayed. If a character folder is selected within the font tree, the
composite character model (denoted with *) is displayed, along with any
instance of the trained character used to create the model (denoted with
an index number, starting at 0). Each instance of a trained character
is kept in a separate sub-folder.
of the font tree is chosen, a model for each character
is displayed. If a character folder is selected within the font tree, the
composite character model (denoted with *) is displayed, along with any
instance of the trained character used to create the model (denoted with
an index number, starting at 0). Each instance of a trained character
is kept in a separate sub-folder.
-
The Enable checkbox specifies whether a character model is used in the font, and which instances of each character are used to build the model. By default, this checkbox is enabled for all character models. To disable a character model or character instance, highlight the model or instance and disable the checkbox.
Note:- If the Enable checkbox is disabled for a character model, then all instances of that character will be disabled.
- Disabled character instances do not factor into the resultant character model.
-
If a character model or character instance is incorrect, highlight the mislabeled model or instance and click the Relabel button to correct the label. If a character model is selected, Relabel will change the name of every instance within that model. If a single character instance is selected, then only that instance will be relabeled, moving it to the corresponding character model folder.
-
To delete a character model, or individual character instances from a character model, highlight it and click the Delete button.
Note: Deleting a character model will permanently delete all trained instances of that character. -
Click the Edit/View button to launch the Image Editor to view a close-up of the selected character model or character instance. Character models can be edited; character instances can only be viewed. A character model that has been edited is denoted with * next to the folder in the font tree.
Note: Use the Image Editor sparingly. You will achieve better results by using good examples of the font than editing poor examples. - If you are unsatisfied with the manual edits made to the character model, you can click the Rebuild Model button to rebuild the selected font character and remove all manual edits made using the Image Editor.
- To start over, and remove all character models and instances from the font, click the Delete All button.
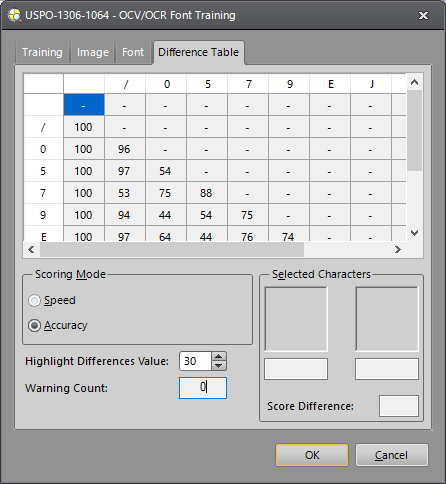
Difference Table Tab
The Difference Table tab displays the difference of the scores for the two selected characters, comparing each character model with all other models. The row and column headers define the character labels, as they were defined when characters were trained. The higher the Score Difference between two characters, the less likely it is that those characters will be confused for one another during the inspection. This data is useful because it indicates any weaknesses in the trained font that could negatively impact performance. In the example below, the score difference between the character models for "e" and "C" is significantly higher at 95, indicating that it is very unlikely these two characters would ever be confused for the current font. At the other extreme, the score difference between the character models for the "o" and "e" is only 27. Thus, this character pair is more vulnerable to confusion.
-
Specify the Scoring Mode difference table to display (Speed or Accuracy). As mentioned previously, the higher the difference score, the less likely the two selected characters will be confused as being the same character during the inspection.
Tip: The scores returned in the Difference Table can be a good indication of whether to use Speed or Accuracy for the Reading Mode parameter selection in ReadText/VerifyText. -
Enter a value in the Highlight Differences Value field. All character model comparisons scoring at or below the Differences Value will be highlighted in yellow, indicating which character model pairs are most likely to be confused for one another. Click the up/down arrow buttons to increase or decrease the threshold for highlighting score differences or type in the value. The Warning Count updates to indicate the number of character model comparisons scoring below the Differences Value. The count depends on the threshold specified for Highlight Differences Value.
-
Click on each yellow highlighted pair to view the character models side-by-side. The Selected Characters field displays the models of each character being compared. The Score Difference displays the difference of the scores for the selected characters. The comparison may reveal that the character models were not trained correctly or that the character models were trained under poor imaging conditions or using low quality characters.
Note: If a character has been disabled in the Font tab, no score will be displayed.