TestRun™ - Spreadsheet View
After connecting to the desired In-Sight vision system and loading the appropriate .job file to the vision system, TestRun configuration may begin. TestRun is configured using the TestRun Setup dialog, which offers a step-by-step series of screens to program TestRun. A navigational pane is provided on the left side of the dialog, from which any of the setup screens can be selected.
- Configure the Job's Pass/Fail Cell
- Create Symbolic Tags
- Image Database Folder
- Variant Configuration
- Job/Variant - Setup Actions
- Job/Variant - Limit Tests
- Job/Variant - Image Selection
- Job/Variant - Defect Tests
- Hardware Tests - Setup Actions
- Hardware Tests - Tests
- Cleanup Actions
Once the TestRun Setup dialog has been configured, return to the Palette and use the buttons to:
-
 New: Create a new TestRun test.
 -
 Configure: Launches the TestRun Setup dialog.
 -
 Run: Execute an existing TestRun test.Note: For In-Sight vision systems running In-Sight firmware 4.10.x, or In-Sight firmware 5.6.0 and greater, TestRun can also be initiated by an external device, such as a PLC via EtherNet/IP Communications or PROFINET Communications.
 -
 Repair: Repair a broken test or value.
 -
 Import: Import a previously created test.
 -
 Export: Export a test.
 -
 Batch Run: Launches the Batch Run dialog, which is used to configure TestRun to execute on a batch of .job files. For more information, see Batch Run.
Display TestRun
-
In the Palette, click on the TestRun™ tab.
Note: If the Palette is not visible, from the View menu, select Palette. - Press the Configure... button to launch the TestRun Setup dialog.
- Once all of the TestRun Setup dialog steps have been configured, press the Run button in the TestRun tab of the Palette to execute the tests.
Configure the Job's Pass/Fail Cell
When using TestRun in the Spreadsheet View, a cell must first be configured with an overall Pass/Fail tag for the job, which indicates the success or failure of the machine vision inspection. While technically it is not necessary to configure a Pass/Fail cell for the job, tagging a cell to record the job's overall Pass/Fail has a couple of advantages:
- The Pass/Fail cell allows the Cognex VisionView Application to identify passing and failing images, and color code them, accordingly.
- TestRun combines the job's Pass/Fail cell information with the identification of "failing" images to construct and configure a defect test for the job's Pass/Fail status, and the expected result for each image.
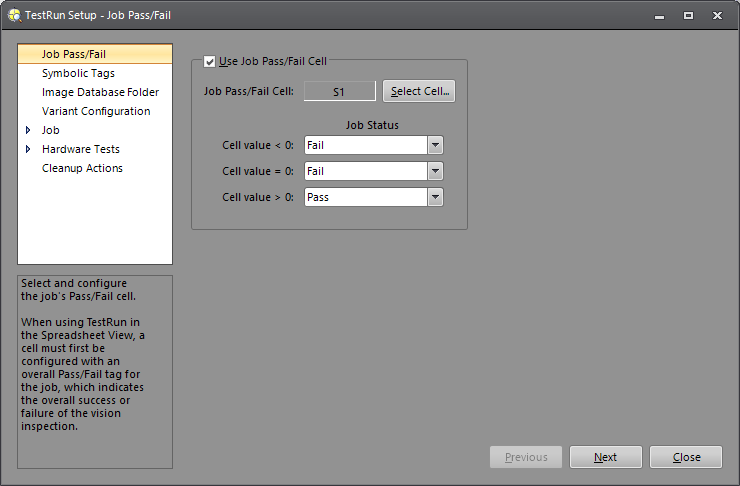
- Ensure that the Use Job Pass/Fail Cell checkbox is enabled (by default, it is enabled).
- Press the Select Cell button to enter cell selection mode and select the cell that will be used as the job's Pass/Fail cell. For more information, see Cell Selection Mode.
- Set the three Job Status settings to indicate the proper status of the job, dependent on the state of the Pass/Fail cell (negative, zero or positive).
- Press the Next button to continue the TestRun setup.
Create Symbolic Tags
TestRun relies on symbolic tags, instead of cell locations, to reference functions and tools in the job (symbolic tags allow the job developer to move cells without affecting TestRun). Therefore, all values that will be used by TestRun must have a symbolic tag. If the job was developed in the EasyBuilder View, symbolic tags will already exist for all the values that can be tested, and this step is skipped if accessed from the EasyBuilder View. For jobs developed in the Spreadsheet View, symbolic tags must be created.
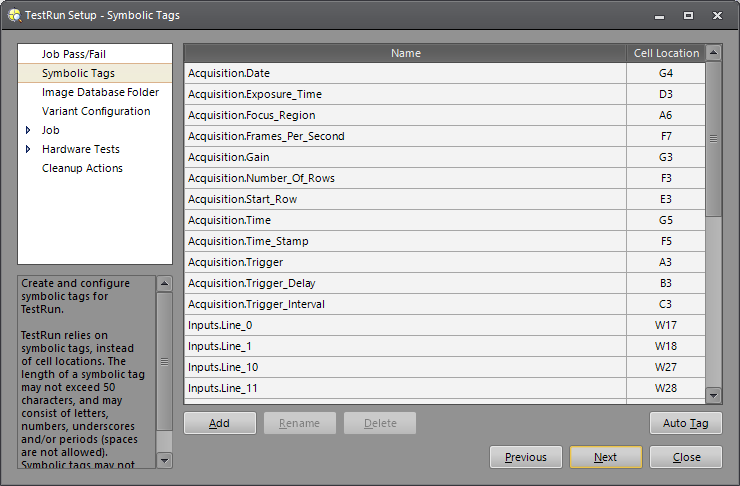
There are two options for creating symbolic tags in the Spreadsheet View:
- Manually adding and tagging the desired cells.
- Using the Auto Tag feature to automatically tag supported cell types.
Manually Add Symbolic Tags
- Press the Add button to enter cell selection mode and select the cell that will be associated with a symbolic tag. For more information, see Cell Selection Mode.
- TestRun will assign the selected cell a symbolic tag in the format of: "_Cell_<loc>", where <loc> is the cell location, e.g. B52.
- TestRun will select the new symbolic tag and the tag can now be edited.
-
If desired, rename the tags to something applicable for the application. Select the desired tag, press the Rename button, type in a new name and press the ENTER key to accept the change.
Note: Renaming symbolic tags in TestRun will change the name of the symbolic tag in the Spreadsheet. - Repeat steps 1 through 4 until all the desired cells have been added.
- Press the Next button to continue the TestRun setup.
Automatically Add Symbolic Tags
By pressing the Auto Tag button, TestRun will automatically examine the job and create symbolic tags for the following types of functions:
- Button: Inserts a labeled push button control into the spreadsheet. Optionally, a button press can be configured to signal a spreadsheet event trigger. For more information, see Button.
- CheckBox: Inserts a labeled checkbox control into the spreadsheet. For more information, see Button.
- ListBox: Inserts a drop-down list control in the spreadsheet. For more information, see ListBox.
- EditInt: Inserts an integer edit control into the spreadsheet. The control works like all other In-Sight interactive numeric input controls. For more information, see EditInt.
- EditFloat: Inserts a floating-point edit control into the spreadsheet. The control behaves like other interactive numeric input controls. For more information, see EditFloat.
-
EditString: Inserts a text edit control into the spreadsheet. The EditString control works like other interactive text input boxes. For more information, see EditString.
- Press the Auto Tag button.
-
TestRun will locate and tag cells which contain the above mentioned functions. If a function is within a Dialog function, it will be prefixed with the Dialog function's name (e.g. "DialogName"_EditFloat). If a function is within a Custom View, it will be prefixed with "Custom_View."
Note: If a desired function was not automatically added, manually add the function using the Add button. - If necessary, unwanted tags may be removed by selecting the tag and then pressing the Delete button.
-
If desired, rename the tags to something applicable for the application. Select the desired tag, press the Rename button, type in a new name and press the ENTER key to accept the change.
Note: Renaming symbolic tags in TestRun will change the name of the symbolic tag in the Spreadsheet. - Press the Next button to continue the TestRun setup.
Image Database Folder
Once the job's overall Pass/Fail cell has been set and symbolic tags created, the next step in the TestRun Setup is the Image Database Folder.
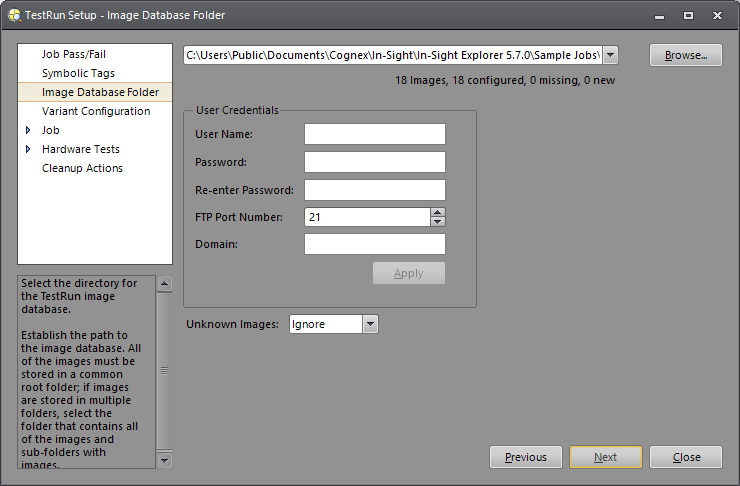
During this step, the path to the test image database is established. The directory path must use one of the following formats:
- C:\TestRun\BracketJob
- file:///\\TestRun\BracketJob
- ftp://TestRunServer/BracketJob
- ftp://10.28.127.73/BracketJob
All of the images must be stored in one common root folder; if images are stored in multiple folders, select the folder that contains all of the images and sub-folders with images. While TestRun is able to accommodate different file structures, it is recommended to use the following type of structure:
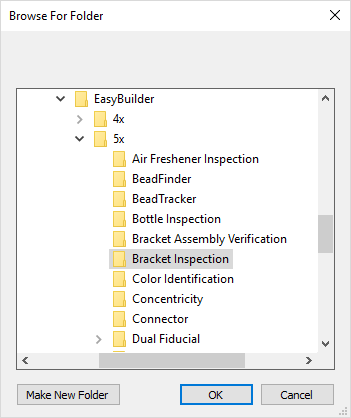
Using this type of structure, the "Bracket Inspection" folder would be selected.
Finally, set the Unknown Images drop-down menu (Ignore, Assume Pass or Assume Fail; default = Ignore). The Unknown Images drop-down is used to determine how TestRun should process images that have not been explicitly added to TestRun during the Image Selection step.
- Set the drop-down to Ignore to allow TestRun to simply ignore any images which were not configured.
- Set the drop-down to Assume Pass to have TestRun assume that the images will cause the job to pass.
- Set the drop-down to Assume Fail to have TestRun assume that the images will cause the job to fail.
Select the Folder for the TestRun Image Database
- Press the Browse button.
-
Use the Browse for Folder dialog to navigate and select the desired image folder. Press the OK button after selecting the folder.
Note:- If an image folder has already been accessed, it can be selected using the drop-down menu.
-
For vision systems configured for signal-driven TestRun, the Image Database Folder must be configured to use an FTP server, and must have a password of at least 5 characters.
-
If necessary, enter the User Name and Password required to access the image directory.
Note: When configuring TestRun's Image Database Folder, if the job developer has accessed (using their own specific User Credentials), the folder to be used by TestRun with another application (e.g. Windows Explorer is being used to view the images in the network folder), and different User Credentials are supplied (e.g. a generic User Name and Password that is to be used by operators on the line), TestRun will be unable to access the folder. To recover from this scenario, close the other application accessing the folder, and close and re-open the TestRun Setup dialog, as well. - If necessary, enter the Domain information.
- Press the Next button to continue the setup of TestRun. After leaving this step, TestRun will automatically search the image directory for .jpg and .bmp image files.
- If this step has been configured before, TestRun will retain the information about the files stored in the directory. If the location of the images has changed, TestRun will attempt to match images based on their paths, relative to the image location, transferring properties of the images for each match.
-
Once the folder has been established, below the drop-down menu, TestRun displays:
- A count of the total number of images in the folder.
- The number of images that have previously been configured in the Job-Image Selection screen.
- The number of images that are no longer in the folder that were there when previously configured.
- The number of newly added images to the folder since last being configured.
Variant Configuration
A job may contain one or more inspections. Each of the separate inspections in the job is considered a job variant. For example, to avoid repeatedly changing jobs over time, jobs are created to handle multiple products. Each of those separate inspections may be considered a job variant.
Typically, different variants are selected by an external input (e.g. a command from a PLC). Each variant may have its own set of Vision Tools, different search regions, different exposure settings, etc. TestRun is designed to test all of the variants in a job.
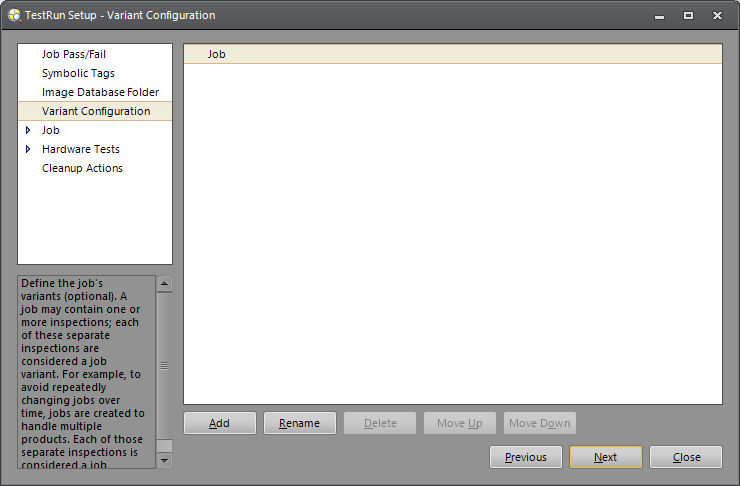
Add a Job Variant
-
By default, a variant named "Job" has automatically been added.
Note: The name can be changed by selecting the desired variant, pressing the Rename button and then typing a new name. After the name has been changed, it will automatically be updated in the configuration steps pane. - Press the Add button to create a new variant.
- Press the Next button to continue the setup of TestRun.
Reordering job variants
- Select a variant.
- Press either the Move Up or Move Down button, depending on the desired direction.
- Press the Next button to continue the setup of TestRun.
Job/Variant - Setup Actions
Before beginning its tests, TestRun may need to set some of the job's parameters to mimic the behavior that an operator may perform when setting up a particular variant to run. Generally, if a job has multiple variants, some amount of configuration will be necessary to prepare the job for the selected variant. Before TestRun can process images for a particular variant, it must first set the state of the job accordingly. The Setup Actions step is used to configure the parameter settings needed for the selected variant's images.
The Setup Actions screen consists of two columns:
- The Symbols column that contains a list of all of the symbolically tagged job settings.
- The Setup Actions column that displays all the job's parameter settings that TestRun will set.
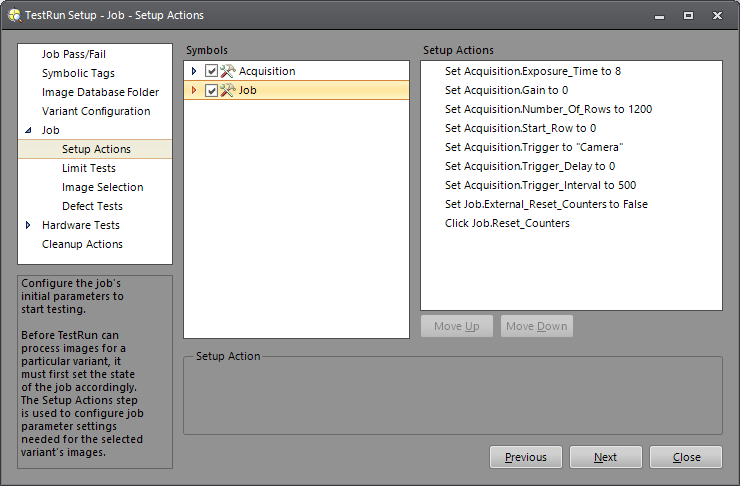
Configure the Job Settings to Test the Current Variant
-
Select a parameter setting from the list in the Symbols column. If necessary, expand the list to display all parameter settings for the selected category.
Note: Selecting the setting will highlight the parameter in the Spreadsheet. - Enable the setting by checking the checkbox beside the setting. TestRun will auto-populate the Setup Actions column with the setting.
- Once the setting has been enabled, select it in the Setup Actions column and the setting's edit control will appear below the two columns.
- Adjust the setting as needed.
- If there are multiple settings, use the Move Up/Move Down buttons to configure the settings in their desired order of execution. TestRun will perform the setup actions in the order in which they appear in this screen.
- Press the Next button to continue the setup of TestRun.
Job/Variant - Limit Tests
Machine vision applications may include many parameters, which are adjustable by machine operators and maintenance technicians, over the course of time. TestRun Limits Tests allow the vision application developer to select adjustable parameters to test, establish the upper and lower limits for those parameters, and quickly determine whether those parameters are still within their established limits. Utilizing TestRun versus hard-coding limits, for instance, allows the developer to provide flexibility to the operators and technicians to make adjustments to keep the system functioning, while still being able to see when parameters are out of range.
The Limits Tests screen is used to setup tests of editable parameters' limits, and consists of two columns:
- The Symbols column that contains a list of all of the symbolically tagged job settings.
- The Limit Tests column that displays all of the job's parameter settings that TestRun will test.
Select and Configure the Variables for Testing Limits
-
Select a parameter setting from the list in the Symbols column. If necessary, expand the list to display all parameter settings for the selected category.
Note: Selecting the setting will highlight the parameter in the Spreadsheet. - Enable the setting by checking the checkbox beside the setting. TestRun will auto-populate the Limit Tests column with the setting.
- Once the setting has been enabled, select it in the Limit Tests column and the setting's edit control will appear below the two columns.
- Adjust the setting as needed. The type of test available depends on the type of editable parameter:
- EditInt: Is In Range
- EditFloat: Is In Range
- EditString: Is Equal
- ListBox: Is Equal
- CheckBox: Is Equal
- Press the Next button to continue the setup of TestRun.
Job/Variant - Image Selection
During this screen of the setup, images that will be used during the tests for the particular variant are selected and defined as either "good" or "bad", i.e. a "good" image should result in a Pass condition, whereas a "bad" image will result in a Fail condition.
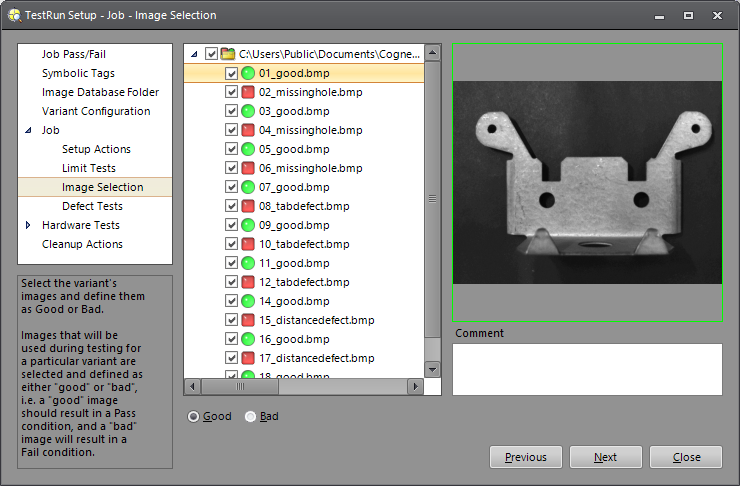
Select the Images for the Variant, and Define the Images as Good or Bad
- Using the tree control, expand the directory of images.
- If the directory contains a mixture of "good" and "bad" images, select each individual image by enabling it and then defining it as "Good" or "Bad" using the selectors below the directory. If desired, add a comment about the image, as well.
- If the directory has been separated into directories containing "Good" and "Bad" images, by enabling the top level, all of the images within that group will be enabled and share the same classification (Good or Bad) as the top level.
- Press the Next button to continue the setup of TestRun.
Job/Variant - Defect Tests
In the Defect Tests screen, images and their expected defects are associated together, creating a database of expected results for each image in the database. From this screen, Defect Tests are configured by selecting which defects (if any) are present for each image, and associating the defect with the expected result of a job's parameter(s).
In the initial, default configuration, the Job Fail defect will exist for each image; it will automatically be enabled for all of the images designated as "bad" images. When a defect is checked (enabled), it indicates that the defect is present for that image. Defect tests are helpful in determining why a vision application may be incorrectly passing or failing an image. Many vision applications perform several inspections on an image, and cumulatively they produce an overall Pass/Fail result. TestRun allows the vision designer to not only determine if an individual image passes or fails, but it also ensures that the specific defects that are supposed to be detected, are in fact, detected.
For example, if a part is determined to be "bad" because it is missing a hole, TestRun will help verify that the part results in a Fail because the job determined the part was missing the hole. If the part with the missing hole results in a Fail because the tool that was used as a fixture had a search region that was large enough to identify and capture the missing hole, and it was not the tool programmed to identify the missing hole, the job's logic was not performing correctly, and TestRun can be used to identify that discrepancy.
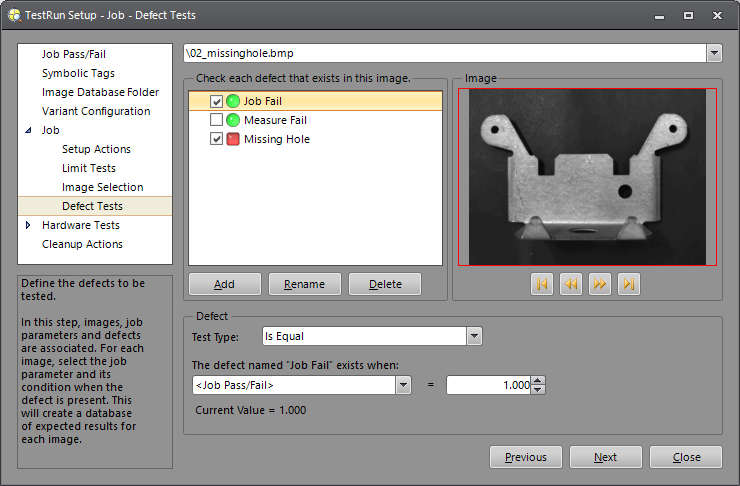
Define the Defects to be Tested
- Select an image.
- Set the default Job Fail defect.
- Add additional defects as needed, and define their expected results.
Select an Image
-
To begin, first select an image by using the image playback buttons in the Image group box. Press the Next Image button to advance the image.
Note: TestRun uses the images defined in the Image Selection step. - TestRun will display the image in the Image group box, and in the Spreadsheet View. The folder containing the image and the name of the image will be displayed in the drop-down at the top of the screen.
- TestRun will also update the expected results for any previously defined defects.
Set the Job Fail Defect's Expected Result
- By default, the Job Fail defect is automatically added and enabled (the checkbox is checked). The Job Fail defect defines the expected results that determine whether or not the overall job returns a failure.
- To define the Job Fail defect, in the Defect group box, use the drop-down menu below the "The defect named "xxx" exists when:" text to select the desired symbolic tag (by default, "<Job Pass/Fail>" is selected. Job Fail is not a symbolic tag, but tests the cell which is configured as the Job Pass/Fail cell).
- Set the Test Type drop-down menu to the appropriate setting for the selected symbolic tag.
Add Additional Defects and Define the Expected Results
- Press the Add button.
-
TestRun will add a defect with the default name, "Defect." By default, the newly added defect will be enabled (the checkbox will be checked).
Note: If a defect has already been added and the default name was unchanged, TestRun will increment the name (e.g. "Defect01", "Defect02", etc.). Press the Rename button to edit the default name and assign a more descriptive name to the defect. - In the Defect group box, use the drop-down menu below the "The defect named "xxx" exists when:" text to select the desired symbolic tag.
- Set the Test Type drop-down menu to the appropriate setting for the selected symbolic tag.
- Use the enabled edit controls to configure test, if necessary.
- Repeat steps 1 through 4, as needed, to add additional defects.
Edit a Defect
- Select a defect from the list.
- In the Defect group box, use the drop-down menu below the "The defect named "xxx" exists when:" text to select the desired symbolic tag.
- Set the Test Type drop-down menu to the appropriate setting for the selected symbolic tag.
Hardware Tests - Setup Actions
Before TestRun can test to ensure that the In-Sight vision system is acquiring the correct image, it must first set the state of the job accordingly. This screen is used to enable parameter settings prior to testing, verifying that the vision system is acquiring the correct image.
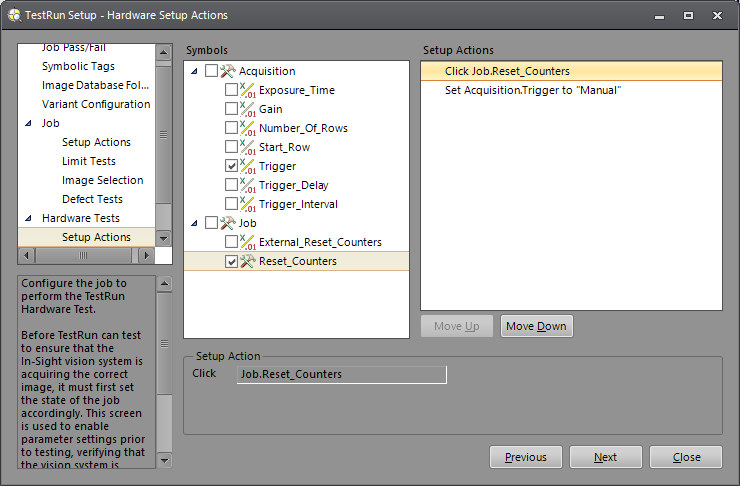
Configure the Job to Perform the TestRun Hardware Test
-
Select a parameter setting from the list in the Symbols column. If necessary, expand the list to display all parameter settings for the selected category.
Note: Selecting the setting will highlight the parameter in the Spreadsheet. - Enable the setting by checking the checkbox beside the setting. TestRun will auto-populate the Setup Actions column with the setting.
- Once the setting has been enabled, select it in the Setup Actions column and the setting's edit control will appear below the two columns.
- Adjust the setting as needed.
- If there are multiple settings, use the Move Up/Move Down buttons to configure the settings in their desired order of execution. TestRun will perform the setup actions in the order in which they appear in this screen.
- Press the Next button to continue the setup of TestRun.
- After performing the programmed Setup Actions, TestRun will automatically trigger the In-Sight vision system to acquire an image.
Hardware Tests - Tests
This step is used to configure tests to ensure that the acquired image is correct. By associating specific job parameters and their expected results with the image, TestRun can determine if the image produces the correct result. For example, a dirty lens may lead to blurry, spotted or darker images; the Field of View (FOV) of an In-Sight vision system may change if the vision system is accidentally bumped; or the focus or aperture on the lens attached to the vision system may change over time due to vibrations. All of these scenarios can be tested by associating a job parameter with an expected result; if the expected result is not returned, there's an issue with the image formation.
To determine if the FOV is correct, features from the part (or the background without the part) can be used. If the features are not present in the image, the FOV has changed. For parts placed in a fixture prior to inspection, features in the four corners of the fixture can be used to establish the proper FOV; if any features are missing, the FOV has changed, or if they're too close or too far apart, the distance between the In-Sight vision system and the FOV may have changed. If the features should form a rectangle, but instead form a non-rectangular quadrilateral, then it's possible that the vision system was knocked off-axis, and is introducing perspective distortion.
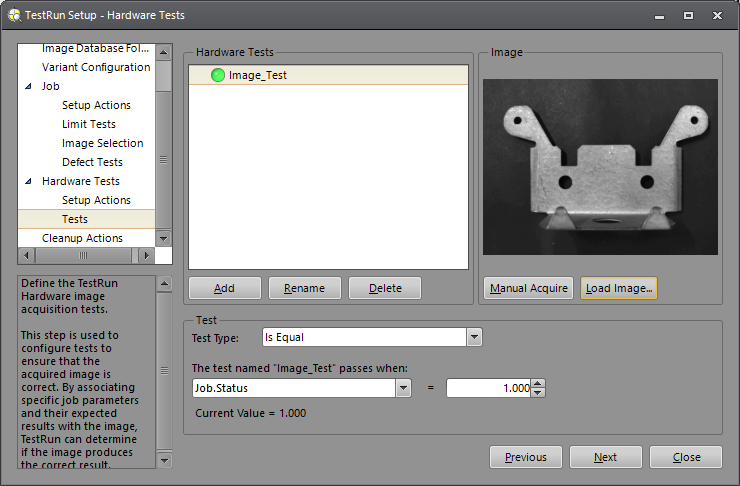
Define the TestRun Vision System Image Acquisition Tests
- Acquire an image.
- Add and configure tests, as needed.
Acquire an Image
- Below the Image group box, press the Manual Acquire button to acquire an image from the In-Sight vision system.
- TestRun will display the image in the Image group box, and in the Spreadsheet View.
Add and Configure Tests
- In the Hardware Tests group box, press the Add button.
-
TestRun will add a test, with the default name "Test", and place the test in the Test group box, where it is ready to be configured.
Note: If a test has already been added and the default name was unchanged, TestRun will increment the name (e.g. "Test01", "Test02", etc.). Press the Rename button to edit the default name and assign a more descriptive name to the test. - In the Test group box, use the drop-down menu below the "The defect named "xxx" exists when:" text to select the desired symbolic tag.
- Set the Test Type drop-down menu to the appropriate setting for the selected symbolic tag.
- Repeat steps 1 through 4, as needed, to add additional tests.
Cleanup Actions
Once testing has been completed, it may be necessary to set the state of the job accordingly. This step defines the setup actions necessary to set the job into the desired state once TestRun has completed its tests.
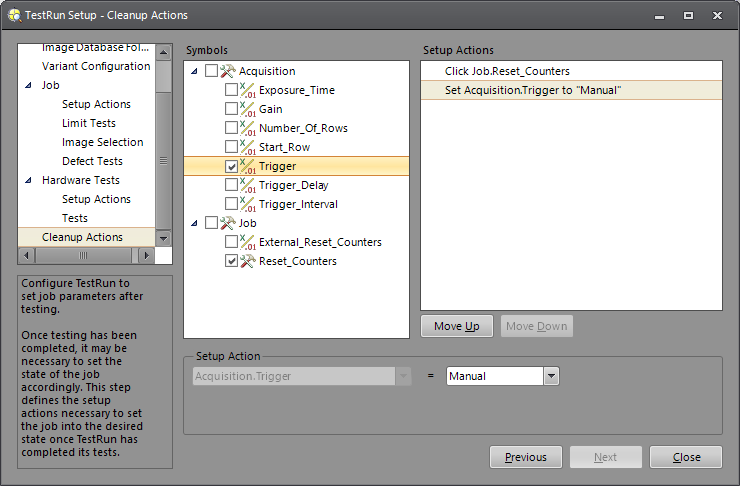
Configure TestRun to set Job Parameters after Testing
-
Select a parameter setting from the list in the Symbols column. If necessary, expand the list to display all parameter settings for the selected category.
Note: Selecting the setting will highlight the parameter in the Spreadsheet. - Enable the setting by checking the checkbox beside the setting. TestRun will auto-populate the Setup Actions column with the setting.
- Once the setting has been enabled, select it in the Setup Actions column and the setting's edit control will appear below the two columns.
- Adjust the setting as needed.
- If there are multiple settings, use the Move Up/Move Down buttons to configure the settings in their desired order of execution. TestRun will perform the setup actions in the order in which they appear in this screen.
- Press the Close button to complete the setup of TestRun.
- After closing the TestRun Setup dialog, in the TestRun tab of the Palette, press the Run icon to execute the TestRun test(s).