Configure Sampling Parameters
Unlike other tools, when you use the Blue Read, you need to configure the Sampling parameters before labeling because these parameters affect the size of character feature labels you place on each view.
Configure Sampling Parameters
Features are the pixels in your image data you are interested in and, at the same time, the pixels that are critical for solving your machine vision problem and achieving your specific goal. For example, the features can be the pixels that represent alphabetical or numeric characters in a view for a Blue Read tool.
How Features are Sampled
Green Classify in Focused mode, Red Analyze in Focused mode, Blue Locate and Blue Read tools do not sample the input images uniformly (although the image sampling does cover the entire image extent). During training, the tools use a special technique to selectively sample at a higher rate those parts of the images that are determined to be more likely to contribute additional information to the network.
Because the network training is performed using both information within the sample region and contextual information from around the sample region, the tool can be strongly influenced by samples collected at the edge of an image. If you are using a view within an image, then the context information for samples collected at the edge of the view will use pixels from outside of the view for context data.
|
|
|
|
|
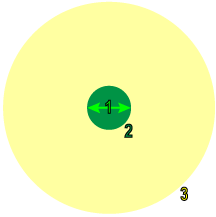
1 |
Feature Size |
|
|
2 |
Sample Region |
|
|
3 |
Context Region |
|
If the sample is at the edge of the image itself, the tool will generate synthetic pixels for use as context. You can control the specific method used for this through the use of masks, borders, and sample color channels (via the Border Type and Color , respectively).
The tools also allow you to provide masks for use during sampling. This allows you to explicitly exclude parts of the image from training, although even masked regions are considered as context, depending on the Masking Mode parameter setting.
Finally, if you are using color images (or any image with multiple planes or channels), you can explicitly specify which channels are sampled. Using multiple channels has a minor impact on training and processing time, but it can allow the tools to work more accurately in cases where color provides important information in the image.
Sampling Parameters
For Focused Mode tools, you need to specify in detail how your features are like as much as possible to effectively teach your tool about them. This specification is achieved by configuring up Sampling Parameters. A Focused tool uses a feature sampler which samples pixel information from a view, and by configuring up Sampling Parameters, you tell this feature sampler about the properties of the features that should be sampled or not.
The Sampling tool parameters control the way that images are sampled during training and processing.
| Parameter | Description |
|---|---|
|
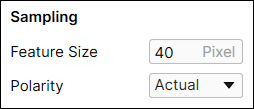
Feature Size |
Specifies the typical feature diameter, in pixels. The Feature Size parameter is graphically displayed in the lower left of the image, and can be graphically resized within the image to set a more accurate size. Feature size strongly influences processing time (n2), in other words,, a Feature Size of 100 is 100 times faster than a size of 10, while a Feature Size less than 15 usually does not yield good results. When setting the Feature Size, consider the following in regards to Processing time (Ptime):
Note:
|
|
Polarity |
The Blue Read tool was pre-trained on a set of images with a consistent text and background polarity, in other words, dark text on a light background, if you happen to have a data set of images with an inverse polarity, you will need to change the polarity by selecting Inverted from the Polarity drop-down menu.
When this parameter is set to Inverted, the images in the Images display, as well as in the main display, will show the corrected polarity. Note: This change in polarity only applies to the Blue Read tool, and any subsequent tools chained to it will keep the original image greyscale polarity.
|
|
Border Type |
Specifies how pixels on the outside of the image are sampled. Tip: Adding an additional mask at the boundaries of the image highly reduces the false detection rate.
|
|
Masking Mode |
Specifies how a mask will be applied to the sampled image. A mask is used to limit areas of the image processed by the tool. Note: Masks can be set after training, however, setting them prior to training will help the learning phase.
|

Sampling Parameter Details: Feature Sampling and Feature Size
Green Classify in Focused mode, Red Analyze in Focused mode, Blue Locate and Blue Read tools analyze images based on the Feature Size that you specify. The feature size, which is based in pixels, functions as a hint to the tool about the expected size of "meaningful" or "distinctive" features in the input images. The best method for selecting a feature size is to examine the input images as if you were a human inspector. Note the features in the image that you would use to characterize the image as good or bad, to identify a defect or problem, or to determine where something was and what it was.
For example, if you were attempting to classify pictures of airplanes based on the number of engines, the feature size would be based on the approximate size of an airplane engine.
During both training and runtime, the tool will collect samples from the image that correspond to the pixels within a subregion of the image, as well as contextual information around that region. The contextual region is approximately five times the feature size.
|
|
|
|
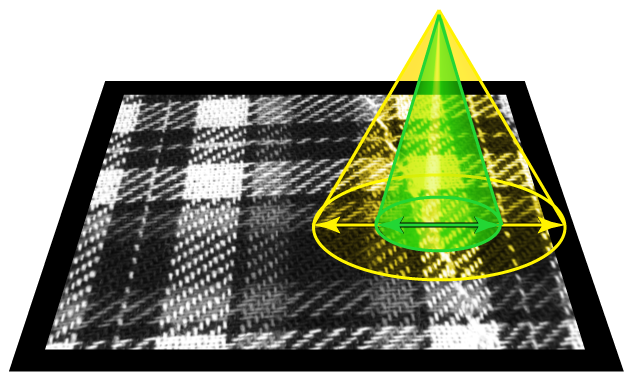
1 |
Feature Size |
|
2 |
Sampling Region |
|
3 |
Context Region |
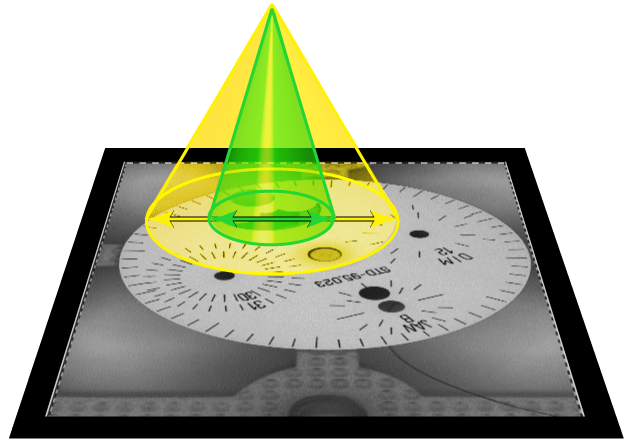
Specifying a feature size is a subjective judgment, although there are a few specific guidelines to follow. For the Blue Read tool, the feature size should be approximately the size of the bounding box of a typical "A" or "E" character.
Sampling Parameter Details: How to Adjust Feature Size
Since the tool was trained on a common character size, you first need to adjust the tool's Feature Size parameter to match the size of the character in the images to which tool needs to be applied to. The tool's Feature Size indicator graphic is displayed in the bottom left corner of the image (shown below).
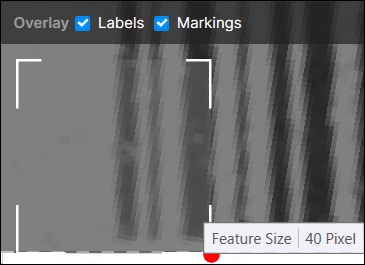
The indicator graphic can be dragged within the image, allowing you to size it based on the characters in the image. In addition, the indicator can be re-sized by dragging the re-size handle (which is displayed when hovering over the indicator). Changing the size of the indicator will also change the Feature Size parameter.
Sampling Parameter Details: Process Images with Pre-trained Network Before Training
When you create a new Blue Read tool, it is already ready to start finding and reporting characters in images, using a neural network pre-trained for character recognition. All you need to do is specify the ROI in your images, and the size of your characters, via the Feature Size parameter. As soon as you do this, you can process a single image (in the image, right-click and select Process from the menu) or your entire training set (click the Book icon).
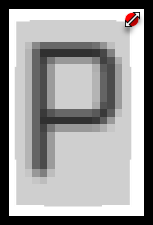
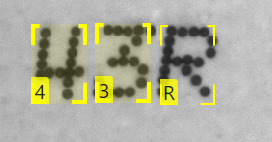
The Blue Read tool indicates the characters it found by drawing a yellow box around the character, with the decoded character value (label) in the corner. The Blue Read tool refers to this as a “feature”.

You can select one or more features in an image by clicking on them, shift-clicking to add additional features to the selection, or holding the shift key down and dragging a region to select a group of features. Selected features are shown with a heavier border around the graphic:
You cannot move features, because a feature is where the tool found a character, not where you think the character should be. You can delete a feature (right-click the feature and select Delete Feature from the menu), but this does not affect the tool. The next time you process the image, that feature will just come back.