Sensor Configuration Editor
About the Sensor Configuration Editor
The Sensor Configuration Editor allows you to view or edit the following properties of a new or configured sensor:
- Logon credentials (User Name and Password)
- Network Connection method (DNS or IP Address)
- Sensor Name (as seen in the OPC Server Runtime)
Using the Sensor Configuration Editor
The Sensor Configuration Editor can be used under two different scenarios:
- If a sensor is not on your local subnet, it may not automatically appear in the Available Sensors tree. In this case, you will need to add the sensor to the configuration manually.
- You wish to edit the properties of a sensor that already exists in your configuration.
To Add a New Sensor to your Configuration
-
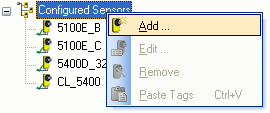
In the Available Sensors pane, right-click the 'All Sensors' or 'Configured Sensors' root node and click Add.
-
In the Sensor Configuration Editor, you may configure the properties of the sensor as desired:
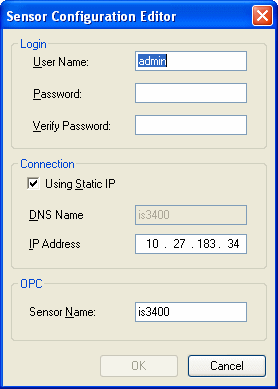
- User Name: The user name for logging on to this sensor.
- Password: The password for logging on to this sensor.
-
Verify Password: Retype the Password for verification.
Note: The User Name and Password defined in this dialog take precedence over the Default Logon. - Using Static IP: Select this check box to specify a fixed IP address to use when connecting to the sensor, rather than the network DNS Name.
- DNS Name: When the 'Using Static IP' check box is cleared, the sensor's network DNS name will be used when establishing a connection to the sensor.
- IP Address: When the 'Using Static IP' check box is selected, the IP address in this field is used when establishing a connection to the sensor.
- OPC Sensor Name: The name of this sensor as seen by OPC clients. This name is also used as part of each fully-qualified OPC tag name. See the Configured Tags Pane topic (in the Server's Configured Tags column) for an example of how this name is used as a part of the OPC tag name.