Define a Custom View of the Spreadsheet
-
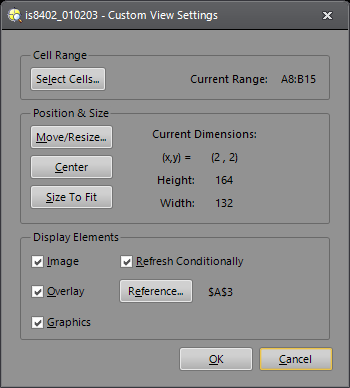
On the Edit menu, click Custom View Settings.
-
Click Select Cells. Cell Selection Mode allows you to highlight the Cell Range to be visible in the Custom View. If this range is too large to fit within the defined Position & Size (next step), then the Custom View permits scrolling to access all cells in the range.
Note: A custom view cell range can quickly be defined by highlighting a group of cells in the spreadsheet, right-clicking within the range, and selecting Custom View Settings. - Configure
the Position & Size of the Custom View with the following buttons:
Move/Resize: Allows you to define the location, height and width of the Custom View by adjusting an interactive graphic region.
Note: The size of the Custom View cannot exceed the size of the Cell Range in the preceding step.- Center: Positions the Custom View in the center of the display; this overrides any location set by Move/Resize.
- Size To Fit: Resizes the Custom View to fit the range specified in Select Cells; this overrides any size set by Move/Resize.
- Choose
which Display Elements will appear in the Custom View:
- Image: When selected, the image will be displayed beneath the Custom View overlay. Clear the Image checkbox to hide the image display.
- Overlay: When selected, the Custom View overlay will always be displayed. Clear the Overlay checkbox to hide the Custom View overlay.
Graphics: When selected, graphics generated by functions in the spreadsheet will be displayed on top of the image at all times. Clear the Graphics checkbox to hide all graphics.
Note: Limiting the display to those elements which are necessary will decrease the amount of time it takes for In-Sight Explorer to refresh the display and can reduce the total cycle time of inspections.
- (Optional) Specify the condition on
which to refresh the selected Display Elements:
Refresh Conditionally: Refreshes Display Elements conditionally based upon the value of a reference cell.
If this checkbox is selected, the chosen Display Elements will refresh only when 'Reference' contains a non-zero value. When 'Reference' evaluates to zero, the Image, Graphics and Overlay will not be refreshed, regardless of the state of their respective checkboxes. Clear this checkbox to always refresh the selected Display Elements after an acquisition.
Reference: Establishes the cell reference that determines when the Display Elements refresh.
Conditional Refresh Example: Assume that Refresh Conditionally is selected and that Reference points to cell $A$1, which evaluates to 1.000 whenever a failure condition occurs. In this case, the Image, Graphics and Custom View overlay will only be refreshed after an acquisition when the value in cell $A$1 is non-zero. Otherwise, the Image, Graphics and Custom View overlay will remain static in the display until a failure condition occurs.
-
(Optional) Specify the sheet zoom level for the Custom View by entering a sheet zoom percentage on the Job Display toolbar. This can be done while the Custom View Settings dialog is open or any time the Custom View is displayed.
Note:- When the sheet zoom percentage is modified for the Custom View, the view is automatically resized to fit the range specified when you click the Select Cells button.
- Separate sheet zoom values are maintained for the Spreadsheet View and the Custom View.
- Click OK to accept the changes to the Custom View, or press Cancel to discard the changes.