Cognex Label Import/Export Plug-in
CLIP (Cognex Label Import/Export Plug-in) is a VisionPro Deep Learning plug-in that helps you importing/exporting the labels, masks, and the images (exporting only) of a VisionPro Deep Learning tool.
CLIP Basics
In VisionPro Deep Learning, the labels, masks, and images are imported/exported based on a view (a ROI-defined view). So, you can import labels or masks only after the ROI of each view in VisionPro Deep Learning are defined. If the labels or masks do not fit the defined ROI, they will be not imported.
The image file name for each view (excluding file type) in VisionPro Deep Learning View Browser and the label/mask file name to be imported should be match exactly. For example, when you import a label for a specific view whose Filename is “name.png” in View Browser, the label file name should be either “name.png”, “name.vrlf" (Red Analyze) or “name.vglf” (Green Classify).
Import/Export Formats
|
Image File Type |
Type |
Import |
Export |
|
Image |
- |
- |
png |
|
Label |
Internal |
.vrlf (Red Analyze), .vglf (Green Classify) |
|
|
External |
png (Red Analyze only) |
- |
|
|
JSON |
.json |
- |
|
|
Mask |
Internal |
.vmf |
|
|
External |
png |
- |
|
|
JSON |
.json |
- |
|
-
.vrlf: VisionPro Deep Learning Red Analyze Label Format
-
.vflf: VisionPro Deep Learning Green Classify Label Format
-
.vmf: VisionPro Deep Learning Mask Format
-
JSON: JSON file format (See the details for JSON file format on later sections.)
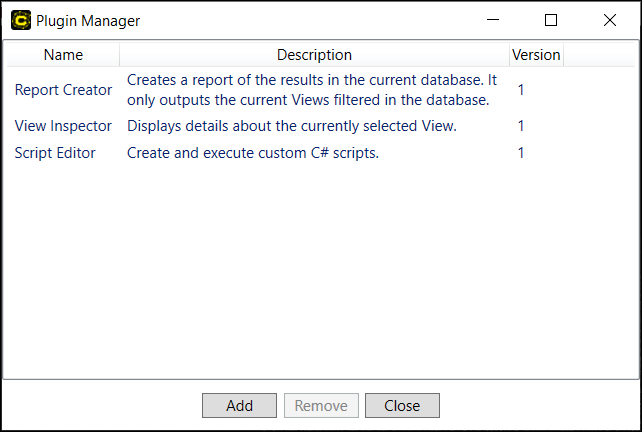
Activate CLIP
-
Run VisionPro Deep Learning.
-
Go to Plugins > Manage Plugins.

-
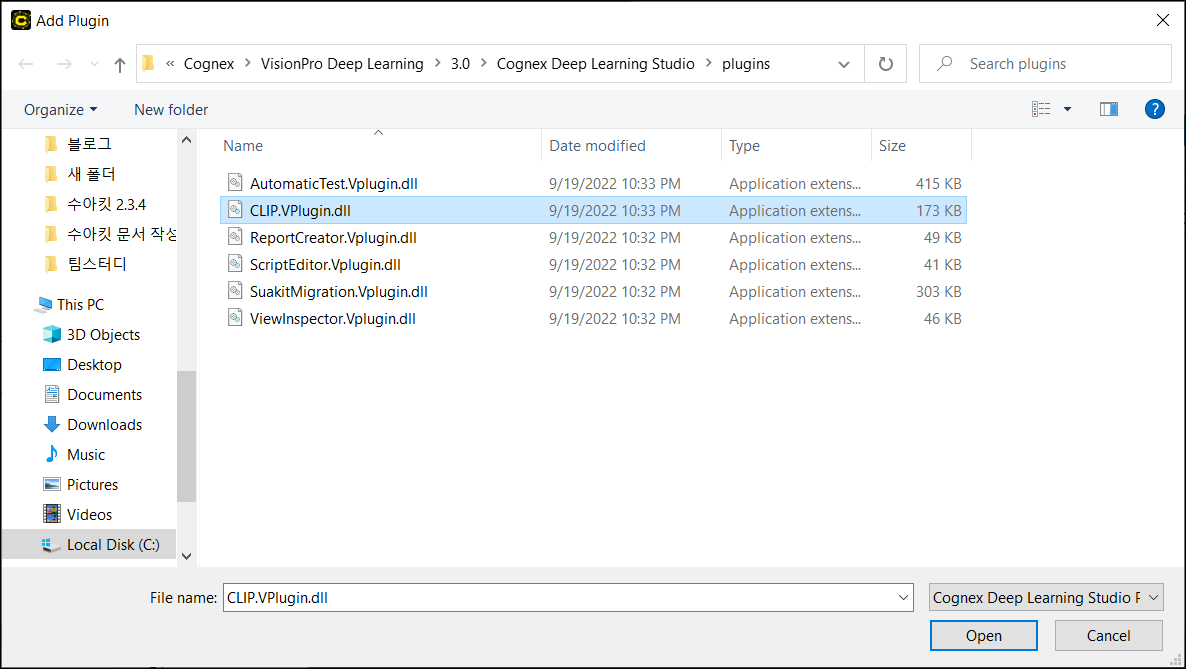
Select Add button.
-
Select CLIP.VPlugin.dll and select Open.
-
Close Plugin Manager.
-
Create or import a workspace, and create or import a tool into a stream in this workspace.
Note: For more details of a workspace, stream, and a tool, see Workspace, Stream, Tool -
Load images into the tool, and set ROI to define views.
-
Select a tool and go to Plugins menu. You will find Import and Export menu depending on the tool you selected.
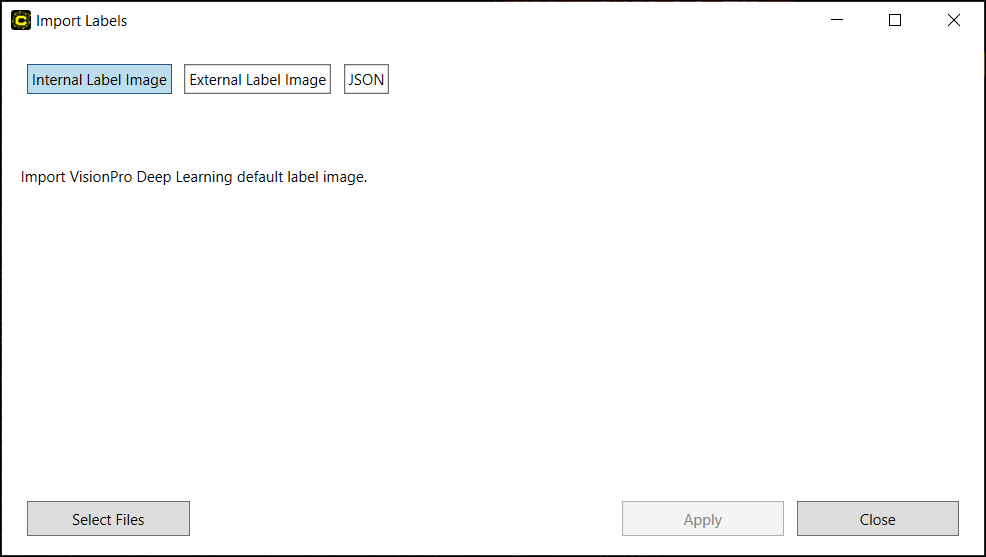
Import Labels
| Red Analyze | Green Classify | Blue Locate | Blue Read | |
|
Import Internal Labels (label files in VisionPro Deep Learning internal label file format) |
O |
O |
X |
X |
|
Import External Labels: png files (image files which represent the labels) |
O |
X |
X |
X |
|
Import External Labels: JSON file (a JSON file which contains the label information) |
O |
O |
X |
X |
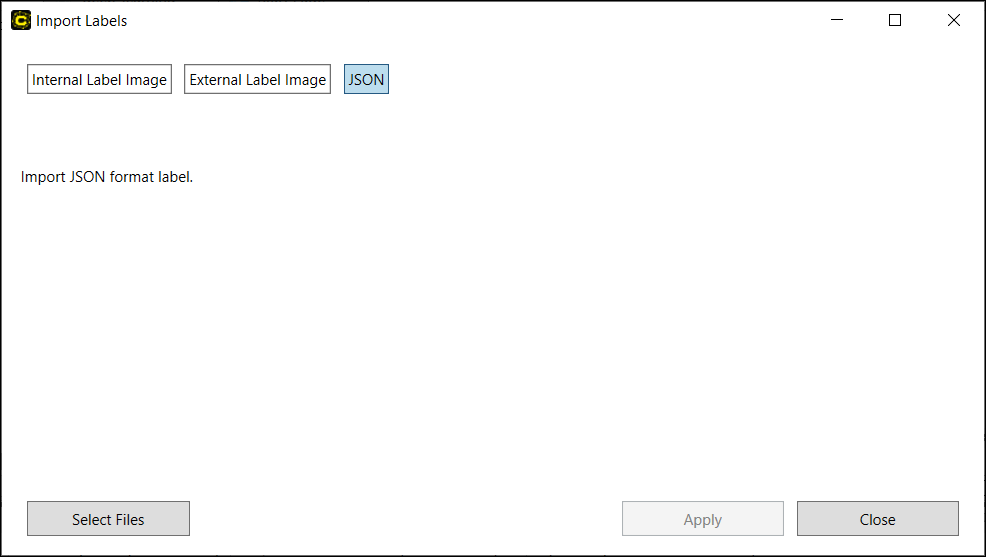
Import Internal Labels
-
Prepare the label files in VisionPro Deep Learning internal label format.
-
Red Analyze label format: .vrlf
-
Green Classify label format: .vglf
Note: To obtain VisionPro Deep Learning internal label files from a VisionPro Deep Learning tool, see Export Labels below. -
Open a workspace, select a Red Analyze or Green Classify tool in a stream.
-
Go to Plugins > Import Labels.
-
Select Internal Label Image and select Select Files.
-
Locate the internal label files and open them.
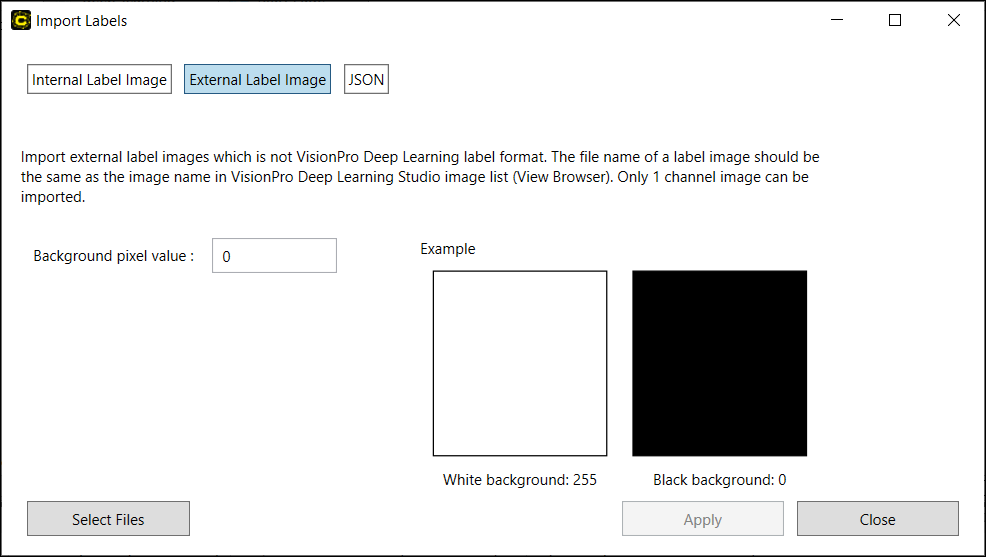
Import External Labels: png files (Red Analyze)
-
Prepare the png-formatted label image files. For example, your label is an image file where the background (the good area) is white and the defective area is black.
-
Open a label image file and get the pixel value for the background. In the example above, the value is 255 (Pixel Intensity).
Note: The background pixel value must be consistent over all label images to be imported. -
Open a workspace, select a Red Analyze tool in a stream, and go to Plugins > Import Labels.
-
Select External Label Image.
-
Feed the background pixel value in the Step 2.
-
Select Select Files to locate the png files and open them.
-
Select Apply.
Import External Labels: JSON file(s)
-
Prepare a JSON file that contains the information of image file names and their labels.
Note: The image file name must exactly match with the image file name loaded in a VisionPro Deep Learning workspace, including the capitalization.For Green Classify, a JSON file should contain the label information for all views. The JSON file must follow the following rules.
-
The key values "classes" and "images" must be included in the file.
-
As a child of "classes", {index (string type), class name (string type)} pair must be included.
-
The key value "images" must have a "class" under each image file name.
CopyGreen Classify JSON Label Example{
"classes": {
"0": "OK",
"1": "NG"
}
"images": {
"CAM1-NG.png": {
"class": [
1
]
},
"CAM2-NG.png": {
"class": [
1
]
}
}
} -
-
The key value "Labels" must be included in the file, and the information of each label should be listed under the key value.
-
The label information should have "StrokeThickness," "Shape," and "Points."
-
"Class" must be entered as a positive integer (unsigned long type), not a string or other types.
-
When you assign the class as 0, it is categorized as Good, and when you assign 1, it is categorized as Bad.
-
-
"StrokeThickness" is the thickness of the outline of a defect region.
-
"Shape” is the shape of a region. It has a string type and must be one of the followings: "rectangle," "ellipse," "line," "polyLine," "polygon"
-
"Points" is the set of coordinates that form the shape of a region. Its values are determined by "Shape."
-
"rectangle": the top left coordinates (x0, y0) and the bottom right coordinates (x1, y1)
-
"ellipse": the top left coordinates (x0, y0) and the bottom right coordinates (x1, y1)
-
"line": the start coordinates (x0, y0) and the end coordinates (x1, y1)
-
"polyLine": the coordinates (x0, y0), (x1, y1), ..., (xN, yN) that constitute a poly line
-
"polygon": the coordinates (x0, y0), (x1, y1), ..., (xN, yN) that constitute a polygon
-
-
Open a workspace, select a Red Analyze or Green Classify tool in a stream, and go to Plugins > Import Labels.
-
Select JSON and Select Files.
-
Locate the JSON file and open it.
-
Select Apply.
For Red Analyze, a JSON file should contain the label information for a single view. Therefore, you need to prepare as many JSON files as the total number of the views. The file name of each JSON file except file extension must exactly match the image file name of each view in the Image Display Area of VisionPro Deep Learning. The JSON file must follow the rules below.
{
"Labels": [
    {
      "Class": 1,
      "Shape": "ellipse",
      "StrokeThickness": 5.0,
      "Points": [
        "104.972811914788,310.801663378971",
        "132.045318045539,338.438180054112"
      ]
    },
    {
      "Class": 1,
      "Shape": "ellipse",
      "StrokeThickness": 5.0,
      "Points": [
        "301.248481362731,141.034489517388",
        "323.808903138356,168.106995648139"
      ]
    }
  ]
}
Export Labels
| Red Analyze | Green Classify | Blue Locate | Blue Read | |
|
Export Labels (labels are exported in VisionPro Deep Learning internal label file format) |
O |
O |
X |
X |
-
Open a workspace, select a Red Analyze or Green Classify tool in a stream, and go to Plugins > Export Images.
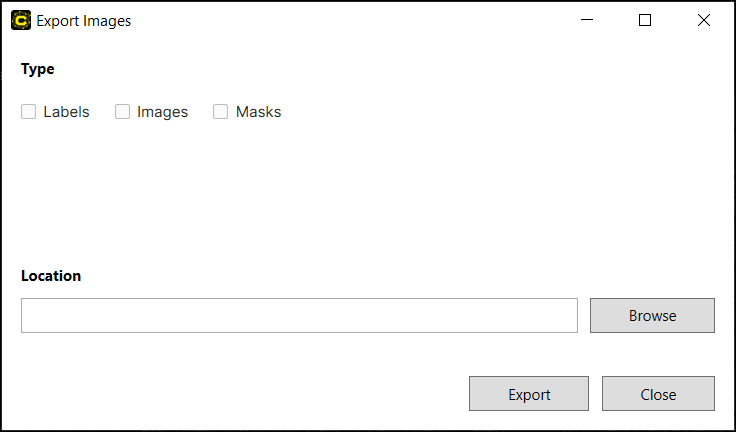
-
Enable Labels checkbox and select Browse to find the location of label files to be saved.
-
Select Export.
-
The label files are saved under SELECTED_PATH/WORKSPACE_NAME/STREAM_NAME/TOOL_NAME/Labels
Import Masks
| Red Analyze | Green Classify | Blue Locate | Blue Read | |
|
Import External Masks (image files which represent the masks) |
O |
O |
O |
O |
|
Import Internal Masks (mask files in VisionPro Deep Learning default mask file format) |
O |
O |
O |
O |
|
Import JSON Masks (a JSON file which contains the mask information) |
O |
O |
O |
O |
Import Internal Masks
-
Prepare the mask files in VisionPro Deep Learning internal mask format.
-
VisionPro Deep Learning mask format: .vmf
Note: To obtain VisionPro Deep Learning internal mask files from a VisionPro Deep Learning tool, see Export Masks below. -
-
Open a workspace, select a tool in a stream, and go to Plugins > Import Masks.
-
Select Internal Mask Image and Select Files.
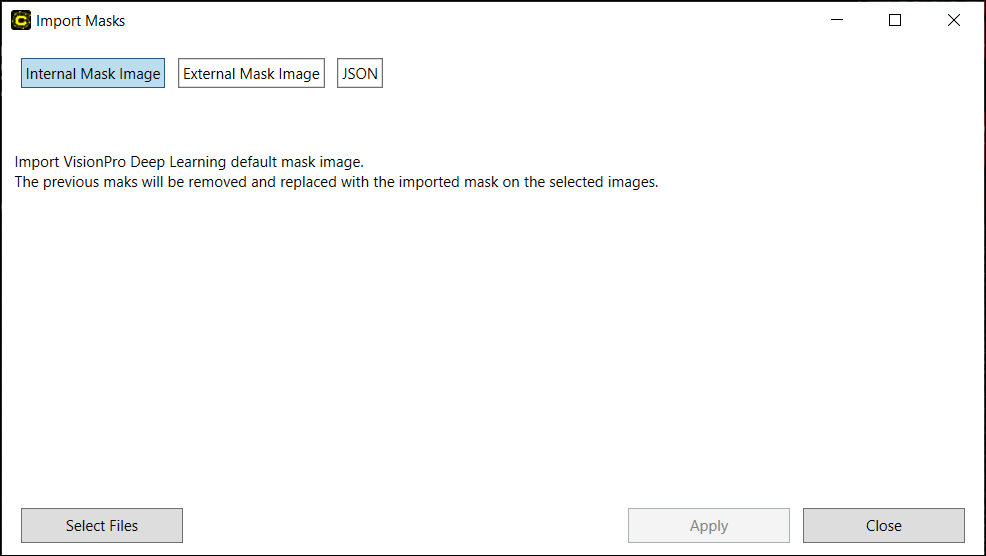
-
Locate the internal mask files and open them.
-
Select Apply.
Import External Masks: png files
-
Prepare the png-formatted mask image files. For example, your mask is an image file where the masked area is black and the other area (the background) is white.
-
Open a mask image file and get the pixel value for the background. In the example above, the value is 255 (Pixel Intensity).
Note: The pixel value must be consistent over all mask images to be imported. -
Open a workspace, select a tool in a stream, and go to Plugins > Import Masks.
-
Select External Mask Image.
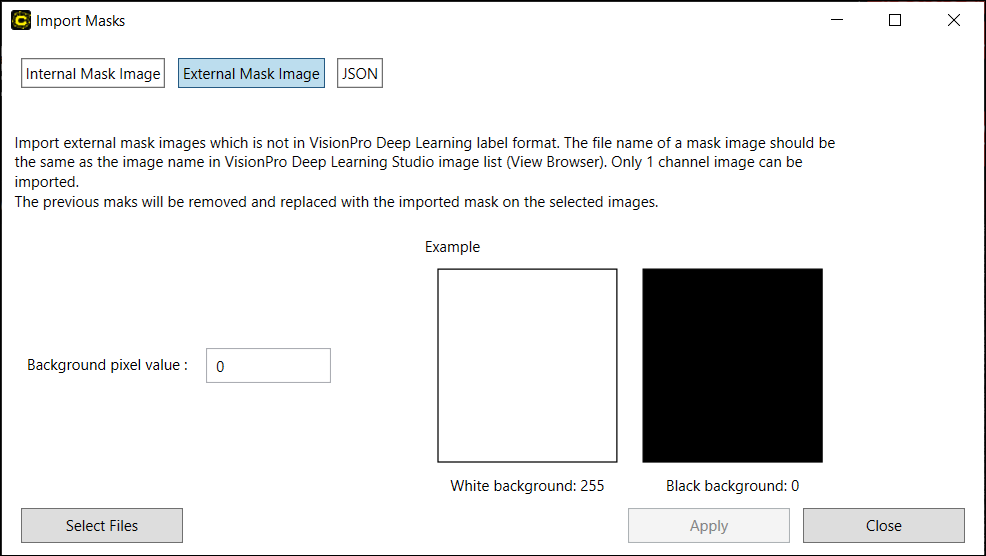
-
Feed the background pixel value in the Step 2.
-
Select Select Files to locate the png files and open them.
-
Select Apply.
Import External Masks: json file(s)
-
Prepare a JSON file that contains the information of image file names and their masks.
Note: The image file name must exactly match with the image file name loaded in a VisionPro Deep Learning workspace, including the capitalization.For all types of tools, a JSON file should contain the mask information for a single view. Therefore, you need to prepare as many JSON files as the total number of the views. The file name of each JSON file except file extension must exactly match the image file name of each view in the Image Display Area of VisionPro Deep Learning. The JSON file must follow the rules below.
-
The key value "Masks" must be included in the file, and the information of each mask should be listed under the key value..
-
The mask information should have "StrokeThickness," "Shape," and "Points."
-
"StrokeThickness" is the thickness of the outline of a mask.
-
"Shape” is the shape of a mask. It has a string type and must be one of the followings: "rectangle," "ellipse," "line," "polyLine," "polygon"
-
"Points" is the set of coordinates that form the shape of a mask. Its values are determined by "Shape."
-
"rectangle": the top left coordinates (x0, y0) and the bottom right coordinates (x1, y1)
-
"ellipse": the top left coordinates (x0, y0) and the bottom right coordinates (x1, y1)
-
"line": the start coordinates (x0, y0) and the end coordinates (x1, y1)
-
"polyLine": the coordinates (x0, y0), (x1, y1), ..., (xN, yN) that constitute a poly line
-
"polygon": the coordinates (x0, y0), (x1, y1), ..., (xN, yN) that constitute a polygon
-
CopyGreen Classify JSON Mask Example{
"Masks": [
{
"Shape": "polygon",
"StrokeThickness": 1.0,
"Points": [
"183,121",
"182,122",
"180,122",
"179,123",
"177,123",
"176,124",
"174,124",
"173,125",
]
},
{
"Shape": "polygon",
"StrokeThickness": 1.0,
"Points": [
"262,135",
"260,137",
"260,138",
"259,139",
"259,142",
"260,143",
"260,144",
"261,144",
"262,145",
"264,145",
"265,144",
"266,144",
"266,143",
"267,142",
"267,139",
"266,138",
"266,137",
"264,135"
]
}
]
} -
-
Open a workspace, select a tool in a stream, and go to Plugins > Import Masks.
-
Select JSON and Select Files.
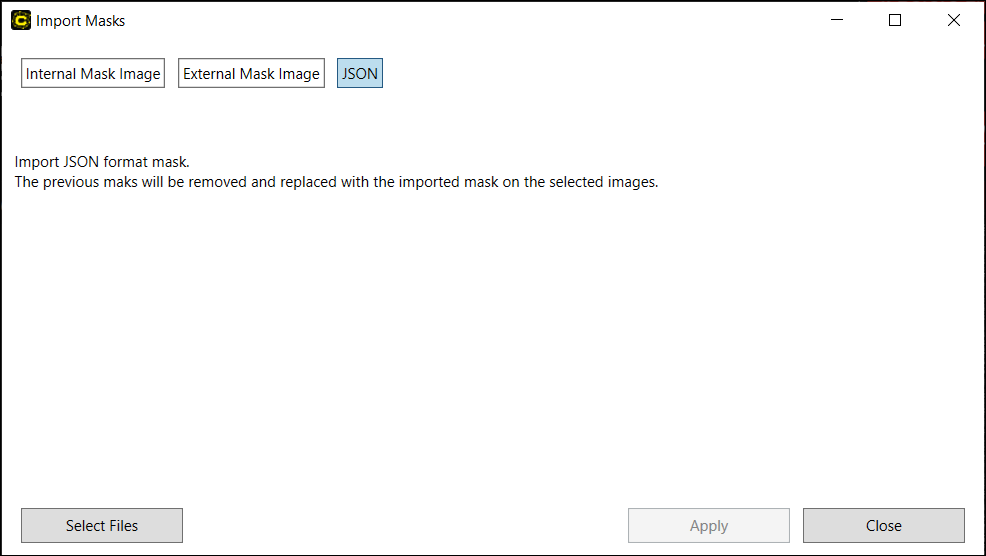
-
Locate the JSON file and open it.
-
Select Apply.
Export Masks
| Red Analyze | Green Classify | Blue Locate | Blue Read | |
| Export Masks(mask files in VisionPro Deep Learning default mask file format) | O | O | O | O |
-
Open a workspace, select a tool in a stream, and go to Plugins > Export Images.
-
Enable "Masks" checkbox and click Browse to select the location of the mask files to be saved.
-
Select Export.
-
The mask files are saved under SELECTED_PATH/WORKSPACE_NAME/STREAM_NAME/TOOL_NAME/Masks
Export Images
| Red Analyze | Green Classify | Blue Locate | Blue Read | |
| Export Images(image files in png file format) | O | O | O | O |
-
Open a workspace, select a tool in a stream, and go to Plugins > Export Images.
-
Enable "Images" checkbox and click Browse to select the location of the image files to be saved.
-
Select Export.
-
The image files are saved under SELECTED_PATH/WORKSPACE_NAME/STREAM_NAME/TOOL_NAME/Images