Train Neural Network
After all views are correctly labeled and split into the training images and the test images, neural network training is performed in the following general way:
- Configure tool parameters and start the training. Train the tool by pressing the Brain icon. Each image in the image set that is being used for training (defined in the Training Set dialog) is sampled across its full extent, using the specified Feature Size when the architecture is Focused.
- The resulting samples are provided as input to the VisionPro Deep Learning deep neural network.
- For each sample, the neural network produces a specific response (depending on the tool type), and this response is compared with the image labeling associated with the sample's location in the training image.
- The internal weights within the network are repeatedly adjusted as the samples are processed and reprocessed. The network training system continually adjusts the network weights with a goal of reducing the error (difference or discrepancy) between the network's response and the labeling provided by the user.
- This overall process is repeated many times, until every sample from every training image has been included at least the number of times specified by he Epoch Count parameter.
-
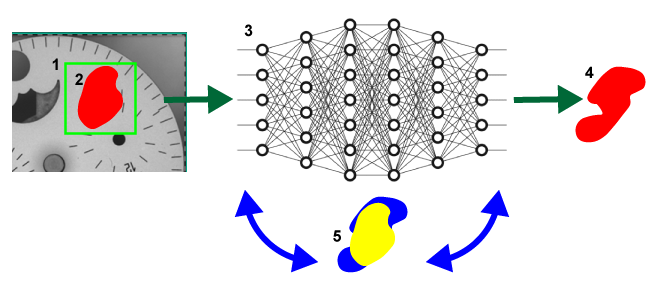
The sampling region.
-
The user-drawn, labeled defect region.
-
The neural network.
-
The response by the network.
-
The iterative process of adjusting the weights to reduce the discrepancy (in other words, error) between the labeled defect (in yellow) and the network response (in blue).
The specific characteristics of the neural network training vary somewhat depending on the type of tool being trained. The goal for network training of the Red Analyze tool in Supervised Mode is to reduce the spatial discrepancy between the defect labeling and the detected defects. For Red Analyze High Detail, network is also trained to locate and identify defect regions within an image, like Red Analyze Focused Supervised. The labeling that you perform for the Red Analyze tool in High Detail labels all of the defect pixels in the labeled image.
-
Sampling Region and Sampling Parameter
While Red Analyze Focused Supervised samples pixels with a sampling region defined by the users, Red Analyze High Detail samples from the entire image, so they don't have a sampling region, not requiring the sampling parameters in training.
-
Training with Validation
Red Analyze High Detail uses validation data set to validate each trained neural network and with these validation results selects the most performing and stable neural network with the given training set.
Configure Tool Parameters
After a tool has been added, the tool's parameters can be accessed to fine-tune the tool's performance prior to training, and how the tool will process images during runtime operation. The VisionPro Deep Learning tool parameters adjust the how the neural network model is trained, and also how the tool processes statistical results.
When Red Analyze tool's Architecture parameter is set to High Detail, the tool is configured to consider the entire image equally. This option is useful when you want to get more accurate or detailed results in pixel levels, at the expense of increased training and processing times. There are 4 categories of tool parameters for Red Analyze Tool in High Detail mode. You can see more detailed information for each parameter.
Architecture Parameter
The Architecture parameters selects the type of neural network model that will be used. This option is useful when you want to get more accurate results, at the expense of increased training and processing times. The High Detail and High Detail Quick architecture setting configures the tool to consider the entire image equally, while the Focused architecture setting is selective, focusing on the parts of the image with useful information. Due to this focus, the network can miss information, especially when the image has important details everywhere.
Mode Parameter
The newly captured images in the front lines of your daily operation can have variations from the training images that constructed your existing tool. With Mode parameter, you can adapt your previously trained tool to the new images with variations coming from your production line. For more details, please refer to Adaptation Mode: Adapting to Line Variations.
Network Model Parameter
The Network Model parameter allows you to select the size of the trained tool network, which will change the time required for training and processing. In High Detail mode, there are 4 different network models; Small, Normal, Large, Extra Large.
-
Normal network model(default) is commonly used for general project.
-
Larger network model is useful for more complex images, but this does not mean that its performance will always be better. Larger network model has a risk of overfitting. Larger network model will increase training and processing time.
If you suffer from a poor performance (recall, precision, and F1 score) in the Normal network model, it is generally recommended to switch over to Small network model to enhance the performance.
Training Parameters
The Training tool parameters control the training process. If any changes are made to the Training tool parameters after the tool has been trained, it will invalidate the training and necessitate that the tool be retrained.
| Parameter | Description |
|---|---|
|
Epoch Count |
The number of times to train using all training images. Higher the value more the repetition. The value is from 1 through 100000. Tip: High Detail mode uses a different concept of Epoch Count from Focused mode. You’d better use a higher epoch count in High Detail mode than in Focused mode with the same database.
|
|
Training Set |
The dataset that is used to create a deep learning model. This means that during deep learning, only the features of the images included in the train set are extracted to create a deep learning model. |
|
Validation Set Ratio |
The ratio of the number of views which will be used as a validation set among training set. You can enter the validation set ratio value from 1% to 50%. |
|
Minimum Epochs |
Due to the validation set, High Detail mode can select the model created from the low epoch as a final model to prevent overfitting. If you set a minimum epoch, High Detail mode selects a model created after this epoch as a final model. |
|
Patience Epochs |
Each time a fixed number of iterations is executed, High Detail mode measures the loss of the model. If no drop of loss is observed for N (the value of Patience Epochs) epochs, High Detail mode stops training and selects the model with the lowest loss until the epoch. You can utilize patience epoch for early stopping in case that there is no need to proceed a training process unless loss drops over a certain period. Tip:
|
|
Patch Size |
The size of the square that divides each view into several chunks. Training (feature detection) and processing of each view are executed based on each chunk. Generally, a smaller Patch Size works better for catching small subtle blobs, and a larger Patch Size for large obvious blobs in terms of convergence speed in training. |
Training Parameter Details: Epoch Count
Epoch Count parameter lets you control how much network refinement is performed. As described in the Neural Network Training topic, the training process repeatedly processes input samples through the network, compares the network result with the user-supplied labeling, then adjusts the network weights with a goal of reducing this error. Because of the large number of network nodes (and thus weights), this process can be repeated almost indefinitely, with each iteration resulting in a progressively smaller improvement in the error. Increasing the Epoch Count parameter setting increases the number of iterations of training that are performed. This will reduce the network error on the training images at the cost of requiring more time for training.
It is important to keep in mind, however, that the goal for training the network is to perform accurately on all images, not just those used for training. As the epoch count is increased, the network will tend to experience overfitting (Terminology), where the error on untrained images increases at the same time that the error on trained images decreases. For this reason, you should carefully monitor the network performance on all images as you adjust the epoch count. You have to choose an optimal Epoch for your dataset because its optimal value is different by dataset, particularly the statistical diversity of your dataset.
Training Parameter Details: Minimum Epochs
Due to the validation set, High Detail mode can select the model created from low epoch as a final model to prevent overfitting. If you set a minimum epoch, High Detail mode selects a model created after this epoch as a final model.
If you get a good processing result to the train set, but not a good one to the test set, you may think overfitting. However, if the processing result is not good to the train and test set, it would be underfitting. In this case, it is recommended to use higher minimum epochs.
Training Parameter Details: Patience Epochs
Each time a fixed number of epochs (1/8 epochs) is executed, High Detail mode measures loss of the model. If no drop of loss is observed for N (the value of Patience Epochs) epochs, High Detail mode stops training and select the model with lowest loss until the epoch. You can utilize patience epoch for early stopping in case that there is no need to proceed a training process unless loss drops over a certain period.
Training Parameter Details: Patience Epochs & Minimum Epochs
Minimum Epochs was applied prior to Patience Epochs during training in VisionPro Deep Learning 2.1.1 or lower versions. This means that Patience Epochs started to be counted after Minimum Epochs was elapsed. Contrast to this, in VisionPro Deep Learning 3.0 or higher, Patience Epochs is applied independently from Minimum Epochs in training. As a result, Minimum Epochs and Patience Epochs in VisionPro Deep Learning 3.0 or higher versions work differently compared to the lower versions of VisionPro Deep Learning. Refer to the examples below for how Patience Epochs and Minimum Epochs are applied during training in VisionPro Deep Learning 3.0.
All the examples below are using the following parameter setup:
-
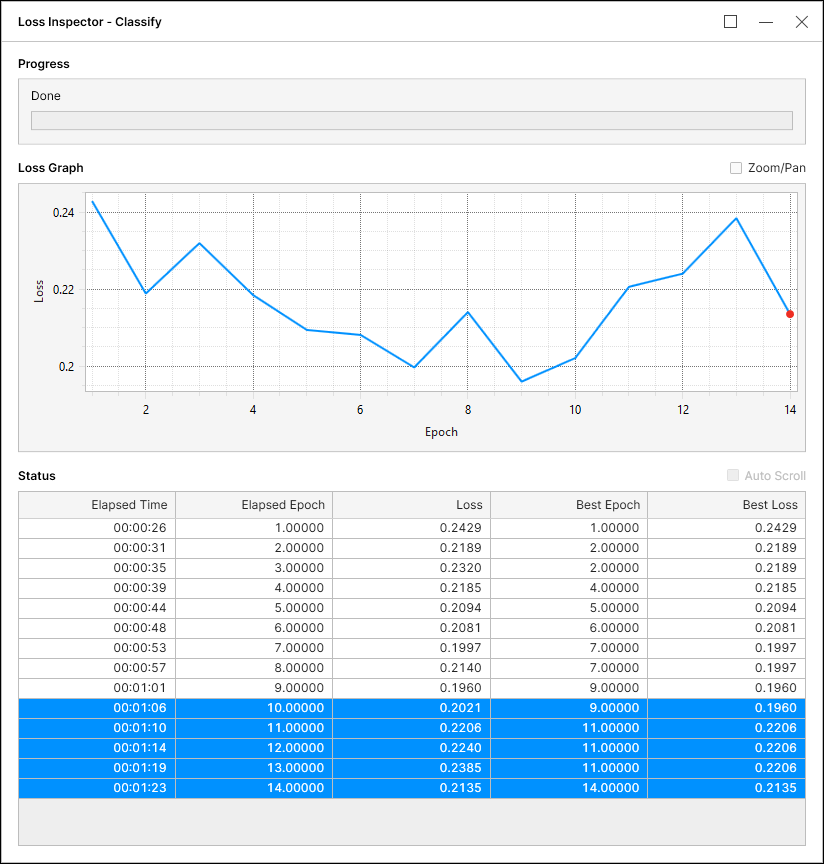
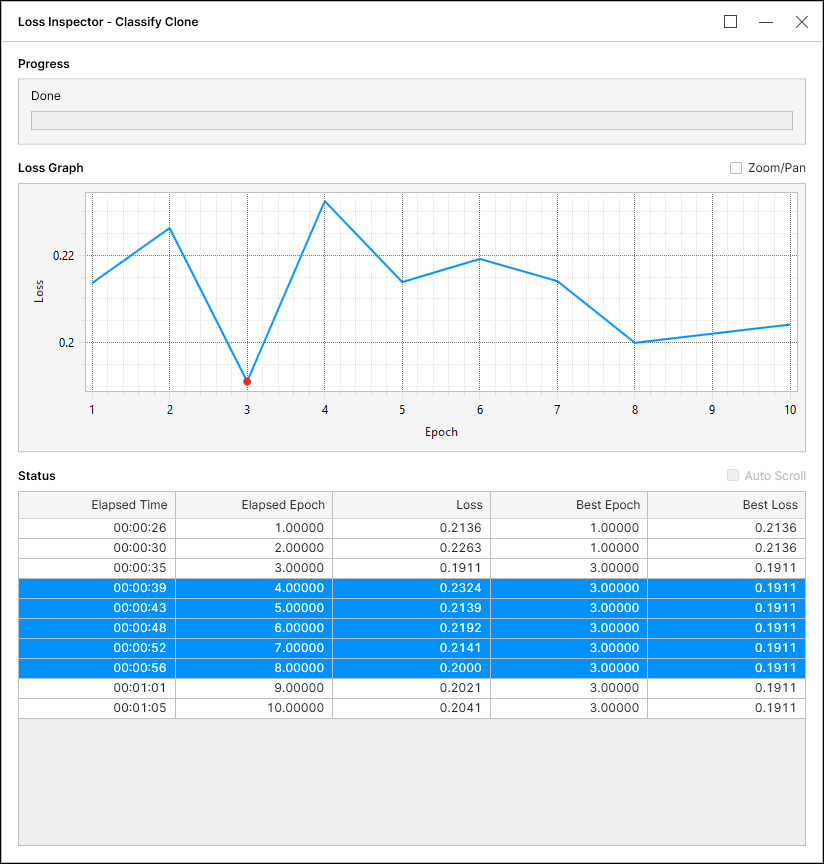
Patience Epochs: 5
-
Minimum Epochs: 10
Example 1. The tool waited 5 epochs hoping for the best loss so far (0.1960) was updated again regardless of Minimum Epochs. Since the best loss (0.1960) was not updated after the waiting, the tool stops training and picks its best loss among the epochs after Minimum Epochs. The corresponding best loss is 0.2135 at the epoch 14.
Example 2. The tool waited 5 epochs hoping for the best loss so far (0.1911) was updated again regardless of Minimum Epochs. Though the best loss (0.1911) was not updated after the waiting, the tool continued its training toward the epoch 10 to also meet Minimum Epochs condition. The tool picks its best loss when it reached the epoch 10, and the corresponding best loss is 0.1911 at the epoch 3.
Example 3. The tool waited 5 epochs hoping for the best loss so far (0.1965) was updated again regardless of Minimum Epochs. Since the best loss (0.1965) was not updated after the waiting, the tool stops training and picks its best loss among the epochs after Minimum Epochs. The corresponding best loss is 0.2106 at the epoch 11.

Training Parameter Details: Validation Set Ratio
It is the ratio of number of views which will be used as a validation set among training set. If you increase the validation set ratio while keeping the number of training set, the amount of data used for training will decrease. So, setting a high validation set ratio could affect the performance negatively when you are using small training set.
On the other hands, too low validation set ratio will not be helpful for selecting good model for unseen data set.
Training Parameter Details: Patch Size
Patch Size is the size of the square that divides each view into several chunks. Training (feature detection) and processing each view is executed based on each chunk. Generally, a smaller Patch Size works better for catching small subtle blobs, and a larger Patch Size for large obvious blobs in terms of convergence speed in training.
Perturbation Parameters
The VisionPro Deep Learning neural network can only be trained to learn the features in images that it actually sees. In an ideal world, your training image set would include a representative set of images that expressed all of the normal image and part variations. In most cases, however, training needs to be performed with an unrepresentative image set. In particular, image sets are often collected over a short period of time, so normal part and lighting variations over time, as well as changes or adjustments to the optical or extrinsic characteristics of the camera are not reflected.
The VisionPro Deep Learning training system allows you to augment the image set by specifying the types of appearance variation that you expect during operation, through the use of the Perturbation parameters, such as the following:
- Luminance
- Contrast
- Rotation
The Perturbation parameters allow the VisionPro Deep Learning tools to artificially generate images to be trained on, improving results for applications with high amounts of variance. These parameters are common across all of the tools. The Perturbation parameters can also be combined. This allows for the generation of more complex images by using the parameters separately, as well as in conjunction.
High Detail mode provides 13 perturbation options. Use only the perturbation options which can actually be acquired at production lines.
| Perturbation | Description |
|---|---|
|
Horizontal Flip 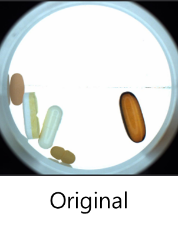

|
It performs flipping in horizontal direction.
|
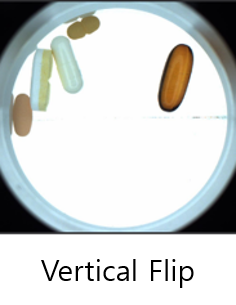
|
Vertical Flip
|
It performs flipping in vertical direction. |
|
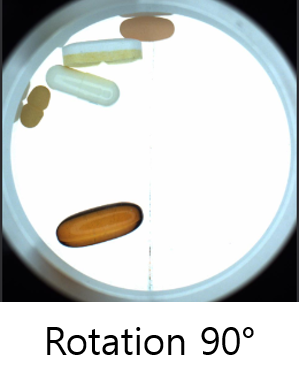
Rotation 90°
|
It performs only +90° rotation.
|
|
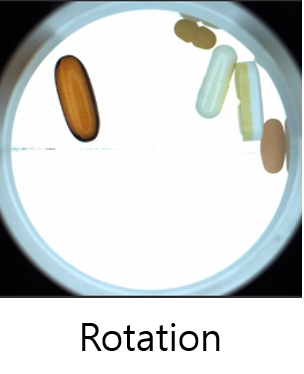
Rotation
|
It performs rotation between 0° to 45°. |
|
Contrast
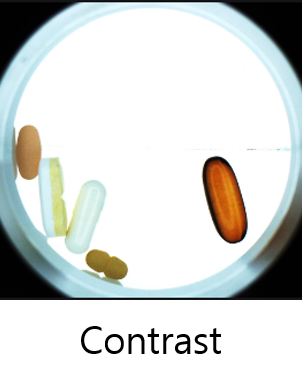
|
It adjusts contrast by multiplying a random value for all channels. The random value follows the uniform distribution within a range of 0 to 2. |
|
Luminance
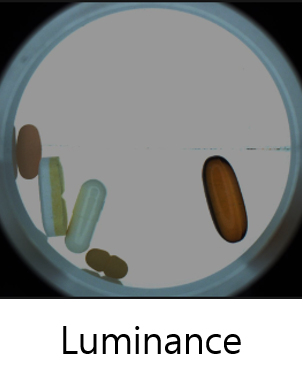
|
It adjusts luminance by adding a random value for all channels. The random value follows the uniform distribution within a range of - 255 to 255.
|
|
Colorwise

|
It adjusts color by multiplying and/or adding different random values per channels.
|
|
Gradation
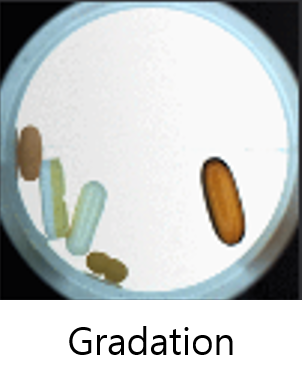
|
It randomly adjust the gradation. |
|
Zoom-In
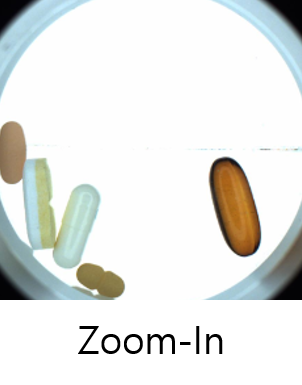
|
It randomly zooms in the views from the center. The maximum of zooming is 5/6 of original view size. The random variable follows the uniform distribution.
|
|
Sharpen
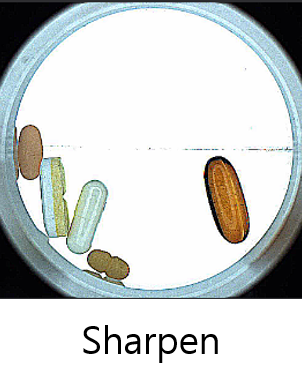
|
It randomly sharpens the views by image filtering within a range of 0 to 2.
|
|
Blur

|
It randomly applies Gaussian Blur to the views. The random variable follows to the Gaussian Sigma Distribution within a range of 0 to 2.
|
|
Distortion

|
It applies a distortion to the views by picking the points in the views and moving them. The number of points is same or less than 6.
|
|
Noise
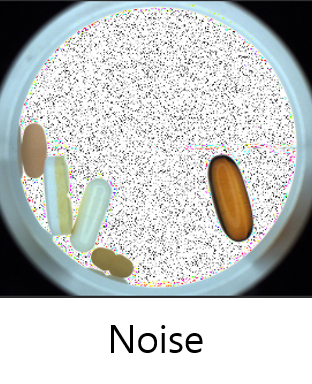
|
It applies the noise by multiplying a random value per pixel for all channels. The random value follows the uniform distribution within a range of 0 to 2.
|
By the law of large numbers, all perturbation options can be applied equally and trained by increasing the number of epochs.
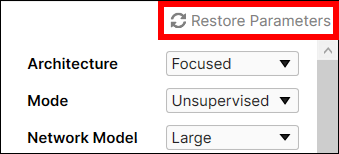
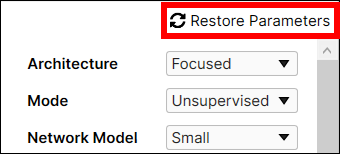
Recover Last Parameters: Restore Parameters
Restore Parameter button is designed for the easy turning back of tool parameter values to the values that you chose in the last training task. It remembers all values in Tool Parameters used in the last training session. So, if you changed any of its values and now want to revert this change, you can click it to roll back to the tool parameter values which are used in the last training. Note that it is disabled when the tool has never been trained or there were no changes from the initial set of tool parameter values.
The following steps explain how Restore Parameter works:
-
Restore Parameter button is always disabled when the current tool was not trained.
-
Once the current tool is trained, the checkpoint of parameter rollback is set to the values in Tool Parameters of the last training session. At this point, if you change any value in Tool Parameters, the button is enabled.
-
Click Restore Parameter button and it reverts the changed value to the value of the checkpoint.
-
If you train the current tool again, with some changes in Tool Parameters, then the checkpoint of parameter rollback is updated to the changed parameter values. Again, the button is disabled unless you make another change for the values in Tool Parameters.
-
If you make another change and click Restore Parameter button again, it reverts the changed value into the value of the updated checkpoint.
Note that if you re-process a trained tool after changing the values in Processing Parameters, the checkpoint of parameter rollback is not updated, and thus Restore Parameter remains enabled. The checkpoint is updated only after the training of a tool is completed.
|
Disabled |
Enabled |
Irreversible parameters that changing these parameters will reset the tool
Network Model, Exclusive, Feature Size, Masking Mode, Color, Centered, Scaled, Scaled Mode (Uniform/Non-uniform), Legacy Mode, Oriented, Detail
Irreversible parameters that these parameters are not invertible in nature
Low Precision, Simple Regions
Other irreversible parameters
Training Set, Heatmap in Green Classify High Detail and Green Classify High Detail Quick(This parameter does not affect the prediction performance)
Overlay parameter in Masking Mode in Blue Read
Control Neural Network Training
The training of Red Analyze High Detail can be controlled by configuring the tool parameters and the training set.
Training Set
The largest single determinant affecting the network training phase is the composition of the Training Set. The best method for controlling the network training phase is to construct a proper training set for your tool. In this way, you can separate images/views into categories that allow you to determine if your tool is generalizing your images/views properly.
Validation Set and Validation Loss
The use of training set is in common for all tools, but High Detail tools has another data set called "validation set" or "validation data" which is part of the training set, whose amount of data is chosen by users. For High Detail modes, the validation loss (=the loss calculated from the validation data) is calculated for each model during the training phase, and the model who gives the best validation loss in terms of performance and availability is finally selected as the result of training.
The purpose of validation data is among many neural network models generated from the training data choosing the best model as the final output of training. The training strategy that adopts validation data to achieve this goal is here called "training with validation." Unlike Focused mode tools, High Detail mode tools (Green Classify High Detail Mode and Red Analyze High Detail Mode) provide the training with validation, and you can control the network training with monitoring validation loss. During training at the end of every 1/8 epoch, the neural network calculates the loss value from the validation set you previously configured.
The validation loss stands for the performance of your trained network in terms of accuracy of classification (Green Classify High Detail Mode) or segmentation (Red Analyze High Detail Mode), which means that smaller loss generally means a better network. So it is better to have this value close to 0. The validation loss of Red Analyze High Detail Mode is calculated per pixel as the segmentation, which is the binary classification among "Good" or "Defect", is executed on each pixel. Though, to gain the full-sight regarding how your network truly performs well, you have to test the trained network against some separate data (Test Data) to prevent overfitting.
Validation Loss (from 0 through 1)
-
1 - IOU
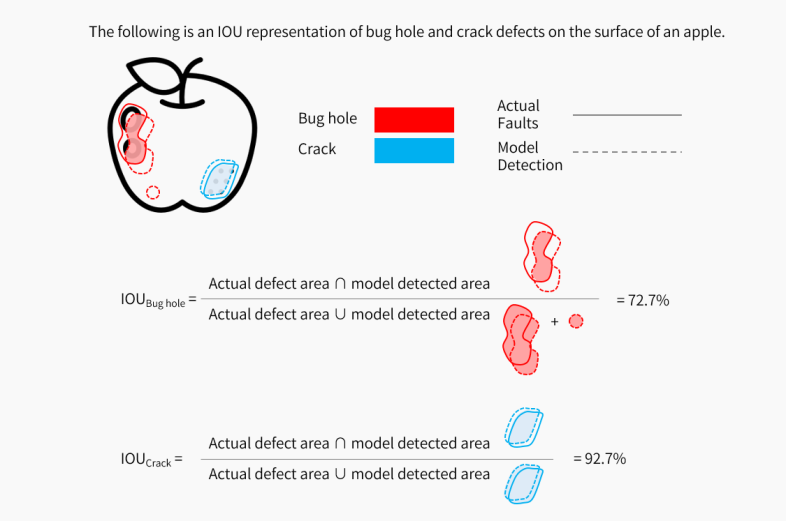
IOU (unit: %)
-
IOU is the intersection over union that measures to what extent predicted areas are equal to their ground truth. The formula to calculate IOU is:
(Ground Truth Area ∩ Predicted Area) / (Ground Truth Area ∪ Predicted Area)