Saving Images with the Image Recorder Block
After adding Camera Devices to your vision application, and you set up either Camera Blocks or VisionPro Tool Blocks in your Task, you can use the Image Recorder block to store either the images acquired with a Camera block, or the images processed with a VisionPro Tool block. Configure image saving as described below.
-
Drag and drop an Image Recorder block into your Task from the Data Storage category of the Toolbox
-
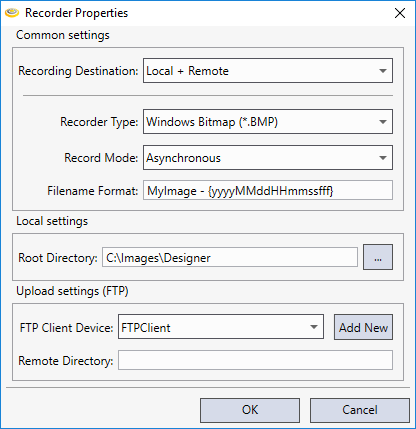
Double-click the block to open the Recorder Properties dialog to configure the properties of the Image Recorder block.
-
Configure the dialog properties as required for your project:
Property Group Property Description Common Settings Recording Destination Specifies where the images will be stored. The available options are the following:
- Local: The images will be stored on the PC running Cognex Designer, in the folder specified with the Root Directory setting. When selected, the Local settings property group is enabled, while the Upload settings (FTP) property group is disabled. This is the default setting.
-
Remote (FTP): The images will be transferred to a remote server with an FTP client device. When selected, the Local settings property group is disabled, while the Upload settings (FTP) property group is enabled.
- Local + Remote: The images will be stored both locally on the PC and transferred to a remote server as well. This enables all settings of the dialog for configuration.
Recorder Type Specifies the file type of the image that will be saved. The supported file types are the following:
- Windows Bitmap (*.BMP)
- Portable Network Graphics (*.PNG)
-
Cognex Image Database (*.CDB)
Note:Consider the following behavior when using the CDB format:
- When storing files locally, you can append additional images to an existing CDB file. To do so, make sure that the CDB file is properly specified with the Root Directory and Filename Format properties.
- When storing files remotely, you cannot append additional images to an existing remote CDB file. Instead, if the CDB file specified with the Remote Directory and Filename Format properties already exists, it will be overwritten.
- Cognex Record (*.BMP + *.SVG)
The default setting is Windows Bitmap (*.BMP).
Record Mode The Image Recorder block can record image sets in two modes: Synchronous or Asynchronous.
- In Synchronous mode, the block uploads and/or locally saves the recorded images directly on the Task thread, and waits until the save/upload has been completed. Therefore, in this mode, potentially long upload operations may hold up the Task execution.
-
In Asynchronous mode, the local save and/or upload jobs are queued in a background thread. The Image Recorder block then performs the upload and/or local saving as the thread becomes available. In this mode, the save and upload time will not be added to the block execution time, nor will that operation hold up the Task execution. Errors in this case are only reported as log messages in the Output window.
Note:- In Asyncronous mode, the Image Recorder block can queue a maximum of 32 images. If the queue is full (for example because of a fast task trigger rate, slower network, or large images), subsequent images will be discarded.
- If Asynchronous mode is set, place the Image Recorder block either as the last block of the Task, or after the last modification (for example, the last time that the image is either processed or modified by another block). This is important because in Asynchronous mode, images are recorded on a different thread, and the block does not wait for the recording to complete: instead, the Task will continue to execute. If, for example, the image is to be processed by another VisionPro Tool Block later in the Task, this may lead to the Cognex Designer application crashing, because accessing VisionPro images from different threads at the same time is not supported.
-
If it is not possible to place the Image Recorder block at the end of the Task or after the last modification to the image, you can make a copy of the VisionPro image and record the copied image. You can copy a VisionPro image in script with the following statement:
Cognex.VisionPro.CogSerializer.DeepCopyObject(InputImage);
Filename Format Specifies how the file name of the image will be written. The default format is MyImage - {yyyyMMddHHmmssfff}, meaning that the files are saved with the MyImage filename, with the recording time appended to them with millisecond accuracy in .NET string format.
Local Settings Root Directory Specifies the directory on the PC running Cognex Designer that will be used to store the recorded images. The default path is the following:
<X>:\Images\Designer\
Use the
 (Browse) button to browse for another folder.Note: This setting is available only if the Recording Destination property is set to Local or Local + Remote.
Upload Settings (FTP) FTP Client Device Specifies the FTP client device used for uploading the recorded images. Use the drop-down menu to select the desired FTP client device, or click the Add New button to open the Parameter Configuration dialog and configure a new FTP client device.
Note: This setting is available only if the Recording Destination property is set to Remote or Local + Remote.Remote Directory The remote directory on the FTP server where the images will be saved. In case the specified path contains non-existing directories, Cognex Designer will automatically create them when the upload starts.
Note:- For most FTP servers, a forward or back slash (/ or \) can generally be used as a directory separator. However, this usage depends on the specific server being used. Windows FTP servers handle both separator types.
- The FTP connection will overwrite an image file with the same name if it already exists in the specified directory on the server.
- Once you are ready, click the OK button to close the dialog.
- Link the output pin of the desired Camera device block or VisionPro Tool Block to the Input/CogImage pin of the Image Recorder block, as shown in the below example.
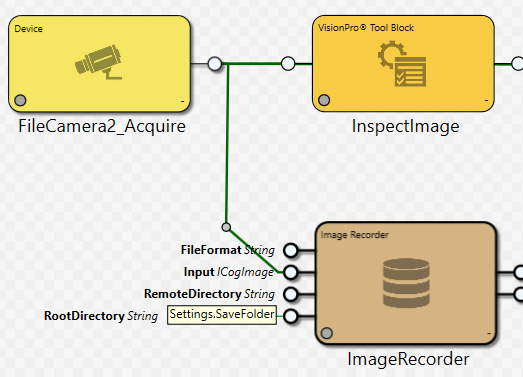
Typically, the RemoteDirectory, RootDirectory and FileFormat input pins are left unlinked, and either use the settings specified in the Recorder Properties dialog, or are configured to a tag that will define the inputs.