Menu Bar – Edit
The Edit menu of the Menu Bar provides settings to manipulate data and settings in the Spreadsheet Editor or the currently displayed WebPage. The actual settings available in the menu depend on whether you work with a Spreadsheet or a WebPage.
Options common for both editors include the following:
| Icon | Option | Description |

|
Undo | Reverts the previous change you made in the Spreadsheet or Webpage. |

|
Redo | Applies the previously undone change in the Spreadsheet or Webpage. |

|
Cut | Copies the selected content to the clipboard. Once the content has been pasted to a new location with the Paste option, the contents will be cleared from their original location. |

|
Copy | Copies the selected content to the clipboard. Once the content has been pasted to a new location with the Paste option, the contents at the original location will be left unchanged. |

|
Paste | Copies the contents of the clipboard to the selected location. |

|
Delete | Deletes the selected component. In case of Spreadsheet cell(s), you can delete the cells by shifting them up or down, or by removing their entire row or column. |
Options that are available when a Spreadsheet is open include the following:
| Icon | Option | Description |
| Clear |
Clears the specified contents of the selected cell(s):
|
|
| Create a WebPage from Selected Cells | Generates a new WebPage from the contents of the selected cell(s). | |
| Export Cells to Template | Exports the contents of the selected cell(s) to Templates. | |
| Publish | Exposes the contents of the selected cell(s) as Tags. | |
| Unpublish | Disables the exposure of cells as Tags that have been previously published. | |

|
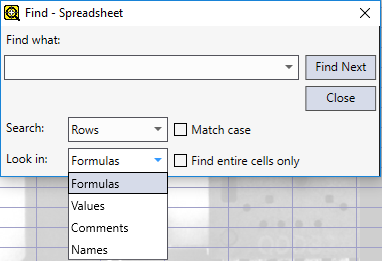
Find |
Opens the Find dialog, allowing you to search for a specific word or phrase within the Spreadsheet.
The available search settings are the following:
|
| Go To | Opens the Go To dialog. Use the dialog to quickly select the cell specified with the dialog. For example, typing M11 in the textbox, and pressing Enter will immediately select cell M11. | |

|
Cell Graphic | Enters Interactive Graphics Mode to edit the cell graphic. This option is available only when the active cell contains a function that has an associated cell graphic. |

|
Maximize Region | Resizes the region cell graphic equal to the image region in the referenced |

|
Cell State | Opens the Cell State Dialog. |
Options that are available when a Webpage is open include the following:
| Icon | Option | Description |

|
Lock | Toggle lock/ unlock selected web page elements in place. |

|
Export | Export the current WebPage as a template. |
| Align | Align two or more webpage elements. Options include aligning by the left, right, top or bottom edge, and by the horizontal or vertical middle line. | |
| Size | Makes two or more webpage elements equal in size, height, or width (depending on the selected option). The selected elements are always equaled to the first selected element. | |
| Spacing | Applies equal horizontal/vertical spacing between three or more selected webpage elements, or removes horizontal/vertical spacing between selected elements. | |
| Layering | Configures the Z-Order of the selected element. Options include bringing an element one index position forward (or to the front), or sending an element one index position backwards (or to the back). | |
| Group |
Allows you to bind multiple webpage elements into a single group, or unbind an existing group of elements. Note:
|
|

|
Replace Tags | Opens the Replace Tags dialog, allowing you to replaces the tags of the selected webpage element. |