Blue Read
About Blue Read
The Blue Read tool is used to perform Optical Character Recognition (OCR). It is a pre-trained tool, having been trained on a large database of images with text in numerous fonts and backgrounds. The characters of the pre-trained tool are numerals (0-9), uppercase letters (A-Z, except "O"), hyphen (-), plus sign (+), ampersand (&), colon (:), and forward slash (/).
Similar to the Blue Locate Tool, the Blue Read tool identifies and locates characters as features in the image. However, as noted above, the Blue Read tool is a pre-trained tool, which provides it with a generic baseline for reading performance, without the need for training. Thus when the tool is first configured, it has the ability to almost instantly recognize and read characters. The tool already knows how to read characters; you just need to define where in the image to look for characters.
The Blue Read tool's strength is in its ability to work on difficult projects, in other words, low contrast, low resolution and/or deformed characters. In addition, there are no difficult to set segmentation settings or image filters required. The tool is able to read characters that traditional machine vision tools had difficulty reading; particularly deformed and/or curved characters on noisy backgrounds.
To use the tool, you provide a Training Image Set and then set the region around the characters to be read. Adjust the Feature Size parameter and label the characters. In most instances, the tool will automatically identify and correctly read the characters, and produce markings of the characters, which you can accept as labels for further training. Once at least one instance of the characters are labeled, train the tool. Then review the tool on images that were not used during the training phase.
The neural network architecture of Blue Read is Focused, so it has all the properties of the Focused architecture, like Red Analyze Focused Supervised and Green Classify Focused tools.
| Blue Read | |
|---|---|
| Image Dataset Composition | Training Set, Test Set |
| Monitoring Validation Loss | X |
| Loss Inspector | Not supported |
Training Workflow for Blue Read
When a tool is in Blue Read mode, the training workflow of the tool is:
- Launch VisionPro Deep Learning.
- Create a new workspace or import an existing one into VisionPro Deep Learning.
- Collect images that contain characters and load them into VisionPro Deep Learning.
-
Add a Blue Read tool.
-
Configure the ROI and Feature Size
-
Within the Read tool, set the ROI and Feature Size.
Note: For more information on setting the Feature Size, see the Configure Sampling Parameters. - In the Image Display window, click the first image.
- The rectangular ROI will encompass the entire image.
- Re-size the ROI so that it encloses the characters. There are two handles on the ROI, in the upper-left and lower-right corners, that you can use to drag and re-size the ROI so that it covers the characters and their possible locations within all of the images.
- Once the ROI is set, press the Apply button.
- This will then apply the ROI setting to all of the images.
- After the ROI has been applied, click the first image again.
-
In the bottom left corner of the display will be an interactive Feature Size box, which indicates the default character size. You can grab it and drag it up to a character and re-size it so that it fits a character.
Tip: Try to keep from making it so big that it encloses parts of another character. After setting it on one character, you can then move it around to the other characters to ensure it's sized correctly. -
Once the character size is set, press the Book icon to process all of the images based on the new character size. This will apply the new character size to all of the images.
Note: If the character size is changed in one image, the change will automatically be applied to all of the other images. However, if the Scaled parameter option is active, the features will only adapt their aspect-ratio to meet the character of the nominal feature-size and clamp the features to within the interval [1/4, 4] of the nominal feature size. That will require pressing the Book icon to reprocess the images and see the result of the Feature Size change on the rest of the images in the training set.
-
-
Label the Characters
The next major step is the labeling of the characters. At least one instance of each character must be labeled. The process of Labeling provides a useful mechanism to determine if the tool is interpreting the characters correctly, prior to training.
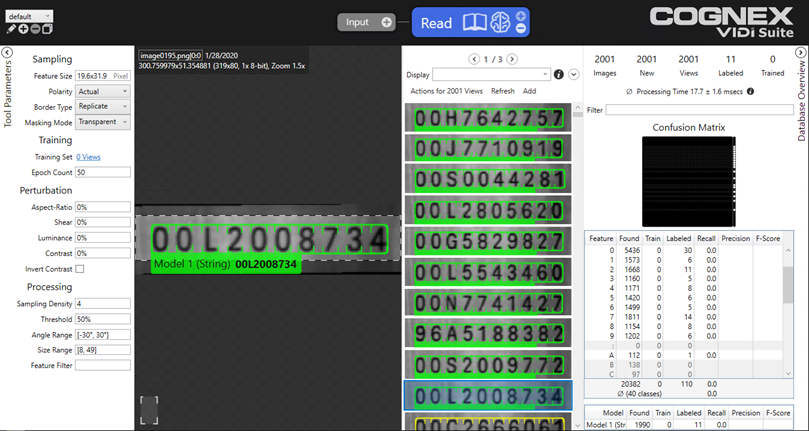
- Expand the Database Overview window. The table lists all of the characters found by the tool.
- Go through the table, character by character, and select an instance of each found character:
- In the table, select a character, then double-click it, which will change the Display window to display only the instances of that character.
- From the displayed characters, select a good instance of the character.
- The main display will switch to that image. Right-click the image and select Accept View.
- That will create a Label of that instance of the character.
- Also delete any instances where the tool incorrectly labeled a character, by selecting the character, right-clicking and selecting Delete Feature.
Note: By labeling and accepting more than one instance of a character, the tool will have more trained results when the tool is trained. See Create Feature Label (Feature Labeling) for the details of labeling. - Expand the Database Overview window. The table lists all of the characters found by the tool.
-
Train the Tool
When using the Blue Read to identify characters, follow these steps:
-
Once a labeled instance of each character has been completed, it's time to train the tool. To train the tool, first add the desired images to the training set.
-
Select the images in the View Browser, and on the right-click pop-up menu click Add views to training set.
-
To select multiple images in the View Browser, use the Shift + Left Mouse Button. Or, use Display Filters to show the desired images for the training only and add them to the training set by clicking Actions for ... views → Add views to training set.
-
-
Prior to training, you need to set parameters in Tool Parameters. You can configure Training, Sampling, and Perturbation parameters or just use the default values of these. See Configure Tool Parameters for the details of the supported parameters.
-
Ensure that the Feature Size parameter in Sampling parameters has been set. The Feature Size parameter gives the network a clue to the size of the characters that you are interested in identifying. So, if the Feature Size parameter setting is clearly going off from the size of characters in your application, there is a chance the tool will not identify the characters in your image.
-
If you want more granular control over training or processing, turn on Expert Mode on Help menu to initialize additional parameters in Tool Parameters.
-
-
Once the training set is filled with the right images, press the Brain
 icon, and the software will begin its computation for the training.
-
If you stop training in the middle of it by pressing the Stop
 icon, you can stop training but you will lose the current tool so far trained.
-
-
After training, review the results. Open Database Overview panel and review the Confusion Matrix and Precision, Recall, F-Score for each character and each model to understand the results. See Interpret Results for the details of interpreting results.
-
After reviewing the results, go through all of the images and see how the tool correctly or incorrectly marked the features and models for each image.
-
-
Review Character Model
After training has been completed, you can generate a character model, based on the number of expected characters, their spacing and placement, and their fielding.
-
Review the Training
After training has been completed, you'll want to go back over your images and ensure that the tool correctly identified the characters in the images. Again, you can use the Database Overview window to review the table of characters, and review the results. Each character the tool found should be the expected character; for example, for the #2, all of the instances in the Display window should be of the #2. If there are instances where there is a "5" or an "S", for instance, you will need to click on that image and re-label those instances with the correct label.
If the tool found all of the instances correctly, the tool is ready for runtime deployment. However, if you had to re-label some of the instances, you will need to retrain the tool, and then repeat the review process.
The details of each step are explained in each subsection of Training Blue Read.