Assign a Pin to a Page or Web Page Control
Cognex Designer allows you to quickly bind the input pin or output pin of a Task Block to any Page Control or WebPage Control element that is compatible with the type of the selected pin. To do so, simply right-click on the input pin or output pin you wish to bind to a Page Control or WebPage Control, then select the Assign to Control option from the context menu, as shown below.
Hovering the mouse cursor over the Assign to Control option lets Cognex Designer generate the list of the available Pages and Web Pages of the project, along with their respective Page Controls or WebPage Controls that are compatible with the type of the selected pin. In the above example, these include the Pages named HMISettings and HMIMain, the Web Page named WebHMIMain, and the compatible Controls of these Pages and Web Pages.
You can bind a pin either to an existing Control which is compatible with the type of the pin (and therefore listed in the context menu), or create a new Control for this purpose.
-
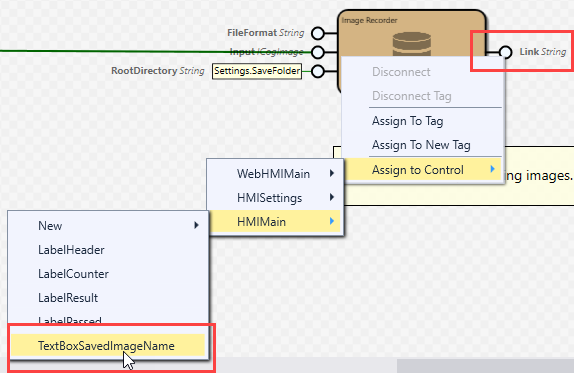
Click on any of the compatible Controls listed in the context menu to bind the pin's value to it. In the below example, the Link output pin of the Image Recorder block has been assigned to a previously-created Text Box Control named TextBoxSavedImageName, that is meant to display the name and path of the latest saved image.
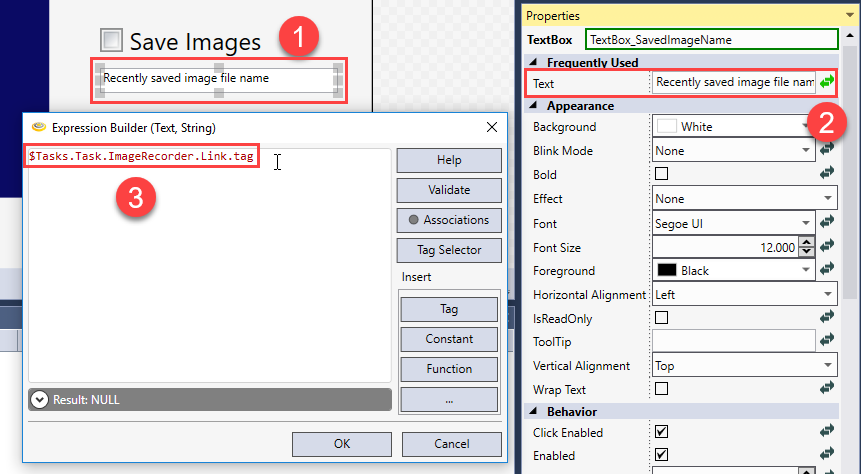
Once the pin has been assigned, you can check the completion of the binding by opening the Page Editor or the Web Page Editor (depending on where the Control has been modified), selecting the Control on the page (1), clicking the Binding Properties button in the Properties window (2), and checking the contents of the Expression Builder (3). The tag of the binding should be there in the dialog, as shown below.
-
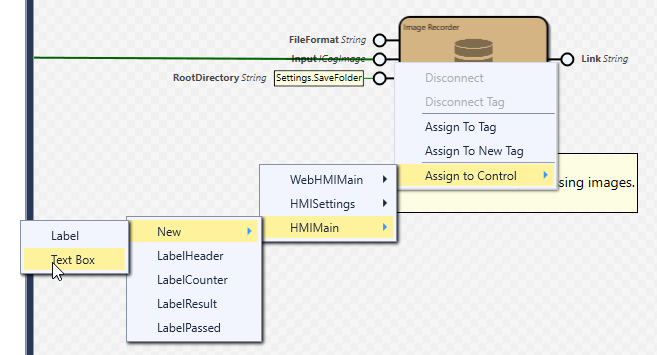
If none of the listed existing Controls are suitable for your purposes, then use the New option to create a new (Web) Page Control element in the selected Page or Web Page, and assign the the pin's value to it. The New menu also lists only Control types that are compatible with the value of the selected pin. In the below example, a new Text Box is created in the Page named HMIMain, and the pin's value is immediately assigned to it.
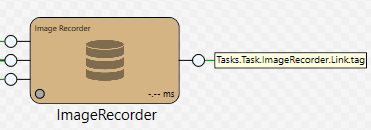
Once a pin is bound to a (Web) Page Control, a new Tag is generated, its name following the $Tasks.TaskName.TaskBlockName.PinName.tag syntax. For example, the Tag created in a Task named Task for a block named ImageRecorder, assigned to its pin named Link will be auto-named as Tasks.Task.ImageRecorder.Link.tag, as shown below.
- Potential whitespaces are removed from the tag's name.
- If the project already contains a Tag whose name follows the above syntax, Cognex Designer adds a numeric suffix to the Tag's name to avoid naming conflicts. As such, if the Tasks.Task.ImageRecorder.Link.tag Tag already exists, then the Assign to Control option will add a "1" suffix to the end of the newly-created Tag, and will name it as Tasks.Task.ImageRecorder.Link.tag1.
- Tags generated with the Assign to Control option are listed both in the Tags Window and in the Tag Manager.
- The Assign to Control option is also available directly for Tags. To bind a tag to a (Web) Page Control, open the Tag Manager, and right-click the tag you want to bind to a Control.