Tag Manager
The Tag Manager is used to add, edit and remove tags in a project. Each row in the table contains a Cognex Designer tag.

|
|
|---|---|
| Property | Description |
| Name | Specifies a unique name to identify the tag. The tag name must be unique, and may only contain alphanumeric or underscore characters. The name can contain '.' but cannot start or end with it. |
| Comment | A text field where the user can enter additional information about the tag. |
| Data Type |
Specifies the data type of the tag, using the Data Type Selector. Note: Tags can also contain an array of data, such as an array of integers or an array of blobs. These types of tags can be created by pressing the ... button to launch the Complex Type Selector dialog. For more information about creating an array data type for a tag, see the Creating an Array with the Complex Type Selector Dialog topic.
|
| Value | Specifies the initial default value/setting of the tag. |
| R/O | Specifies whether or not the tag value is Read only. |
| Selected Path (Optional) |
Specifies the device path where the data should be loaded. Note: See Selected Path for more details.
|
| Persistent |
Specifies whether or not the tag value should be saved on shutdown, and reloaded when the application starts up again. |
Right-clicking on any column of a Tag in the Tag Manager provides access to the following options:
| Option | Hotkey | Description |
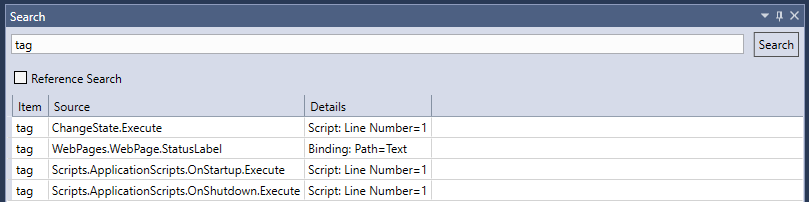
| Find All References | Ctrl + F9 |
Finds where the selected tag is used by listing all reference locations in the Search window. Use this tool in large projects containing multiplePages and/or Web Pages and scripts to check the following properties of a specific tag:
|
| Create | Insert | Creates a new empty row at the bottom of the list of tags to allow you to add a new tag. |
| Delete | Delete |
Deletes the selected row (and tag) after confirmation. Note: This action cannot be undone.
|
| Duplicate | Ctrl + D | Copies the selected row (and tag) into a new row below the selected tag. The duplicate tag's name receives a numeric suffix (for example, copying a tag named Result will be named Result1) and inherits all properties of the row selected for copying. |
| Edit | F2 | Marks the selected row for editing. This context menu has the same effect as left-clicking anywhere into the row. |
| Export | N/A | Opens the Export dialog, allowing you to export the selected tag into a Template file. See the Import and Export Tags topic for more information. |
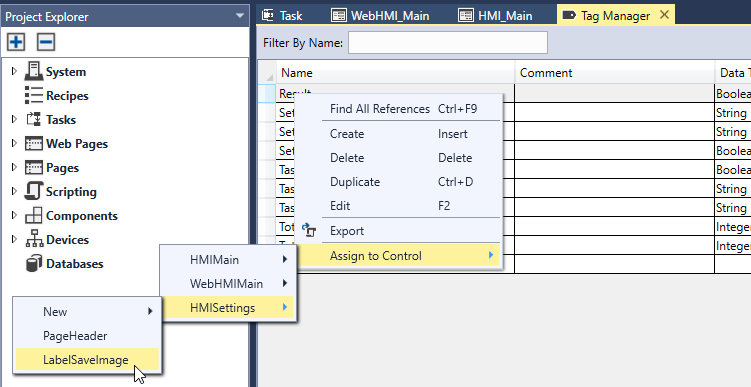
| Assign to Control | N/A |
Allows you to quickly assign a Tag to any Page Control or WebPage Control element that is compatible with the type of the tag. Hovering the mouse cursor over the Assign to Control option lets Cognex Designer generate the list of the available Pages and Web Pages of the project, along with their respective Page Controls or WebPage Controls that are compatible with the value of the selected tag, as shown below.
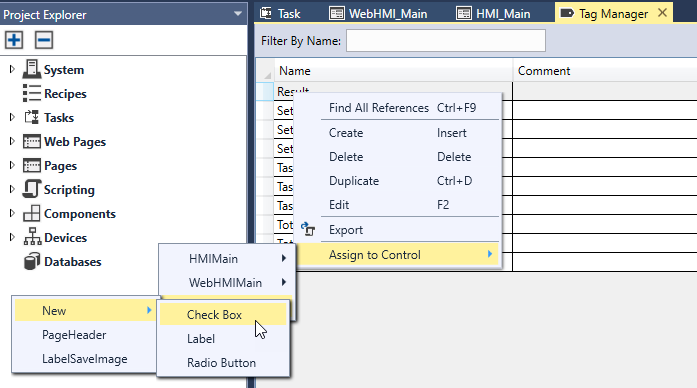
In the above example, these include the Pages named HMISettings and HMIMain, the Web Page named WebHMIMain, and the compatible Controls of these Pages and Web Pages. If none of the listed existing Controls are suitable for your purposes, then use the New option to create a new (Web) Page Control element in the selected Page or Web Page, and assign the tag to it, as shown below.
The New menu also lists only Control types that are compatible with the value of the selected tag. In the above example, these Controls include the Check Box, the Label and the Radio Button. Tip: The Assign to Control option is also available directly for input and output pins in the Task Editor. See the Assign a Pin to a Page or Web Page Control topic for more information.
|