In-Sight Network
The In-Sight Network pane offers a great deal of flexibility when managing multiple In-Sight devices at once. The In-Sight Network pane is a "tree" containing all the In-Sight vision systems, vision sensors and emulators automatically detected on the subnet, as well as any host tables that have been entered manually into the Explorer Host Table dialog. For more information, see Explorer Host Table Setup Dialog.
Display or Hide the In-Sight Network Pane
-
On the View menu, click In-Sight Network (alternately, click the In-Sight Network
 button on the Explorer
toolbar, or press CTRL+SHIFT+1).
button on the Explorer
toolbar, or press CTRL+SHIFT+1).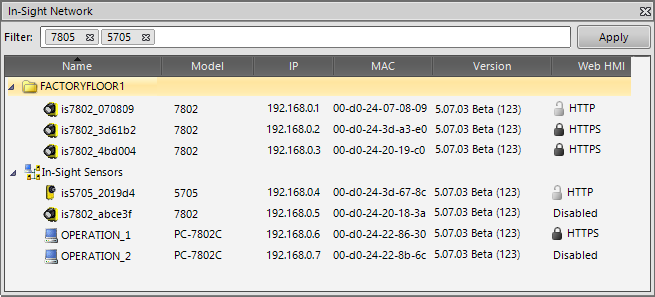
In-Sight Network Pane Properties
- Double-clicking a device from the In-Sight Network pane opens the EasyBuilder View. A Spreadsheet View is also available for the selected vision system and emulator. You can make the Spreadsheet View the default view from the Job View Panel. For more information, see Job View Panel.
- If logged onto an In-Sight device with an active view open, and another user logs on to the same device, the device's icon still displays a "logged on" status.
- The SD Card folder and the RAM Disk folder only display in the In-Sight Files pane. For more information, see In-Sight Files.
-
Filter textbox: Filters the In-Sight devices. For more information, refer to the Filter Operations Using Tokens section in this topic.
- Apply button: Creates tokens to filter the In-Sight devices.
-
Name: The host name of the In-Sight device.
Note:- You can configure the host name of an In-Sight vision system or vision sensor in the Network Settings dialog. You can configure the host name of a host table in the Explorer Host Table dialog.
- In-Sight emulators use Microsoft Windows' local compute name as the host name.
-
Icon: The icon next to each host name indicates the device type and whether or not logged on to the device. The following table summarizes the various In-Sight Network status icons for In-Sight devices:
Icon Device Type
Description 
In-Sight Micro 1000 Series or In-Sight 8000 Series Vision System
An In-Sight vision system that has not been logged on to. 
An In-Sight vision system that is logged on to.

In-Sight 2000 Series Vision Sensor An In-Sight vision sensor that has not been logged on to. 
An In-Sight vision sensor that is logged on to. 
In-Sight 2000 Mini Series Vision Sensor An In-Sight vision sensor that has not been logged on to. 
An In-Sight vision sensor that is logged on to. 
In-Sight 5000 Series Vision System
An In-Sight vision system that has not been logged on to.

An In-Sight vision system that is logged on to.

In-Sight 70xx - 74xx Series Vision System An In-Sight vision system that has not been logged on to. 
An In-Sight vision system that is logged on to. 
IIn-Sight 7000 Gen2 Series Vision System An In-Sight vision system that has not been logged on to. 
An In-Sight vision system that is logged on to. 
In-Sight 9000 Series Vision System An In-Sight vision system that has not been logged on to. 
An In-Sight vision system that is logged on to. 
In-Sight Emulator
An In-Sight emulator that has not been logged onto.

In-Sight Emulator
An In-Sight emulator that is logged on to.
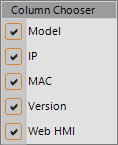
Customize Columns
You can customize the In-Sight Network pane by displaying the Model, IP, MAC, Version and/or Web HMI columns. These columns are hidden by default.
-
Right-click any column. The Column Chooser menu displays.
-
Check the checkboxes you want to display.
-
Model: The model type of the In-Sight device.
Note:- If it is a host table, "Host Table Entry" is displayed.
- If it is an emulator and the Emulation Model is set to Standard, "PCHOST" is displayed. If it is an emulator and Emulation Model is set to a specific In-Sight model, "PC-xxxx" (xxxx = model number) is displayed. For example, if Emulator Model is set to In-Sight 5705, "PC-5705" is displayed. For more information, see Emulation Panel.
- IP: The IP address of the In-Sight device.
- MAC: The Media Access Control (MAC) address of the In-Sight device. The MAC
address is a hardware address that identifies a specific node of a network. Every
In-Sight vision system has a unique MAC address assigned to it, which cannot
be changed. For example, 00-d0-24-01-02-03. To locate the MAC address of an In-Sight vision system, look at the
serial number label affixed to the vision system. Alternately, you can open the About In-Sight Explorer dialog.
- Version: The firmware version of the In-Sight device. For more information, see Firmware Versions.
- Web HMI: The Web HMI connection status of the In-Sight device: HTTP, HTTPS or Disabled. For more information, see HMI Settings Dialog.
-
- The selected columns displays.
Network Operations
Right-clicking an In-Sight device from the In-Sight Network pane displays a menu that allows you to perform the following operations:
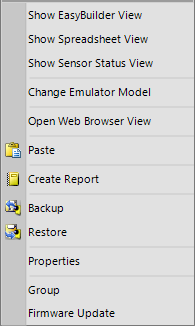
- Show EasyBuilder View: Shows the current image from the In-Sight device and the current job in the EasyBuilder graphical user interface. The status bar indicates the Online/Offline status. For more information, see EasyBuilder View.
-
Show Spreadsheet View: Shows the current image from the In-Sight vision system as well as the semi-transparent spreadsheet overlay or Custom View (optional). The status bar indicates the Online/Offline status. Spreadsheet Views for multiple vision systems may be shown simultaneously. For more information, see Spreadsheet Navigator.
Note: This option is not available on the EasyBuilder-only vision sensors. - Show Sensor Status View: The Sensor Status View displays information contained within the memory buffers that make up the Machine Status Stack. For more information, see Sensor Status View.
-
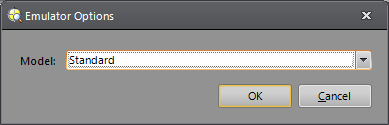
Change Emulator Model: Opens the Emulator Options dialog to select your desired local emulator model from the Model drop-down list. You can filter emulator models by using the Filter box that appears when you expand the drop-down.
Note:- This option only displays when you right-click on your local emulator.
- You can also change the emulator model by using the Options dialog. For more information on emulator models, see Emulation Panel.
- Open Web Browser View: The Open Web Browser View opens the default browser to the web-based human-machine interface (HMI) of the selected In-Sight vision system or sensor. For more information, see Open Web Browser View.
- Paste: Pastes job files that have been copied to the clipboard.
- Create Report: Generates an .HTML or .XML report that contains job and network configuration details for one or more In-Sight devices(s). For more information, see Create Report Dialog.
- Backup: Stores an archive of job and configuration data for this device to the Backup directory. For more information, see Backup Dialog.
- Restore: Retrieves an archive of job and configuration data for this device.
-
Properties: Displays details of the hardware information and network identification, as well as the flash, RAM memory and SD Card configuration.
Note: The SD Card configuration displays only on the In-Sight vision systems where the SD card is installed.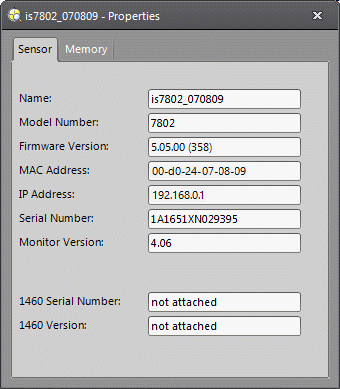

- Group or UnGroup: Groups the selected In-Sight devices or ungroups the selected group. For more information refer to Group Operations.
- Move To: Moves the selected In-Sight device(s) to another Group. For more information refer to Group Operations.
- Firmware Update: Right-click on one or more In-Sight devices or a Group to open Update Firmware Dialog. When opened from the In-Sight Network pane, the Firmware Update dialog only displays the selected In-Sight device(s) or device(s) in the selected Group.
- You can drag files from both the In-Sight Files pane and Microsoft Windows Explorer folders to any device within the In-Sight Network pane. This is equivalent to a copy operation. For more information, see In-Sight Files.
- Performing cut or copy operations from either the In-Sight Files pane or a Microsoft Windows Explorer folder places files on the Windows clipboard. You can paste these files to a device by right-clicking the device and selecting Paste.
Filter Operations Using Tokens
You can filter the In-Sight devices using multiple "tokens."
- Type a keyword in the Filter textbox.
- Click Apply. The keyword displays as a "token" in the Filter textbox.
- Repeat steps 1 and 2 until all the keywords are added.
- The filtered In-Sight devices are displayed.
- To remove a token from the Filter textbox click "x" on the token.
Group Operations
You can create one or more Groups to organize In-Sight devices.
Create a Group
-
Select one or more In-Sight devices from the In-Sight Network pane.
Tip: To select multiple, non-consecutive items, hold down the CTRL key and highlight the items. To select multiple, consecutive items, hold down the SHIFT key and highlight the first item, and then the last item in the pane. - Right-click the selected devices and select Group.
- The selected devices are placed in a group called <New Group>.
Rename a Group
- Select the group that you want to rename.
- Click the text of the group again or press F2.
- Type a new name for the group and press Enter on your keyboard, or click outside of the textbox.
- The group is now renamed.
Ungroup
- Right-click the group that you want to ungroup, and select Ungroup.
- The selected group is removed from the In-Sight Network pane and the In-Sight devices in the group are now moved to the In-Sight Sensors node.
Move In-Sight Devices to Another Group
-
Select the In-Sight device you want to move to another group.
Tip: You can move multiple In-Sight devices at the same time too. - Right-click the selected In-Sight device(s) and select Move To > desired Group.
- The selected In-Sight device(s) are moved to the Group.
Sort Operations Using Columns
You can sort the In-Sight devices in ascending (default) or descending order using the columns.
-
Click one or more columns that you want to use to sort.
Note: To select multiple columns hold down the SHIFT key and highlight the Column. - The In-Sight vision devices are now sorted in ascending or descending order.
- If the arrow is hidden the column is sorted in ascending order.
- If the arrow points down the column is sorted in ascending order.
- If the arrow points up the column is sorted in descending order.